Cloth Dollmaking for Everyone!
The class for beginners as well as the
more advanced dollmakers.
by Judi Ward
This class will begin
with a two piece pancake doll, and progress through 3 more dolls, getting
more and more advanced each time. You will be provided with complete 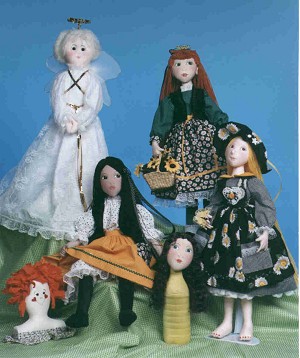 patterns
for all dolls, and patterns for a multi piece, mix and match wardrobe of dress, petticoat,
skirt, apron, pinafore, gown that is also a blouse and slip, pantaloons,
vest, hat, shoes, sandals and stockings. patterns
for all dolls, and patterns for a multi piece, mix and match wardrobe of dress, petticoat,
skirt, apron, pinafore, gown that is also a blouse and slip, pantaloons,
vest, hat, shoes, sandals and stockings.
The doll variations will
include 4 hands. 4 feet, including high heel feet. 4 bodies, including
one with a bust. 4 heads, including a pretty profile face with light
sculpting. Variations for all will be taught, including invisible jointing,
feature placement for changing your dolls age, even a Raggedy adaptation.
Learn all the techniques
needed to make beautiful, quality cloth dolls, whether they are simple
or detailed.
We will cover sewing, turning
and stuffing detailed fingers. Articulating fingers and even arms and
legs. We will cover stuffing extensively! We will cover basic hairstyling,
face placement, and basic painting and shading of the features.
(NOTE: For extensive painting and hairstyling classes, check out the
other classes at Crafty College.)
Also please note that the 2 heads without
bodies in the picture are just showing 2 face and head variations.
This class will answer
almost every question you have about making cloth dolls, but will not
teach nylon stocking needlesculpting like Lisa Lichtenfels
dolls, nor face mask dolls.
Join us for this definitive
class de-mystifying cloth dollmaking. This class is a bargain for just
the patterns!!
Class Table of Contents
Chapter 1
What
do you need--Where do you get it. Including a list of mail order suppliers
for hard to find dollmaking supplies.
Chapter 2
Preparing
your patterns for use, both the patterns for this class and other
patterns. Different techniques for using those patterns.
Chapter 3
Sewing
techniques to be used and practiced for all of your dollmaking.
Chapter 4
Stuffing
techniques for smoothe lump free dolls. To be used for all of the
dolls. Includes special finger articulation, and arm and leg wiring,
using readily available chenille stems, rather than hard to find and
easily broken wire.
Chapter 5
Making
the Beginner Doll, as an Angel named Angelique. She is a 2 piece
pancake style doll, but looks so detailed when done. Includes the
face techniques for the simple face. The simple hairstyle, that looks
so elegant, and the easy gown, wings, and simplest, cleverest sandals
you have ever seen.
Chapter 6
Making
the Intermediate doll, named Maria. She is a 6 part, tab head doll
with stitched on limbs and all-together fingers. Includes template
face placement, and reverse template face placement. The gown is now
used as a slip-blouse. There is a skirt, pantaloons, vest, stockings
and shoes too. Also includes more embroidery, and face painting techniques.
Making bendable knees and elbows, 3 different ways, and another variation
on the basic hairstyle.
Chapter 7
Making
the More Advanced doll, named Susannah. She is a 6 part doll with
a rounded head design, a 4 part shaped body, and outside jointing.
Learn to sew and turn those tiny fingers, with the 2 middle fingers
together to make it a little simpler. Her clothes use the skirt as
a slip, and include a dress pattern, pantaloons and vest too.
Learn yet another variation on the basic hairstyle, and more shading
techniques for the face. Susannah is a good candidate for the
wiring methods taught in chapter 3.
Chapter 8
Making
the Advanced Doll named Jennifer. She is a 6-part doll with invisible
jointing, a profile face, a 4 part body with a bust, belly button
and bottom. Light needle sculpture is used on the face. Learn 2 foot
styles. a flat foot with toes and a high heel foot. Jennifers clothes
are a dress with a pinafore, to be used with the flat foot version.
A formal variation of the dress
to be used with the high heel foot version. A picture hat to be worn
with any of the clothes. Sorry, the formal dress version is not pictured,
but the drawings will be very true to life. Jennifer is also a
good candidate for the wiring methods taught in chapter 3.
Chapter 9
Making
changes, to add even more variety to the patterns. Including my famous
wrap ups! All the little extras you didnt even know you wanted
to know! And extra things I decide to add as the class progresses!
Now Open! Register and Start Today!
"On-Demand"
and "Self-Paced" Class!
Click HERE to Register.
All Registrations are done on the Doll Net Market Site!
Cost: $39.95
The full
sized patterns are included online.
|