Design Your Own Cloth Doll
Class
©1995 with additions copyrighted 1996-1997
Taught by Judi Ward of Judi's Dolls
Chapter 1 and 2
Part B
.…LEGS AND FEET…
Now place the leg down on the freezer paper or other paper and draw around it the same way you did for the arm. HOLDING YOUR PENCIL STRAIGHT UP AND DOWN.
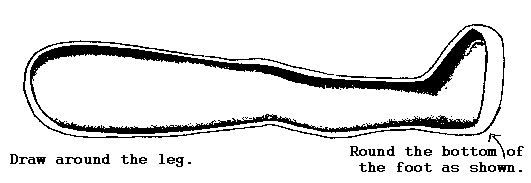
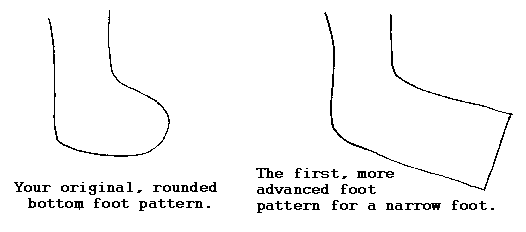
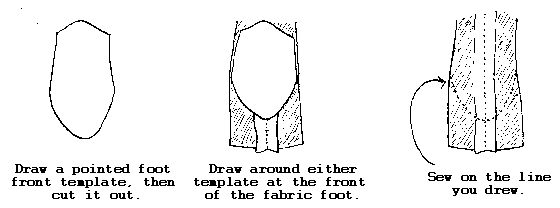
The first, beginner foot will be rounded for the child doll, So just draw around the whole foot, rounding the bottom, as shown.
The rounded hip area is for a jointed doll. If you want an unjointed doll, do the same for the leg pattern as you did for the un-jointed arm pattern shown above, adding at least 1/2" to the top length.
CHILD TYPE LEG AND FOOT.
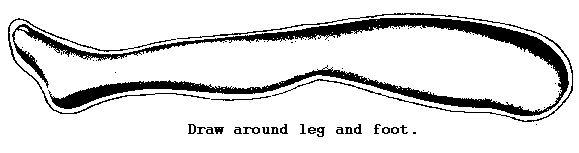
.…LADY TYPE LEG WITH HIGH HEEL FOOT…
For the lady type leg, you will draw around it just as you did for the child leg, but when you get to the foot, continue drawing around it just like you did the leg. Do not round the bottom out.
Remember: If you are making an unjointed doll, you need to straighten out and extend the leg top as you did for the arms and/or the other type of leg.
This gives you a simple foot that can actually be put into a purchased high heel shoe, or may even fit into the shoes that came on the vinyl doll you are using as a pattern template. (Mine had high heel shoes on)
Now I will show you how to design a high heel foot that has the heel already on it. This will be a foot that you will paint the shoes onto. I like the painted on shoes for high heel dolls. It's fun to color co-ordinate them with the dolls clothes and to decorate them around the edges with fancy braid or cording. They also don't get lost!
.…FOR MORE ADVANCED DOLLMAKERS…
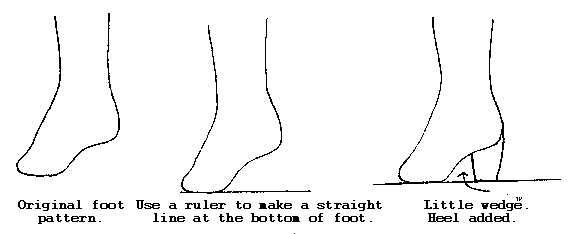
Below, I will show you how to design an easy, flat front, foot style. For the child type doll, this will allow you to needle sculpt toes if you wish. For the high heel doll, it will make a more realistic looking shoe front.
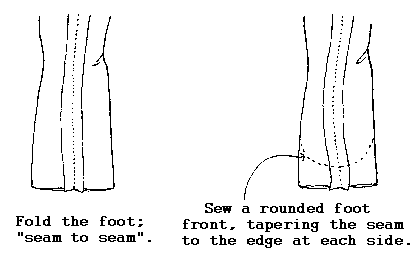
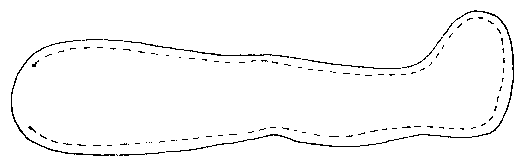
For the child/baby doll foot, start at the crook of the ankle and draw a line straight out, along the foot top, and straight out along the foot bottom as shown. Extend this line about 1/2" past the rounded foot front. Connect the lines. You now have a foot pattern that looks like it will be REALLY WEIRD when done, but it won't, I promise.
When sewing this type of leg/foot, you will leave the foot front open, along with the opening for stuffing. You will then fold the foot part "seam to seam", and sew a curved toe area, tapering the seam to the edge at each side. In fact, you can draw the little toe bumps on, sew on the lines you drew, turn right side out, stuff, then needle-sculpt more defined toes.
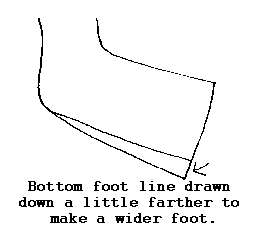
.…NOTE…This foot will be narrow, if you want a fatter foot, draw the bottom foot line down a little farther, and then make the foot the same as above.
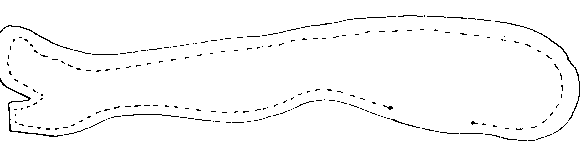
This wider foot is easier to make needle-sculpted toes on. In fact, you can draw the little toe bumps on, sew on the lines you drew, turn right side out, stuff, then needle-sculpt more shaped and well-defined toes.
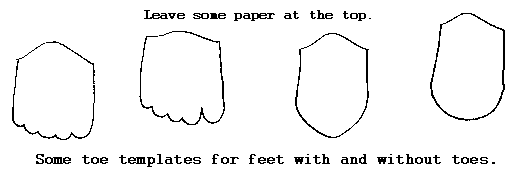
BUT I CAN'T DRAW THE TOE BUMPS YOU SAY! BUT YOU CAN DRAW AROUND A BIG DOLLS TOES, (THEY ARE MORE DEFINED THAN A SMALL DOLLS TOES) PUT THE DRAWING ON A COPY MACHINE, THEN SHRINK AND/OR ENLARGE IT TO FIT ALL KINDS OF DOLL SIZES.
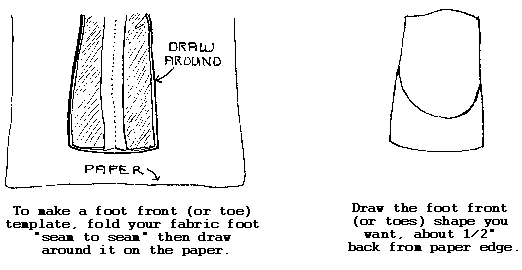
Cut these foot front or "toe bump" designs out, leaving some at the top of them. You now have foot/toe templates to draw around for many sizes of doll feet with or without toes.
I always draw templates freehand to draw around, so if I wish to use a pattern over again, or to put it into pattern form for my doll pattern business, I have the foot front already designed. With the method above you don't need to be able to draw free hand. With these types of feet, you can make needle-sculptured toes then put "real" doll shoes and socks on, or if you just make the toe area rounded, you can even paint the shoes on.
NOW, IT'S TIME TO THINK LIKE A DESIGNER!!!!! YOU ARE ONE!!!!
Think of the possibilities in foot design! How about really long feet for a hillbilly doll? How about really fat, wide feet for a cartoony, baby doll or child doll?
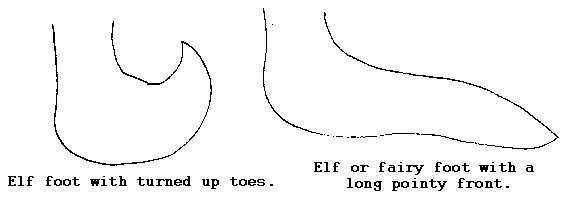
Go back up to the basic rounded foot pattern and think "pointed up toes" for an elf doll. Think long pointed toes for another elf or fairy look. Think and look-look and think. Let your creativity and imagination start working. Put it into overtime.
Think about different fabrics for legs and feet. Stripes? Prints? Cut the feet off at the ankles, add seam allowances to the cut edges, then make the legs from one fabric and the feet from another. Just think-think-think! Create-create-create!
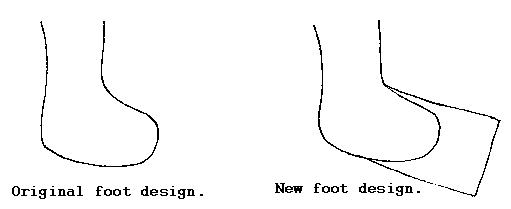
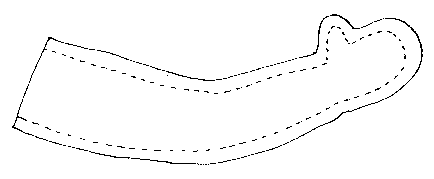
NOW, TO DESIGN A FLATTER FRONT HIGH HEEL FOOT.
THIS IS A LITTLE MORE ADVANCED, BUT NOT AT ALL HARD. REALLY!
You may have to make a couple of patterns and feet to get the length and width you want for a particular doll.
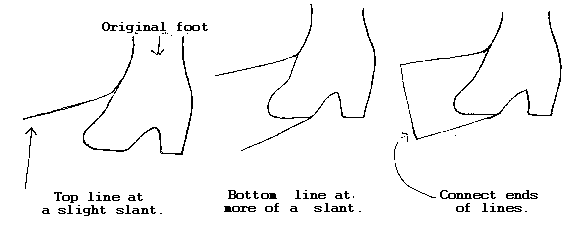
Put your original high heel foot pattern, with the heel on it, down on a new piece of freezer paper or other paper. Where the foot bends at the arch, draw a line straight out, slanted slightly lower than parallel to the flat bottom of the original foot. This line needs to be about 1/2" beyond the end of the original foot too. Now draw a straight line out from the bottom "ball" of the foot. This line will slant downward slightly more than the upper line you drew. Connect the ends of the lines…. NOTE…The farther apart the ends of the lines are, the wider the foot will be.
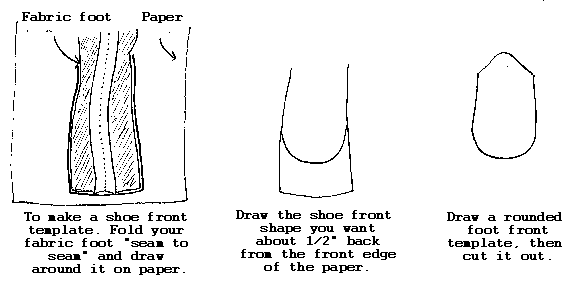
When sewing this type of high heel foot, you will first leave the front of the foot open, along with the opening in the leg for stuffing. You will then fold the foot front "seam to seam" like for the child or baby feet. Draw and sew a curved seam around the front, tapering the seam to the edge at each side. If you want a pointed toe on the high heels sew a seam around the front that comes to a point at the center. I make a template to draw around so if I wish to use a pattern over again, I have the foot front already designed. After you have made a few feet, you will like some and not others, throw away the templates you don't like.
You have now designed patterns for the arms and legs without seam allowances. These patterns are designed to be drawn around on doubled fabric. You then sew on the lines you have drawn. If this is a first time design experience for you, or if you are very new to the cloth doll-making world, I recommend that you first design and make the simplest arms/hands and legs/feet first. Then go on to the more detailed feet/hand types. Design and make a few sets of arms and legs for practice. You can put them all to use after the body and head design lessons, which will go on-line in 3 days.
Remember to leave the tops or backs of the legs and arms open for stuffing for a jointed doll, and to leave the tops of the legs and arms open for an un-jointed doll.
Tops of legs/arms left open for a jointed doll.
This is my preferred opening for turning and stuffing. The ladder stitch
closes the curved tops so that the stitching is nearly invisible. I will
teach the ladder stitch later in this class, for those of you who don't
know how to do it.
Backs of legs/arms open for jointed doll, if
you are fearful of closing on a curve.
Tops of legs/arms left open for an un-jointed
doll. The un-jointed limbs will be stitched on.
You can now design and make several kinds of legs, arms, feet and hands. Make a few more patterns using the techniques you have just learned. Sew up a few arms and legs of different types. Practice makes perfect.
Remember, you need to trim away any excess fabric at the fronts of the more advanced feet, and you need to clip into any "v" shapes, before trying to turn your parts right side out.
We will design the bodies and heads and make a stuffing fork next.
Happy Beginning Designing!
Judi Ward
Judi's Dolls
http://JudisDolls.com

© 1998, Internet Visions Co. All rights reserved. All trademarks are owned by Internet Visions Company.