Design Your Own Cloth Doll
Class
©1995 with additions copyrighted 1996-1997
Taught by Judi Ward of Judi's Dolls
DESIGNING THE BODY
Now that you have designed and sewn some arms and legs of various types, I’m sure you are chomping at the bit to get on with the heads and bodies. I am going to show you how to design the tab head type head and body using two kinds of vinyl heads and bodies.
The child doll I am designing around has her neck as part of her head. The lady doll I am designing around has the neck as part of the body.
I made photostats of the actual doll heads and bodies (Like I did for the legs and arms) so you can see better how to draw around them, and add or delete the neck areas. When I cut out the head photostats I cut off the hair. To draw around the real heads that you have, you can just push and pin the hair out of the way.
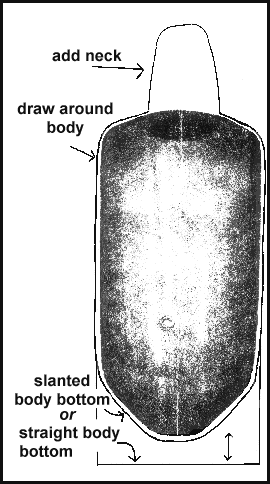
To design the body of the child doll, simply lay it on your paper and draw around it, again holding your pencil straight up and down. Since it doesn’t have a neck, add a neck, rounding it at the top as shown, or leaving it straight across at the top. The doll’s hair will cover it, so either round or straight will work. The neck needs to be about 2” long.This neck tab will be stitched or glued to the back of the doll’s head to assemble the doll.
If drawing the neck freehand bothers you, you can draw around your thumb or a screwdriver handle or some such thing. It is just a little long tube shape so it is really very easy to draw.
If you are going to make jointed legs, leave the bottom of the body with the slanted sides.
If you are going to stitch the legs on, you will need to straighten out the bottom of the body, since the legs will be stitched on here. (If the bottom of the body is left slanted, the straight top legs that you designed will stick out at the sides.)
Add about 1/2” extra at the bottom of the body, like you did for the tops of the arms and legs. This type of stitched on leg is called a swing leg, and you will find it on most simple dolls and country dolls
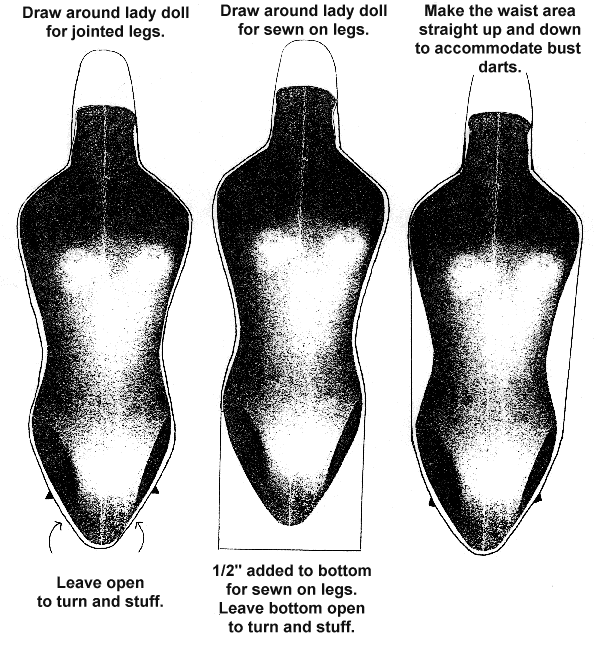
For the lady doll body that has the neck as part of the body you will hold it down on the paper the same as for the body above, and draw around it the same way, just continuing around the neck area too.
The neck area will be a funny shape due to the flange, but you will just cut the area smoother when you fold it in half lengthwise to even up the pattern. The neck area will need to be lengthened to about 2” long too.
Note: This 2” neck length is good for dolls up to about 17” tall. A longer neck would be needed for larger dolls, and of course a shorter neck length would be needed for very small dolls. The ballerina doll pictured on the Crafty College intro. to my class was designed from a cheap “Barbie” type doll, and her neck is only about 11/2” long. By the way, she fits into “real” Barbie clothes!
Now lets get back to the lady type doll. Most of you will want a bust for your lady dolls. With this type of 2 piece body the bust can be achieved with darts, or by adding gathered, stuffed circles to the flat chest.
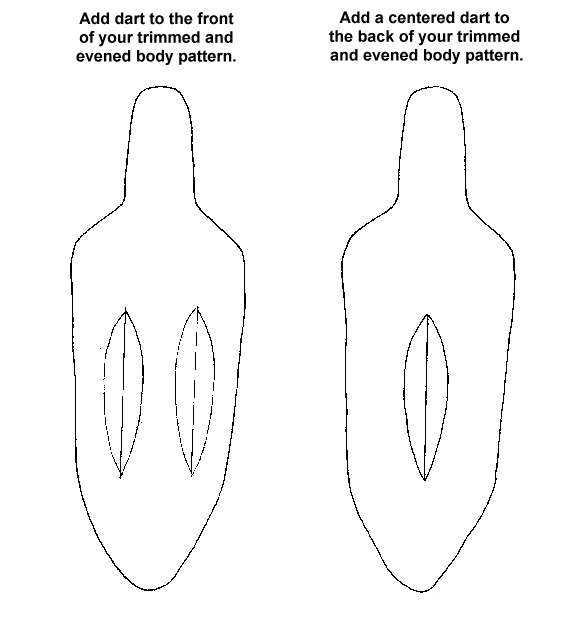
The red headed doll with the bead knees and elbows, on the intro. pages at Crafty College has the darted bust. To achieve this you will need to make the lady doll pattern straight up and down at the waist, then add 2 darts in front as shown in the following illustrations. You can also add a dart in the center back to give a curved spine and a shaped “bottom”.
Note... To be sure that both sides of the body match exactly, cut the body pattern out and fold it in half lengthwise, then trim off any little discrepancies before you use it as a pattern. If you trimmed off a lot, you will need to put the body pattern onto a folded piece of paper and draw around it, adding a little back to it.
Another Note… The bust darted body looks, stuffs and shapes much nicer if you make a jointed doll. If you make the flat bottom body with the bust darts, the body distorts at the bottom if you stuff it really firmly like it should be.
Make a front and a back body pattern for the placement of the darts. You will draw around only one of the pattern pieces on your doubled fabric, then sew just inside the lines you drew, just like for an un-darted body. Cut the sewn body out, and then draw the darts in place, using the “reverse” template method described below. Pinch the darts up and sew them in, taking care not to sew through the front and back of the body at the same time, while you are sewing in the darts!
The “reverse template” method is the best and easiest way to mark the darts on your fabric. Cut the darts out of your pattern pieces, leaving “dart shaped holes” in the pattern pieces for you to draw through. This “reverse template” method also works for some face designs, and for clothing darts. Experiment a little with it to see where it will work for you.
Judi Ward
Judi's Dolls
http://JudisDolls.com

© 1998, Internet Visions Co. All rights reserved. All trademarks are owned by Internet Visions Company.