Design Your Own Cloth Doll
Class
©1995 with additions copyrighted 1996-1997
Taught by Judi Ward of Judi's Dolls
Chapters 5
The Invisibly Jointed Doll
The stuffing etc. for a jointed doll will be much the same as for an unjointed doll, except you will be closing curves with a ladder stitch, so you need to practice and get it down, so your closings are nearly invisible. The bottom of the body needs to be closed with a ladder stitch.
This is a very curved area, and you need to take great care in closing it. Add extra stuffing all along the closing to assure a smoothe closing. ANOTHER IDEA… Rather than having a closed neck top, make your pattern with a straight neck top. Sew the body all the way around, except at the neck top. Turn and stuff through the neck. It is harder to stuff through the tiny neck, but if closing the pronounced curve at the bottom of the body is too difficult, this design may be the best.
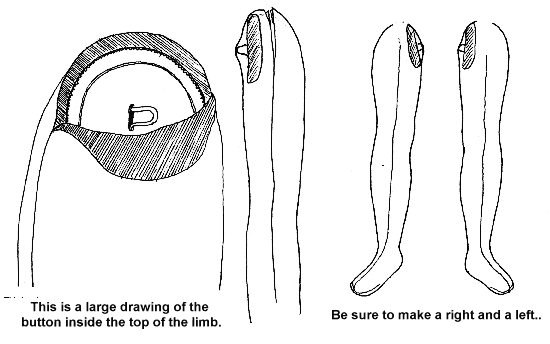
You will be inserting metal shank buttons into the upper arms and legs before you close the arm and leg openings.
For very small dolls, with arms/legs about 3/4” wide or less you don’t need the buttons, but for larger limbs the addition of the buttons inside makes a firm, sturdy, flat jointing.
The buttons I like best are made by Prym-Dritz, and they are the ones with the teeth inside the cap. They are available in most fabric stores, in a variety of sizes. I also carry them in my catalog. You want to use the largest size that will comfortably fit into the arm/leg top. For the size dolls that I have designed around for this course, no buttons were needed for the arms, Size 36mm were needed for the legs. Don’t try to use the cover buttons that DON’T have the teeth inside the cap. They pull apart as soon as you pull the jointing cords tight, and the shank comes right out of your doll’s limbs!
You can also use clothing buttons as long as they have a big metal shank. The shank needs to be big enough to get the upholstery needle through, and upholstery needles are fat. I ran across some old military looking buttons in a thrift store that were great, and I have used some coat buttons too. ANOTHER DON’T. Don’t use big plastic buttons with a metal shank imbedded in the plastic. The shank will invariably pull out of the plastic just as you get the limb pulled tightly.
As you can tell, I’ve tried lots of things over the past 20 or so years, and have had several jointing disasters, by using buttons that weren’t strong enough to hold up to tight jointing. Prym-Dritz Buttons to Cover with the teeth inside the cap are the best, and the most universally available.
The metal buttons are used after you close them. They are inserted in the limbs, on the “Big Toe” side for legs and the inner arm side for arms, with the shank against the fabric. The top edge of the button will be nearly even with the seam allowance. Be sure that you make right and left arms and legs. The following illustrations show how they are inserted, and positioned. After they are inserted, add extra stuffing or cotton balls, and then close the openings with a ladder stitch.
NOTE… For tiny limbs without buttons, just close the openings with a ladder stitch, adding a little stuffing as you close.
Close the curved opening with a ladder stitch.
(LEFT)
Finished limbs. The shank side of the buttons will be against the body, and the jointing will look like a vinyl dolls jointing. No buttons will show. (RIGHT)
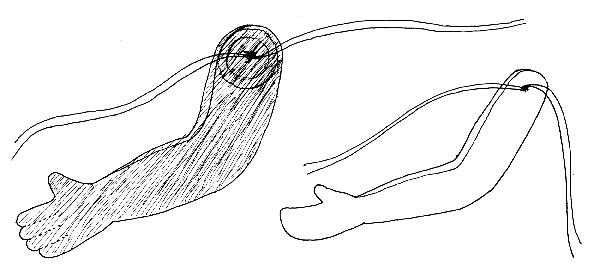
With all of the limbs closed, you are ready to joint your doll. Thread 2, one-yard long strands of heavy nylon cord, (I have it in my catalog for 10 cents a yard) or 4, One yard long strands of nylon dental floss through the eye of your upholstery-jointing needle. Pull it through only a little ways, not half way.
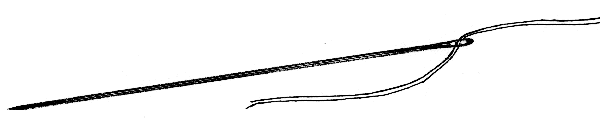
Cords threaded through the jointing needle.
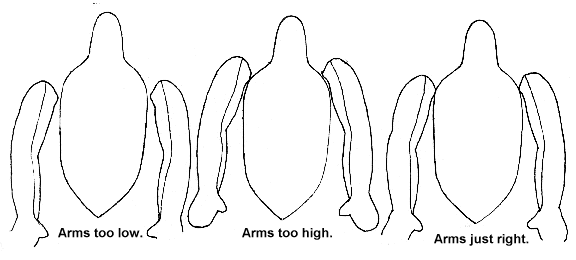
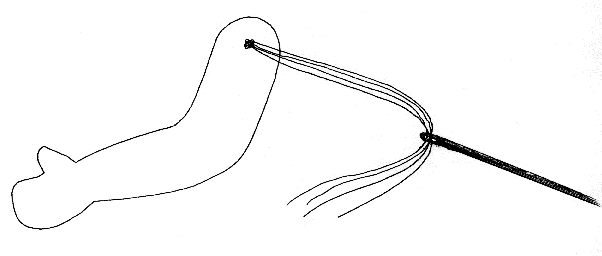
Position the arms at the shoulders of your doll, so a nice shoulder line is created. Look, and mark where the shank of the button touches the doll’s body.
Now put the jointing needle with the cord through the shank of the button in one arm, then pull it 1/2 way through and tie it in a knot. If you aren’t using a button, just put the needle through the fabric, catching a little stuffing up for extra strength. Pull 1/2 way through and tie the cords the same way.
Cord through shank of button, which is inside the arm, pulled 1/2 way through and tied. (LEFT)
Cord through just the fabric and a little stuffing. (RIGHT)
Now put all 4 (or 8) cord ends through the eye of your jointing needle, and pull them only a little ways through.
All 4 (or 8) cords through needles eye and
pulled just a little ways through.
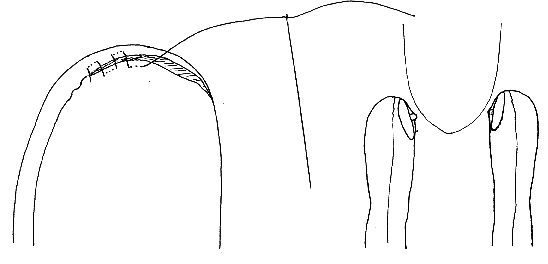
Now put your needle, with all of the cords, through the doll’s body. Enter and exit at the dots you marked on the body. Sometimes it is hard to get the needle through, especially on a large, well-stuffed doll. If you twirl the needle BACK AND FORTH between your fingers AS YOU PUSH IT, it will go through quite easily, without pushing a blob of stuffing ahead of it. When the cords are through the body, take the needle off.
…VERY, VERY HELPFUL HINTS…
Now divide the cords in half, and put 1/2 of them (2 or 4) through the eye of the needle, then put the needle through the shank of the button inside the other arm, from the right to the left. Take the needle off, and thread the other 1/2 of the cords through the eye of the needle. Put these cords through the shank of the button from the left to the right. The cords must be coming out of the shank in opposite directions so you can pull them tight and tie them.
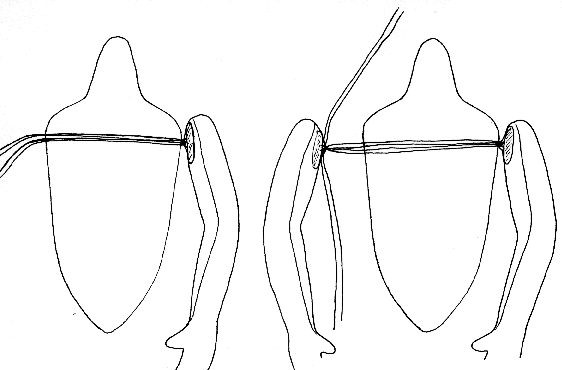
All of the cords through the body. (LEFT)
1/2 of the cords through the shank from the right to the left and 1/2 through the shank from the left to the right. (RIGHT)
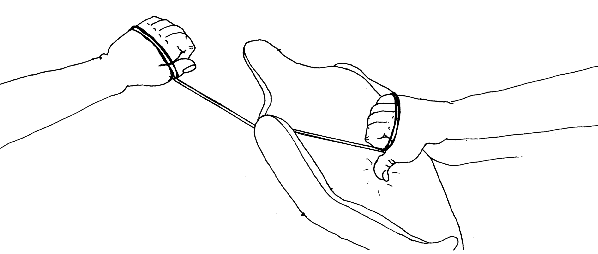
Now you can pull the cords very tightly, pulling the arms in firmly against the body. BUT, YOU SAY, OH DEAR! How can you keep them tight while I tie them? Here’s how.
You should have plenty of cord to wrap it around your hands as you pull. YOU DIDN’T CHEAT, AND CUT SHORTER CORDS THAN 1 YARD, TRYING TO SAVE CORD DID YOU? Pull the cords tight, then with one thumb, hold your doll’s body down firmly on a table, while wrapping the cords that are tightly held in the other hand around the joint area between the body and arm. You only need to wrap it around twice, and it will hold the arm tightly in place. Now you can tie the cords in a square knot between the body and arm. I like to tie them twice. Cut the ends of the cords, but not right at the knots. Poke the loose ends into the area between the body and arm.
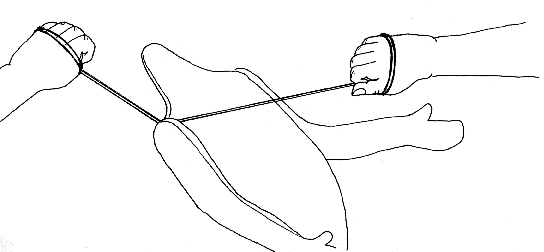
Wrap cords around hands and pull tight.
Hold doll down hard with one thumb, while maintaining
tension on the cords in both hands.
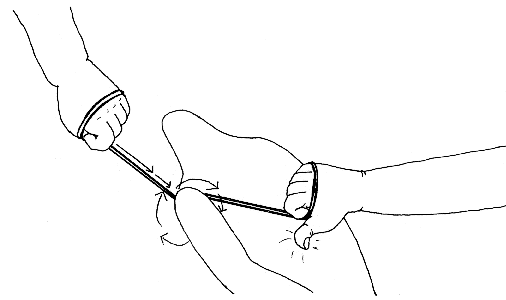
Wrap cords around twice quickly, between the
body and the arm, then tie twice in square knots.
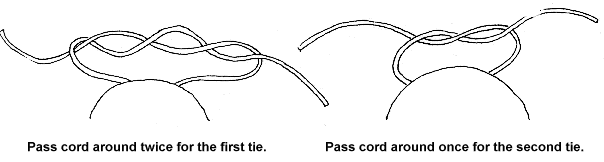
Helpful Hint…To make an automatic square knot, without having to think about “right over left”-“left over right”, simply make the first tie a “nurses knot”. To make a “nurses knot” you pass your cord around twice for the first tie and once for the second tie.
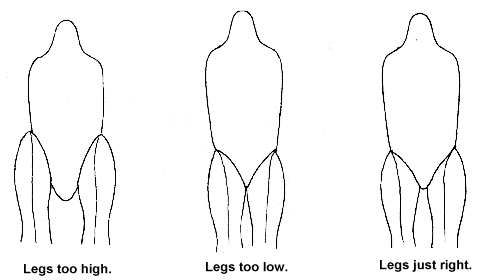
Now for the leg placement. You don’t want the legs too high or too low. When they are pulled in you want a nice hip line. Place the legs at the sides of the body, and push in on them to see how they will look after the are pulled in. When you like the look, peek under, and mark the spots where the button shank touches the body.
Repeat the arm jointing steps, for jointing the legs. It is easier to get the cords through for the legs because you will have less body to go through.
If you aren’t satisfied with the leg placement, clip the cords and start over. Once in a while I will get a set of legs on too high or low and have to do it over too.
Your original doll is now all designed, stuffed and the limbs attached. Some of you have the heads attached too. Some of you want to wait for face directions before attaching the heads. If you use the ladder stitch to attach the heads it makes a very nice joining. Simply push the head against the neck stub where you want it. Then take a stitch in the head back, right where the neck touches, then a stitch in the neck right where the head touches. Take three stitches this way, then pull them tight. Repeat all around. Anchor off the stitching by stitching in place up on the head where the hair will hide it.
If you hot glue the heads on, put only the tiniest dab of hot glue on the neck stub, then press the head on. You can add a little more glue where needed, after the head is in place. If you put a big blob of hot glue on, it invariably squishes out and shows.

Judi Ward
Judi's Dolls
http://JudisDolls.com

© 1998, Internet Visions Co. All rights reserved. All trademarks are owned by Internet Visions Company.