Design Your Own Cloth Doll
Class
©1995 with additions copyrighted 1996-1997
Taught by Judi Ward of Judi's Dolls
Chapters 5
STUFFING
You should have a doll or hopefully, dolls, designed, sewn, cut out and turned right side out, ready and waiting for stuffing and assembly. Your hemostats are so helpful for turning your dolls. Just reach inside with them, grab a bit of fabric in their teeth, then slowly, pull and work the doll part right side out. Kind of like putting on panty hose but in the reverse!
Stuffing is soooooooooooo! important to making excellent quality cloth dolls! It takes practice, and a well-stuffed cloth doll will be HARD. There are only a few places and occasions when soft stuffing is O.K. Soft stuff a very simple, perhaps 2 piece, ōRag Dollö meant for a baby or small child to play with. Soft stuff near the tops of stitched on legs and arms so they will remain mobile, and soft stuff some primitive and country dolls. Also, some arms/hands that you stuff with chenille stems can be left without stuffing, except at the tops, letting the chenille stems do the stuffing. Other than that all of the rest of the cloth dolls need to be stuffed very firmly. Woven fabric dolls need the firm stuffing to work out the wrinkles and shape them.
Firm knit and felt dolls donÆt suffer from the wrinkle problem like woven fabric dolls, but need the firm stuffing to shape them.
Almost all, well designed, jointed dolls will stand alone in shoes if they are stuffed firmly enough. I even have high heel dolls with the ōshoeö designed the way you were taught in the more advanced dollmaker part of the shoe design lesson, who stand alone with just the cloth feet.
Stuffing and shaping your cloth doll can ōmake or breakö your finished doll. The finest design can be ruined by poor stuffing. The simplest design can be made to look very detailed by a good stuffing job.
When you are working with firm knits, like velour, you can actually mold the doll as you stuff, almost like clay. Two dolls from the same pattern can be made to look very different just by altering the stuffing.
Of course, in reality, no two cloth dolls look exactly alike, even if they are made from the same pattern, by the same dollmaker, at the same time. For me that is the pure joy of cloth doll making.
The stuffing you use has a great deal to do with the smoothness of your finished dolls too. Use the more expensive stuffingÆs that are all soft and downy. Some bargain brands have what I call ōfloor sweepingsö in them. These are hard, bunches of polyester that didnÆt get spun and processed. Every lump that you put into your doll will usually make a lump on the outside.
Stuff each area of your doll with the largest amounts of stuffing that you can get into an area at once. The fewer breaks in the stuffing, the fewer lumps in the doll.
After stuffing it is important to close the openings nicely and in most cases the LADDER STITCH is the best stitch to use. The ladder stitch lets you close straight or even curved openings nearly invisibly! It does take a little practice but once you get it you will never close things with an over-cast stitch again.
When you do the ladder stitch, your needle ENTERS AND EXITS on the right side of the fabric, right along the seam allowance. You take 2 or 3 stitches, then you pull them tight. When you pull the stitches tight, the raw edges will turn inside and the thread will disappear! You will usually need to add a little more stuffing as you close. You will also need to get in the habit of pulling the thread near to the stitches rather than pulling on the needle. As you pull the stitches tight, you will need to poke the raw edges a little to get them to go inside the seam. In my hands on classes we use a little chant ōSTITCH-STITCH-STITCH, PULL AND POKEö.
When closing a curve, like the tops of legs and arms for a jointed doll, you sometimes need to poke the raw edges to the inside in a few places as you close. CLOSING TIPģCotton balls are great to add in at the tops of curved closures, to finish filling the tops firmly as you close. They donÆt puff out of the opening and they give you a firmer top.
Hand sewing note...I always do all hand sewing and needle-sculpturing using a double or quadruple thread. Some designers use a single thread, but for me, double or quadruple prevents broken thread disasters.
Hand sewing note #2.. Always pull on the thread near your stitching, not at the needle.
Hand sewing note #3...Use good European threads if at all possible for your dollmaking. Using good thread will eliminate lots of broken thread disasters.
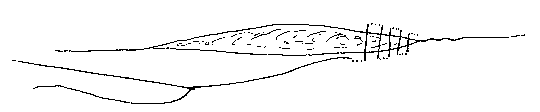
Ladder stitch illustration. The 3 dotted lines represent A stitch under the fabric, not 3 stitches.
PRACTICE PRACTICE PRACTICE, until it comes naturally to have your needle both enter and exit on the RIGHT SIDE of the fabric.
Before you start stuffing, I want to show you:
SOME IDEAS FOR ARTICULATING KNEES AND ELBOWS FOR JOINTED OR UNJOINTED DOLLS.
You can also do the bead, stitch or tie at the ankles and wrists if desired. NoteģA doll articulated in this way will not stand alone.
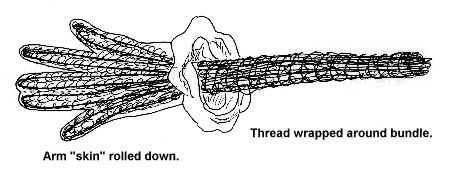
Chenille stems are my favorite for stuffing and articulating fingers of all sizes, and even arms and legs on small dolls. Hook your stuffing fork in the center of the bent chenille stem to help guide the stem into place.
Chenille stem hooked onto stuffing fork. This is the easiest way to get the chenille stem to where you want it.
With chenille stem folded in half, and using your stuffing fork as a guide and holder, guide one chenille stem into each finger, or hand and thumb, depending on the kind of hands you have made. For small hands and fingers use the skinny chenille stems. For bigger fingers, use the big 15mm size chenille stems. If you canÆt find the big ones, you can use two of the smaller ones. Or use only one, and carefully stuff around the chenille stem.
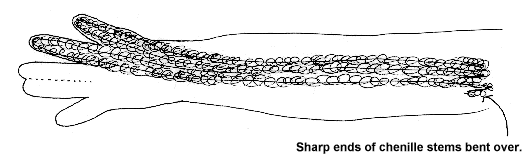
NOTEģ you will need to bend the free ends of each chenille stem, so there are no sharp ends to deal with.
Fingers stuffed with chenille stems using your
stuffing fork to guide them into place.
If you have stuffed all of the fingers with chenille stems, you will need to bundle together all the ends that protrude into the arm, because they are impossible to stuff around when they are left unbundled. Simply wrap ordinary thread all around the bundle. NOTEģIf the stems go up past the elbow, you have a bendable elbow as a bonus! If they are too long for a small arm you will need to cut them off.
VERY CAREFULLY stuff the hands, both top and bottom, and stuff the arms all around the chenille stems. You may wish to leave the hands very softly stuffed for delicate lady hands.
BONUSģfor some small dolls, the chenille stems are all the stuffing that is needed for hands and arms.
If you donÆt wish to stuff the fingers with chenille stems, ōtwirlö small amounts of stuffing on your stuffing fork, by holding the stuffing firmly in your fingers and twirling the stuffing fork into it, thereby making a ōQ-tipö on your fork. It will of course be bigger than a real Q-tip. With practice you will be able to judge just how much stuffing is needed for different sizes of fingers. You want to stuff each finger with one ōQ-tipö. With the ōQ-tipö on your fork, guide it down into one finger, then hold the finger tightly and pull your stuffing fork out. Repeat for all of the fingers, and then continue stuffing hands and arms as usual.
Judi Ward
Judi's Dolls
http://JudisDolls.com

© 1998, Internet Visions Co. All rights reserved. All trademarks are owned by Internet Visions Company.