|
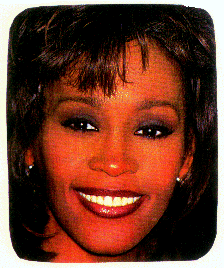
Picture below is a model's
|
Put it on a copy machine to make
|
Design Your Own Cloth Doll
Class
©1995 with additions copyrighted 1996-1997
Taught by Judi Ward of Judi's Dolls
Chapters 6 - Part 2
Methods of Face Design
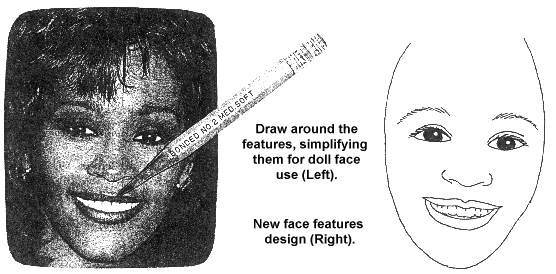
Another fantastic face design method is to design from a magazine picture of a real person. First, find a full-face picture of a face you like. This is especially good for adult faces.
|
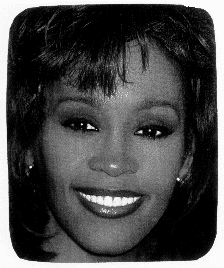
Picture below is a model's
|
Put it on a copy machine to make
|
Rub pencil on the back of the copy machine image, put it down on a new piece of paper and draw over the features, which will simplify them so they are useable for a doll face. You can also draw around the face shape, for head size and feature placement reference.
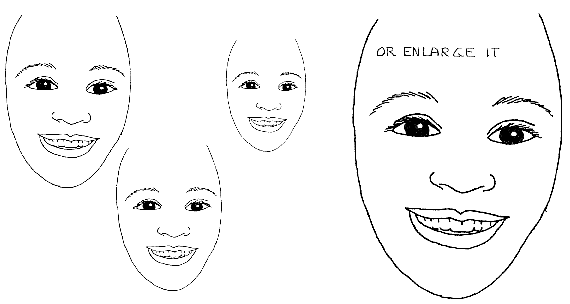
Now, you can reduce the drawn image as much as you want,
so it will fit lots of doll sizes.
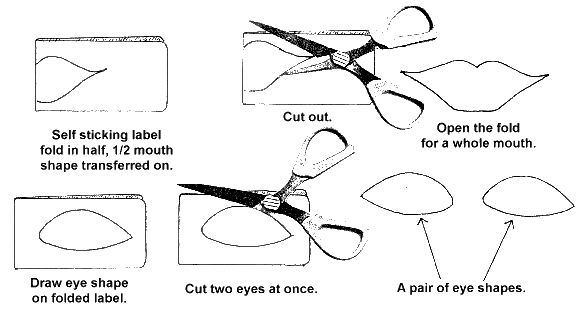
Now you can transfer these features to labels,
stick them on your dolls finished, stuffed head and draw around themůorůmake
your original head pattern with a seam allowance, rather than the sew then
cut method. Trace the features onto one head piece before you sew it. Taping
the design to a light window, then putting your fabric piece over that
to do the tracing is a good way to see the features through the fabric.
Of course some of you have a light table, and that is ideal.
Remember to draw JUST UNDER THE EDGE of the stick on features, because when you draw AROUND something it gets bigger.
NOW FOR SOME BASICS
ON USING THE LABELS TO MAKE TEMPLATES TO DRAW AROUND
You will always pencil the backs of your feature designs, then transfer them to a label. You can make a whole mouth, that is perfect on both sides by folding the label in half, then cutting the mouth out on the fold. You can make two matching eye shapes by drawing one eye shape on one side of the label, fold the label in half then cut two matching eye shapes at once.
Remember the needle point method of getting the labels off of the paper backing.
Add the irisĺs of the eyes on the label if you want to, and actually color them with felt tip markers or crayons before you stick them to your dolls face. Do the same for the mouth. You can get a better pre-look at what your doll will look like with the features you have chosen and designed.
ůAn embroidery after stuffing hint for those who wish to embroider the facesů
For embroidering after stuffing, you simply put your needle into the stuffed dolls head, back in an area that will be covered by hair. Embroider the feature, then exit back out at the back part of the head.
Remember to add the "life-lites" to the eyes on your finished faces, no matter what medium you use for finishing the faces. Also, for detailed lips it is a good idea to add a little white shine to the center of the bottom lip and a tiny bit of white shine to the top lip on the same side as the "lites" in the eyes. Blush your dolls cheeks with ordinary powdered ôpeopleö blush, or even colored pencil or crayons. Crayons and colored pencils make great eye shadow too.
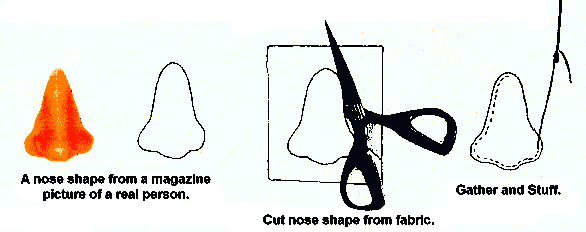
LETS MAKE SOME STITCHED ON NOSES
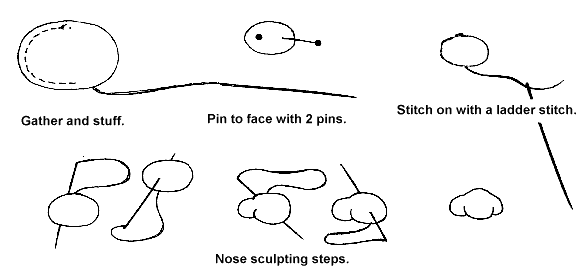
An oval or circle, gathered around the edge, stuffed, then stitched to your doll's face and then sculpted, or just left un-sculpted makes a nice easy nose for a baby, child, country or clown doll.
A stitched on shaped nose is great for fantasy characters and old people dolls. You can use the nose shape from a magazine picture nose as a pattern. You will need to start out with a bigger shape than your desired finished nose, then gather it all around and stuff it, keeping the shape as you stuff.
Pin it to the face as shown above, then stitch it in place with a ladder stitch. Sculpt the nostrils and you have a fine character nose.
Make the nose really outsized, for a real silly gnome or elf. Make a big red round nose for a clown. Play around with various added on nose shapes to add lots more variety to a simple tab head doll. You will be amazed at how 3 dimensional the head will become.
A note about stitching the noses on with a ladder stitchůTo do the ladder stitch for sewing on a nose (or eyelids. IDEA) you take a small stitch in the face right where the nose edge touches the face, then you take a stitch in the back edge of the nose right where it touches. Continue around this way, a stitch in the face-a stitch in the nose edge-a stitch in the face-a stitch in the nose edge, pulling the stitches tight after about 3 or 4 stitches. DONĺT try to stitch into the face and nose back at the same time. It usually results in a broken needle and lots of frustration. It will also result in the stitches showing a lot.
Judi Ward
Judi's Dolls
http://JudisDolls.com

© 1998, Internet Visions Co. All rights reserved. All trademarks are owned by Internet Visions Company.