Design Your Own Cloth Doll
Class
©1995 with additions copyrighted 1996-1997
Taught by Judi Ward of Judi's Dolls
Chapters 8 - Designing Basic Clothing Patterns
PART 1
Hopefully you now have several dolls with a variety of faces and hairstyles waiting to be dressed. Are they calling to you to be dressed in certain styles and colors? Are they begging to be wild and crazy? Or quiet and subdued? Do you have a doll that started out to be a girl, but now it’s demanding to be a boy! With cloth dolls this sometimes happens. They take on a life of their own, and you have little control over it once they make up their minds! Designing and making clothes for your dolls can be such a joy, and often simple designs show off your doll to the best advantage.
To get a “feel” for clothing shapes I recommend that the first thing to do is some research through the patterns you have and through books on doll clothes like “Dressing Twentieth Century Dolls” by Johanna Gast Anderton or The Collectors Book of Doll Clothes by Dorothy, Elizabeth and Evelyn Coleman. These books are probably available at your library, or they can be ordered through inter library loan, if your branch doesn’t have them. Look at the shapes that clothing pieces are designed from. Most pieces are variations on rectangles, squares and circles. Also look through the patterns you have, to see the many ways doll clothes are designed and constructed. This research will result in finding many basic pattern shapes, to help demystify clothing design and construction.
You don’t need a lot of basic clothing pattern designs to make a lot of doll clothing. A basic shirt pattern can be a pajama top, a jacket, a night shirt etc. One basic dress pattern can be made into everything from a little girls school dress to a wedding gown with just a few changes. A dress skirt can be a regular skirt with the addition of a waistband. A pair of pants can be pantaloons, shorts, pajama bottoms, knickers, with the addition of knee bands, leggings etc. by just making them wider or narrower, longer or shorter.
Experiment!! It’s fun and a fantastic creative outlet.
This chapter isn’t going to be a sewing lesson, except for some hints to make doll clothes easier to make. If you are ready to want to design a doll and the clothes yourself, you have probably made quite a few dolls already and have sewing and finishing methods that you prefer.
My “Judi’s Dolls” patterns have lots of innovative sewing methods that give your doll clothes a very professional, quality look, since I prefer clothing that is made more like real people clothes and that can be removed.
Some dollmakers prefer clothes that are sewn onto the doll. The choice is yours. It is your doll design and your doll clothes design. Do the finishing the way you prefer. There is no one way, that is the only “right” way.
Experiment with different ideas and adapt your designs to the way that the dolls you make will be used. You need to use sturdy, washable fabrics and methods for a play doll, but you can use fine fabrics and even glue for a strictly “look at “ doll.
One method that I highly advocate is making dress bodices lined. It is much easier to finish the neckline when you can simply sew two bodices together down the backs and around the neck. The “clip, turn to the inside then top stitch” method is hard to do and produces a weak neckline area. Of course if you have designed a primitive type doll you may want the torn, unfinished look.
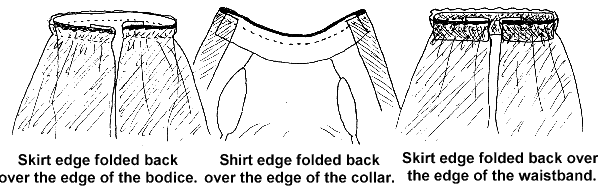
The method I recommend for concealing raw edges where a shirt meets a collar or where a skirt meets a bodice, is to fold the skirt ends back around the edge of the bodice or the shirt edge back around the edge of the collar. This also holds true for skirts with a waistband. Fold the skirt ends around the ends of the waistband. When you pull the skirt/shirt etc. down to be right side out the edges will be finished and concealed in the turned back part.
This “turned back placket” method makes much nicer finished ends on your doll clothes.
Designing you own doll clothes is really very simple. Before we start, lets look at some more possibilities from a few basic designs.
FOR EXAMPLE
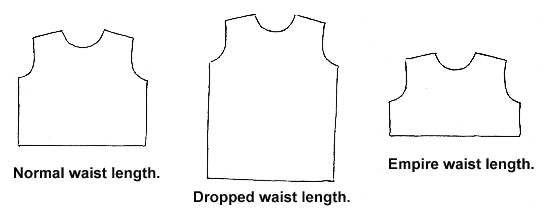
A basic waisted dress bodice pattern can be made into a high waisted dress by simply shortening the bodice. It can be a dropped waist dress by lengthening the bodice. The high waisted version can be a nightgown by lengthening the skirt and making the gown from “nighty” fabric.
The dress bodice can be turned into a shirt by planning the opening down the front rather than the back. A shirt collar is just a length of fabric twice the width that you want the collar to be by the length of the neck opening, folded in half lengthwise. I will show you how to make some other collar styles later. Short sleeves can be lengthened, long sleeves shortened; any length of sleeve can be made wider to be a full gathered sleeve. Skirt lengths can be adjusted from tu-tu length to evening gown length.
Long pants can be shortened to be shorts. Widen the pants and add lace and elastic to the bottoms of the leg openings to be pantaloons, either knee length or ankle length. Shorten the wide pants to hip length and add lace and elastic to the leg openings to be bloomers or the bottom part of a sun-suit. By adding a bib and straps, bloomers, pants or shorts are quickly changed into sunsuits or overalls.
Full gathered skirts are simply a length of fabric at least four times the waist measurement by the length desired plus hem allowance. The fullness of the skirt can of course be more than four times the waist measurement, but, sometimes if there is too much fabric to be gathered onto a small waist, you won’t be able to get it all on. Sew on as much of it as you can then cut the excess off. Another way, one of my favorites, to get lots of fullness in a skirt and still be able to attach it to a very tiny waisted bodice, is to make the skirt a full circle with a hole cut out for the waist edge.
Most doll clothes are made from only a few basic shapes, which I will show you how to create. You will use the doll/dolls that you made to make clothes patterns to fit the doll you designed. Since this doll is a flatter doll than one with a four or more piece body we can use a simpler pants design. Pants for a more shapely body design will need to have a four-piece design. At the end of this lesson I will show the more adventurous designers how the 4-piece design for pants looks, and how you can make that type of pattern for your dolls if desired. You have probably seen and used that pants design from other patterns.
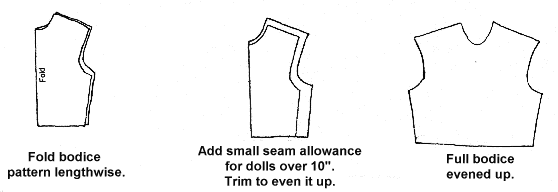
All pattern pieces need to match on both sides, so after you get the basic shape drawn you will need to fold the paper in half down the center of the bodice or pants or tunic, and cut your pattern out that way.
I will illustrate the basic pattern pieces used to dress all of the dolls pictured. As you can see it takes very few basic pieces to make an endless variety of clothes. The methods used to make these pieces are much the same as the methods you used to design your doll.
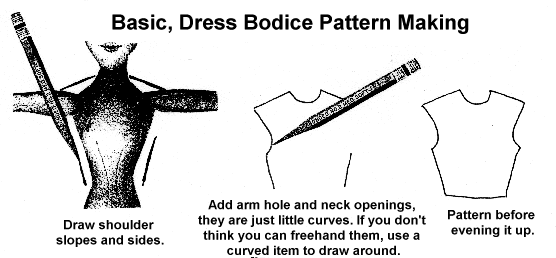
I am going to illustrate the method by drawing around a reduced size copy machine copy of a doll I designed using the methods you have been learning. You will use your actual doll/dolls to draw around.
This pretty doll was shown nude and hairless on the class registration page. She will appear at the end of this lesson in a lovely gown and wide brimmed picture hat.
When drawing around your doll to make most patterns, be sure to hold the pencil STRAIGHT UP AND DOWN. You may add small seam allowances for the basic bodice, but for a small doll, under 10” you usually don’t need to for the bodice. By holding your pencil truly STRAIGHT UP AND DOWN the seam allowance is added simply by the width of the pencil. For larger dolls add about 1/4" extra for seam allowances, when you cut your rough patterns on the fold to even them out.
If you have designed a very large doll, even larger seam allowances (1/2”) can be added. In my case, it seems that the larger the clothes I am making, the larger I want the seam allowances to be.
NOTE…For some of the patterns I will direct you to draw a little ways away from the doll, not right along the body
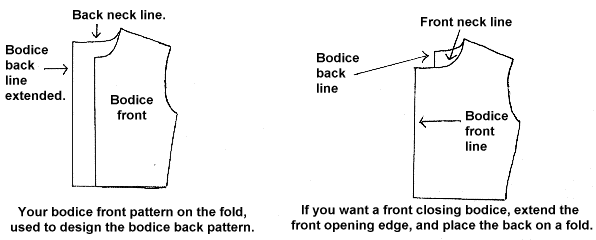
Now, you can use the basic bodice front pattern to make THE BODICE BACK PATTERN. The neckline on the back pattern is usually a little higher than on the front. You need to add about 1/2" to the back center width for a doll under 10” and about 3/4" to the back center width for a doll over 13”. This extra width is for the back overlap, and where you will sew snaps, buttons, Velcro etc. or just overlap the back and sew it shut.
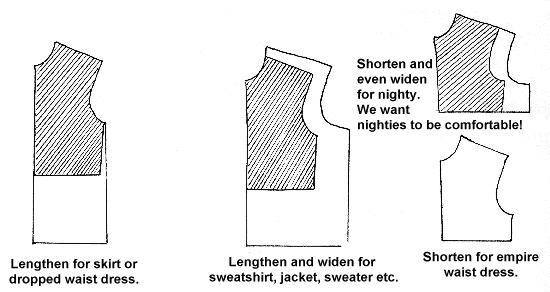
Now, you have the basic bodice front and back patterns with the closings designed for either the front or back, You can lengthen, shorten and widen this basic pattern to make dress bodices, nightgown bodices, button front shirts, back closing shirts, sweaters, sweatshirts, jackets, robes etc.
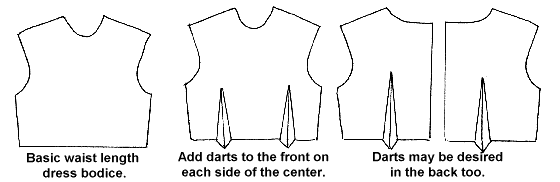
You may want or need to add waist darts to a fitted dress bodice, so the waist fits nice and snug. This is especially true for a lady doll with a tiny waist.
You will have to use your own judgement as to how much width and/or length you want to add to the basic bodice to make patterns for other types of tops. As an example. For a sweatshirt you would want to add perhaps 1/2" width to each side seam, for a doll under 10”. The length would look best at about hip length. You can always cut pieces from good quality paper toweling and baste or tape the toweling together for a fitting. Paper toweling makes the cheapest and best fitting material.
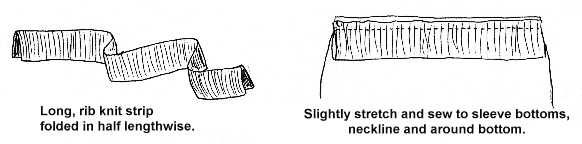
Sweatshirts (sweatpants too) and sweaters will need to have rib knit cuffs, necklines and bottoms. Simply cut a strip of rib knit (or sweater knit) twice as wide as you want the rib knit parts to be plus seam allowance, by the length needed to sew onto all of the parts needing rib knit. Example. 2” in length for each wrist edge, 4” for the neck, and 7” for bottom, for a total of 13”. Fold the strip in half lengthwise and slightly stretch it as you sew it in place.
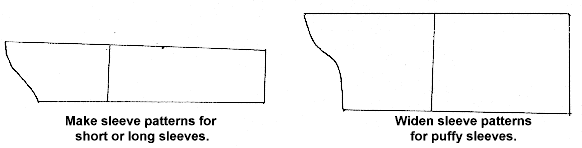
SLEEVE PATTERN MAKING
You will use your dolls arm for sleeve designing. A sleeve is just a rectangle or square with a curvy top edge. Be sure to plan for hemming, or lace and elastic, or rib knit cuffs. If you have made a jointed doll, you will have to pull the arm straight out and hold it while you draw around it. You may need to have someone hold it down for you. If you have made a doll with stitched on arms, just place the arm straight out at the dolls sides and it will stay fine for you to draw around it. Before we design the sleeves, I want to illustrate the best way to put elastic on doll clothes.
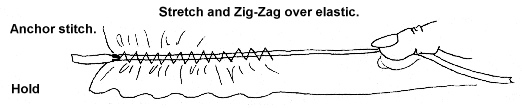
Anchor stitch 1/8” wide elastic at one end. Hold the anchor-stitched end, then stretch the elastic as you Zig-Zag stitch over it. The Zig-Zag stitch needs to be wide enough to go all the way across the stretched elastic, not into it. You will be making a “thread casing”. You can gather up a lot of sleeve fullness this way. When you have adjusted the fullness to your liking, anchor stitch the end, to keep the elastic from slipping back through the “thread casing”.
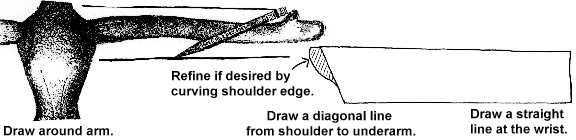
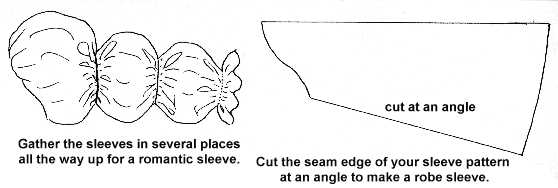
Draw around the arm as illustrated, about 1/4" away from the arm. Draw a diagonal line from the shoulder top to the line under the arm. Draw a straight line at the wrist. This makes a narrow, straight sleeve pattern. You will add wrist hem allowances, depending on the finish you plan to do at the wrists.
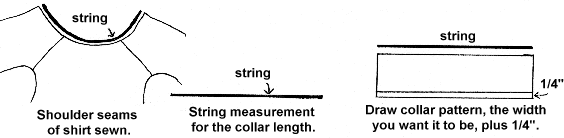
To make a shirt collar pattern, sew the shoulder seams of the shirt you are making, from the pattern you designed previously. Measure the neck opening with a piece of string. Lay that piece of string down on a piece of paper and draw a straight line along it. Designers note…I use string for measurements a lot, because it is more flexible than a tape measure for small doll “stuff”.
Decide how wide you want your collar to be, and draw lines at each end, that long, plus 1/4" seam allowance for sewing the collar to the shirt.
Connect the ends. This is a collar pattern that has 1/2" end seam allowances on it. The wide seam allowances make it easier to sew the little collar ends. You will trim them after sewing.
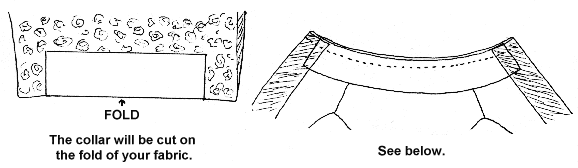
Stretch the neck edge of your shirt a little as you sew the collar to the shirt. Remember to fold the front extensions back around the collar edge. When you turn the extensions to the inside, the front of your shirt will be nicely finished. Note, in the drawing, that the collar is a little shorter than the full neck length. That is so the front can be overlapped, without overlapping the actual collar. This is achieved by the slight stretching you did of the shirt neck as you sewed the collar on.
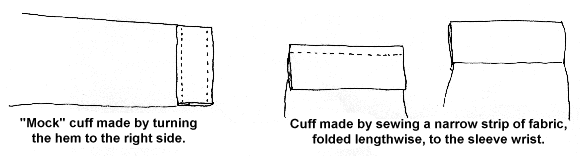
You can make a “mock” sleeve cuff on a long sleeved shirt by simply turning the hem at the wrist to the right side, and topstitching. Of course, be sure you have allowed enough of a hem at the wrist to do this. Or you can sew a little strip of fabric, folded lengthwise to the wrist edge of the sleeves, to make a cuff.
Now think about what a basic shirt pattern can be turned into. Make it wider and longer for a nightshirt. How cute in red flannel, on a man doll, with a long pointy nightcap. How about a fat man doll, and turn him into Santa? Shorten the shirt, add fur collar and cuffs, for a trendy looking jacket to go with a straight skirt (we’ll design the skirt later) for a Jackie Onassis look. Add rib knit collar, cuffs and bottom to a shortened, widened shirt, and then a felt letter to make a letterman’s jacket. Think like a designer. Ask yourself, what can I do for variety using this basic shirt as a jumping off point? Be an observer of clothing in magazines. You will suddenly realize that most clothing is made from just a few basics.
Judi Ward
Judi's Dolls
http://JudisDolls.com

© 1998, Internet Visions Co. All rights reserved. All trademarks are owned by Internet Visions Company.