Desired length plus hem allowance, by 4 times
waist measurement plus 1/2" at each end for the turned back placket.
Design Your Own Cloth Doll
Class
©1995 with additions copyrighted 1996-1997
Taught by Judi Ward of Judi's Dolls
Chapters 8 - Designing Basic Clothing Patterns
PART 2
SKIRT PATTERN MAKING
Skirts can be sewn to bodices or add a waistband to make a regular skirt.
THE BASIC FULL SKIRT, is just a length of fabric at least 4 times the waist measurement. Allow about 1/2"at each end for the turned back placket. For a very slim waisted doll, very lightweight fabrics gather and sew to the bodice waist, or skirt waistband, much easier for this type of skirt. If the fabric is too heavy it will “be hard to sew on”. The only measurements you need are the length of the desired skirt plus hem, and the 4 times waist measurement. You can make the skirt fuller by using more than 4 times waist measurement, but the “hard to sew on” rule often applies, depending on the weight of your fabric.
Desired length plus hem allowance, by 4 times
waist measurement plus 1/2" at each end for the turned back placket.
Refer back to the illustration of the turned back placket at the beginning of this chapter for how to best finish the back edges of skirts where they sew to waistbands or bodices.
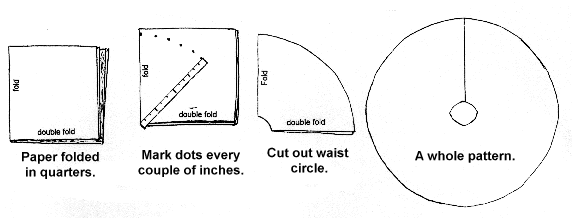
A very easy, full skirt, that will sew easily to the tiniest waist is the full circle skirt. Sometimes you can draw around something round like a plate to make a pattern for a full circle skirt. Sometimes you will need to make the pattern by folding a big piece of paper (freezer paper) in quarters. Measure from your doll’s waist to the length you want the skirt to be plus 1”. For the illustration below I will use 12” as this measurement. Put one end of a ruler at the point of the fold, with the ruler along one edge of the paper. Mark a dot at the other end of the ruler. Move the ruler a couple inches from the first dot and make another dot. Always keep one end of the ruler at the point of the fold. Continue making dots every couple of inches. You will have dots marked in a fan shape. Connect the dots, with slightly curved lines. Cut the circle pattern out. Now cut a small 1/4 circle out of the pointed end. This will be the waist edge. Open the paper pattern, cut one fold apart, and try it around your doll’s waist. If it is too small, refold the pattern and cut it a little bigger, not more than 1/4" at a time. If your first cut out made a waist edge that was too big for your doll’s waist, you can gather it to fit. Remember to have the skirt waist big enough to allow for the turned back placket.
This type of skirt makes beautiful formal gowns. The doll in the lavender gown at the end of this lesson is dressed in a gown made from 2 full circles. The top circle is cut in a curve at the front. A ribbon waistband was added and it is tied on in the front.
This type of skirt also makes cool “Poodle Skirts” if you make the skirt from felt.
A half circle makes a lovely skirt too. Be sure to re-cut the waist edge to fit, and adjust the length. A quarter circle makes a nice a-line skirt. Re-cut the waist edge to fit and adjust the length. How about an a-line skirt with the fur trimmed jacket? A really pretty Jackie ‘O’ look.
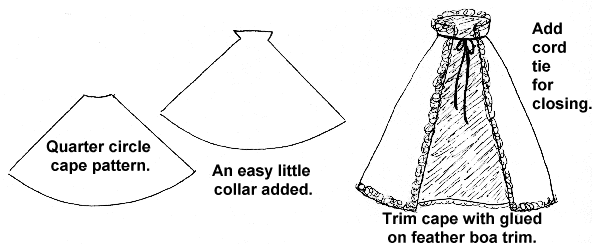
A quarter circle makes a lovely cape too. The doll dressed in the slinky black gown (it’s just a rectangle) has a boa trimmed cape made from a quarter circle. I added a little collar to the cape as illustrated below. This cape is lined with a fine organza.
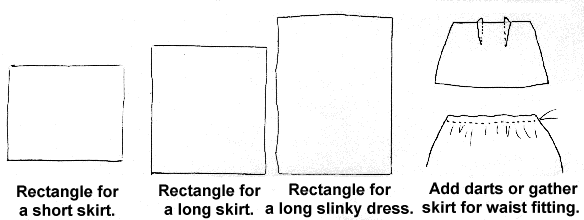
A straight skirt pattern is just a rectangle wide enough to go around your dolls body at it’s widest point, plus the fold back placket allowance, by the length you want the skirt to be. Add darts at the waist for fit, or slightly gather the waist, then sew on a waistband, which is just a waist length, plus 1” strip, folded lengthwise.
You can make this skirt any length, a short mini skirt, a long elegant skirt..or..make it go all the way from above the bust to the ankles, plus hems top and bottom, and you have an elegant, slinky evening gown. Make it from shiny satin, spandex or sequined fabric. Designers note…I don’t like the sequined fabric that has the sequins sewn on. I like the ones that have the sequins pressed right into the fabric. I see it in fabric stores a lot. The “sequins” are smaller and it is easier to sew.
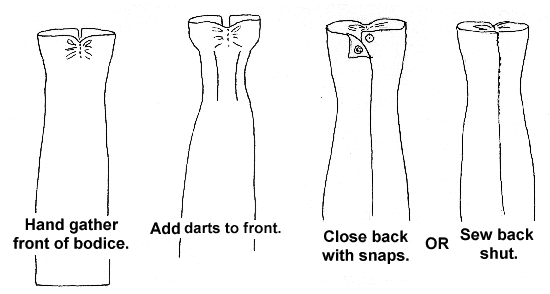
The long slinky dress I made, has the top edge folded to the inside about 1”, then I hand gathered the center of the bodice after the dress was on the doll. I added 2 front darts starting just below the bust and ending just below the waist. I didn’t add darts in back. I closed the dress with tiny snaps. You could of course just sew it closed. This dress just skimmed the doll’s figure. This basic design can be embellished with beads etc. It looks so tailored and elegant, but can be made in minutes!
PANT’S PATTERN MAKING
Easy 2 piece pants, panties, pantaloons leggings etc.
The doll/dolls you have designed in this class have the flatter 2 piece bodies so they can wear the easy, 2 piece pants. You have probably seen this type of pants pattern in lots of patterns. It is very easy and versatile. By simply shortening or lengthening, widening or narrowing it you can make all kinds of pants.
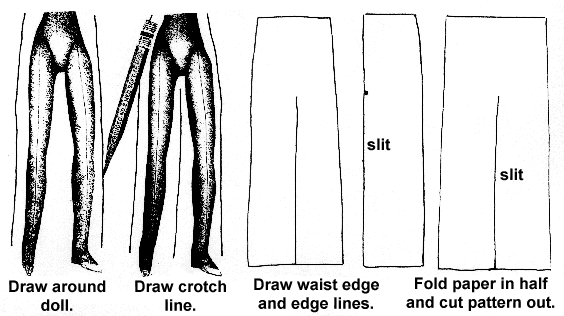
Lay your doll down on a piece of paper and draw around it as illustrated below, about 1/4" away from the body for a doll under 10” tall. Draw around it about 1/2" away from the body for a doll over 10” tall. Draw a line from 1/2" below the crotch to the ankle. Take the doll off of the paper and draw across the waist and across at the ankles. This will make a straight, tight pants pattern. Add hem and waist edge allowances.
Fold the paper down the center of the drawn pattern and cut it out, which makes both sides match. All of the different types of pants you may desire will be designed from this basic pattern.
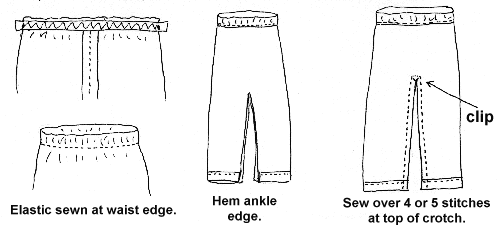
This straight, narrow pants pattern makes good leggings and is best made from a knit fabric. Sew one side seam, then stretch and sew narrow elastic to the inside waist edge. Sew the other side seam, and then turn the waist edge to the inside and top stitch all around the waist. Hem the ankle edges. Sew the crotch seam. I like to sew across 4 or 5 stitches at the top of the crotch, then clip to the seam before turning. The pants turn flatter and nicer this way.
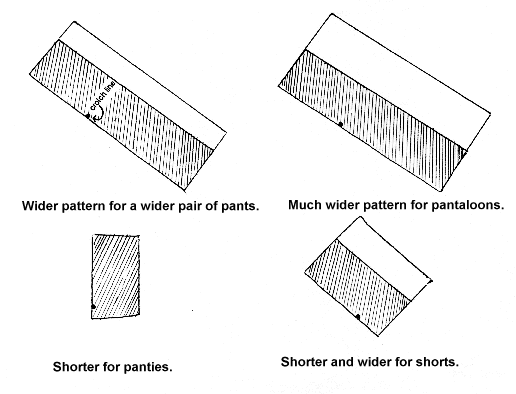
Add or subtract width and/or length for other pants styles. Finish waist edges with elastic or by gathering with thread, crochet thread or silk ribbon. For pantaloons, finish the bottom edges with lace and elastic or gathering. For panties, finish the leg openings with lace. For sweatpants, finish the ankle edges with rib knit, which we covered earlier.
The basic pants pattern is shown shaded.
The length and width choice is up to you. You are the designer. Remember; you can make quick try ons from paper towels.
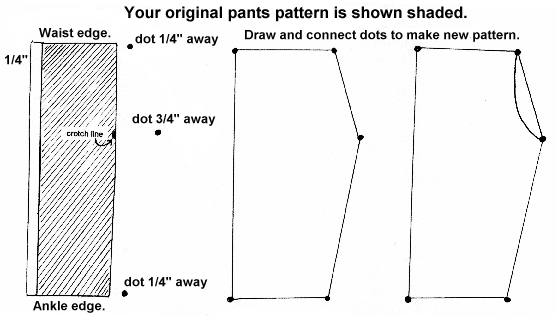
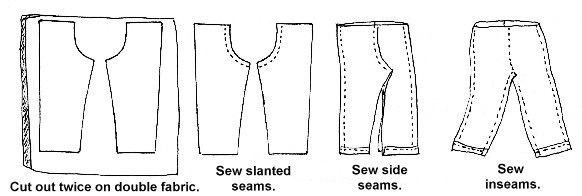
I told you earlier that I would show you how to design the 4-piece pants pattern. You will use your 2-piece pattern as a design template. Fold it in half lengthwise. All you will have is a rectangle. Put it on a new piece of paper. Mark the crotch line. Draw a line the full length of the rectangle, 1/4" from one long side. Make a dot 1/4" from the waist edge on the other side. Make another dot, 3/4" from the edge at the crotch level. Make another dot 1/4" from the ankle edge.
Draw a diagonal line from the waist dot to the crotch dot. Draw another diagonal line from the crotch dot to the ankle dot. Draw across the ankle edge and the waist edge. See illustration below make sense of the above.
Your original pants pattern is shown shaded.
To make pants from this pattern, cut out twice on doubled fabric. Sew slanted crotch seams. Sew sides together. Sew inseam. Of course finish waist and ankle edges as for 2 piece pants. This pattern will make straight, tight pants. Adjust width at the side seam, just as for the 2 piece pants. Adjust length as for the 2 piece pants too.
Now lets design a VERY SIMPLE tunic top. This is a great top for an elf, combined with tight leggings, or long stockings, or for an elf doll who’s body and legs are made from print or colored fabric. This tunic is wonderful made from felt. No hemming or finishing needed. How about a doll with a leaf print body, and striped legs? Perhaps make the elongated feet shown in chapter 2.
Make them as long and silly as you want them. Maybe even wire the toes! Then you could curl them! Make the tunic from felt, so you don’t even have to worry about hems and finishing. Lace the neck opening with crochet thread, yarn, thin leather or even raffia. Tie a simple cord or strip of leather around the waist for a belt. The elf doll pictured at the end of this class is dressed in this simple tunic pattern, along with long stockings and a widened pair of pants made from the 2-piece pattern. I cut fringe at the legs and gathered the legs and waist with crochet thread.
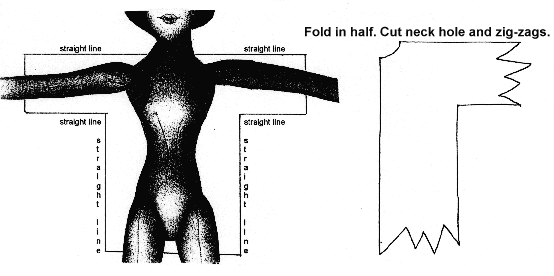
Put your doll down on a piece of paper.
Draw straight out from each side of the neck to about elbow level. Draw straight out from the under arm area, about 1/2" from the arm. Draw straight down the sides of the body about 1” away from the body for a doll over 10”. About 1/2" away from the body for a doll under 10”. If you want a wider, looser tunic, draw farther away from the body. Fold the paper down the center of the pattern you have drawn. Cut it out, evening up the lines you drew. At the arm and bottom of the tunic, cut zig-zag shapes. They don’t have to be perfect; any old zig-zags you desire are fine. Cut a small neck hole. See the illustrations below.
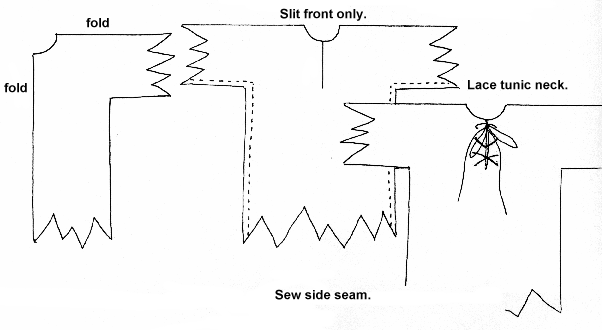
Place this pattern on a double fold of felt and cut it out. Slit the front neck in the center just enough so you can get the tunic over your doll’s head. Sew the side seams. Turn tunic right side out. Put on doll and lace the neck opening if desired.
My elf is pictured at the end of this lesson.
Now lets design a mermaid.
If you make a mermaid you don’t even have to make legs for your doll.
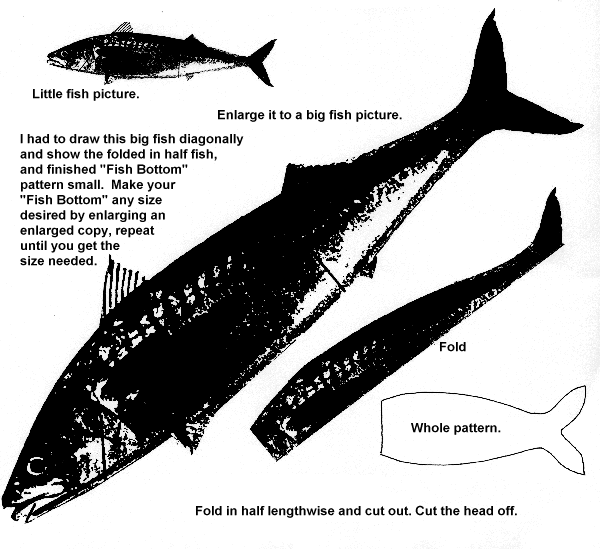
But, you say, I don’t know how to draw and design a fish bottom! Never fear, there are fish bottoms all over the place that you can trace, put on a copy machine and enlarge (or reduce).
I have some soap in my bathroom that would make the cutest little chubby fish bottom. I have a shower curtain that has several fish designs on it. I’ll bet there are lots of coloring books with fish in them. My big dictionary has fish in it. There is no shortage of fish bottoms.
You only need the design from about the gills to the tail. You don’t need the top or bottom fins either. To make your fish bottom symmetrical, fold it down the center from gills to tail and cut it out. Open it up and you have a nice symmetrical fish bottom for your mermaid.
A fish/mermaid bottom needs to be at least twice the length of the doll’s body. Make it longer if you wish. It’s your doll design. It needs to be wide enough at the top for the doll’s hips to fit inside. Stuff your mermaid bottom with stuffing and plastic pellets so it will lie nicely. Ladder stitch or glue the dolls hips inside the fish bottom. Decorate the joining with a metallic trim, or anything you want.
Sew the fish/mermaid bottom from a glittery fabric, or paint it with scales etc. If you do quilting, how about outlining scales with quilting. The possibilities are nearly endless.
My mermaid has little round “boobs” made by gathering and stuffing circles, and then sewing them to her chest with a ladder stitch. She has sea shell buttons over her “boobs”.
Her hair is made from metallic gift ribbons that I bought in the grocery store by the greeting cards. It was already curled and in bunches. I just hot glued 3 bunches onto her head. I added this and that to make a mini scene, and now she lives in my “fish bathroom” as the Granddaughters call it.
My mermaid is pictured at the end of this lesson.
Judi Ward
Judi's Dolls
http://JudisDolls.com

© 1998, Internet Visions Co. All rights reserved. All trademarks are owned by Internet Visions Company.