|
|
|
|
|
|
Remember, the tinier the fingers, the thinner the fabric needs to be for making your dolls. The hand pattern given here was done and turned from washed muslin, Doesuede, sand washed Silk, and even the pale peach, 60 wide sleepwear velour that I use a lot! There are thicker velour's too, which are 45 wide. They are too thick for very thin fingers. Stiff poly cotton broadcloth, and stiff 100% cotton broadcloth may be too thick and unyielding for tiny fingers too. Washing the broadcloth fabrics will often soften them enough to make tiny fingers though. Felt is also too thick for very small hands.
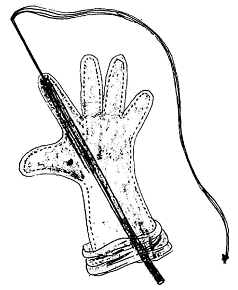
1. You will need Small tubes, like coffee stirrers, the tube from canned air, or tiny brass tubes if you have them. Actually any stiff tube that you can put a thin, needle sculpture needle through, and that fits into your sewn fingers. Cut the double coffee stirrers down the center lengthwise, so you only have one tube. Cut the coffee stirrers/tubes just shorter than your needle. Cut brass tubes with a hack saw if they are too long.
2. A long, thin needle sculpture needle.
3. Sewing thread, and the sewn hand/arm that you wish to turn right
side out.
|
|
|
|
|
|
 1.
Put the appropriate sized straw or tube inside the finger to be turned.
1.
Put the appropriate sized straw or tube inside the finger to be turned.
2. Put the threaded needle, with a sturdy knot at the end into the tip of the finger.
3. Pass it down the tube, and out of the open end of the arm. You will have to roll the arm fabric up and out of the way.
4. Pull on the thread and the tube together, as you carefully
and gently work the tip of the finger to the inside. The finger won't go
into the tube, It will just press against it as you slowly pull back on
the
thread and the tube.
When you first start to pull the tip in, you will think it is not working, and then, POP! The finger turns like magic! It may take you a few tries to get the feel of pulling on the tube and the thread, while working the cloth up, so the tip can pull inside, but once you feel it, it becomes so fast and easy you will be in shock!!!
5. Remove the tube, cut the thread and re-knot it.
6. Repeat for all of the fingers, turning them all into the palm of the hand.
7. Finish pulling the hand and arm, right side out, and then clip all the threads that are hanging out of the ends of the fingers.
8. Poke the little thread ends that are still visible, into the fingers, with the point of your needle, before stuffing,.
NOTE: Don't use a big, fat needle. It will make big, fat holes in the
finger tips!
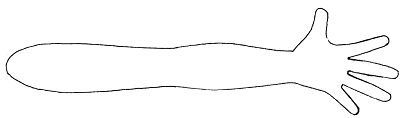
A hand and arm pattern to try. This is my hand, with the fingers lengthened a little, designed on the copy machine.
I have a Free finger design Mini Class which we have included with this class... Designing Fingers Using a Foolproof Method!
Judi Ward
Judi's Dolls
http://JudisDolls.com