Use the hand patterns that you have already designed. Choose the size/sizes you wish to use. Draw around the pattern/patterns on doubled fabric. Sew on the lines you drew. Trim, clip and turn right side out. (For some of the projects, you will need to extend the wrist length.) Ideas will follow.
You can also put your patterns on Freezer Paper. Iron the Freezer Paper to your fabric, and then sew around it.
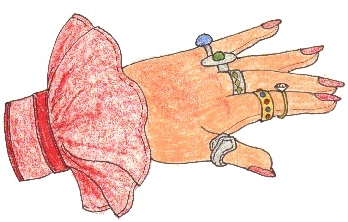
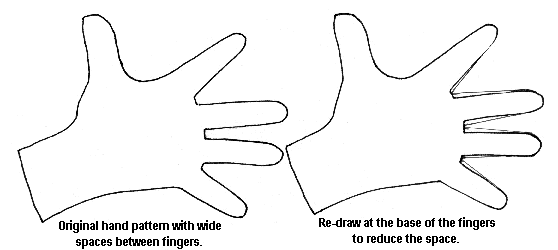
If you are going to make a 1/2 size or larger hand project, the wide space between the fingers needs to be reduced as illustrated below. If the space is left so wide, it results in a claw like look to the fingers. I also recommend putting real fake fingernails on these large hand projects. Super glue holds them to synthetic fabrics, like Doe Suede and velour. Put the glue sparingly on the nail, not on the fabric. Craft glue or an all-purpose adhesive holds them to cotton. Hot glue holds them to any fabric. The fake fingernails come in so many sizes, with so many sets in a package, you can always mix and match, to get the correct size for even 1/2 size hands. You may have to use a finger nail for a thumbnail etc.
Note
The fingers will come out slimmer than real life for these
large projects too. I leave them that way, especially for the ring holder.
That way the rings fit onto the hand easily.
When I teach in person, it seems that most of the students have never successfully made hands with good fingers. Starting large, and then progressing downward in size is the best way to practice. Sewing fingers takes practice.
By practicing the sew-sew-lift-turn method you will become a world class finger maker! Without practicing though, it wont ever get easy.
All doll sewing requires very small stitches. Finger
sewing REALLY requires those small stitches! I use a maximum of
15 stitches per inch, sometimes smaller.
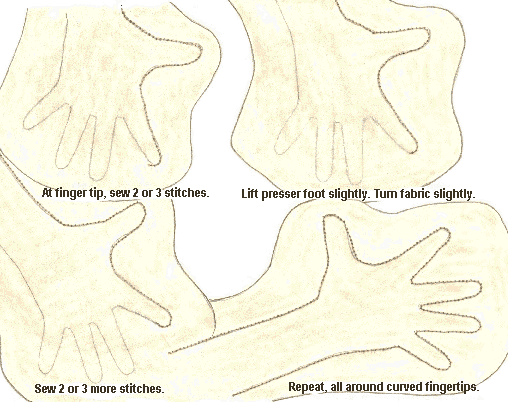
When you get to the top of a finger, no matter
what size, you need to get in the habit of having your right hand ready
to lift the presser foot on your sewing machine. You lift it just enough
to allow you to turn the fabric a tiny bit in the direction you wish to
sew. Dont try to drag the fabric around as you sew. Dragging it
will result in little points or squared off places on the fingertips, rather
than smoothe curves. This sew-sew-lift-turn method will prove invaluable
for other small curves too. Like around noses and jawlines.
I personally prefer making my dolls in velour or Doe Suede? because I dont like dealing with the wrinkles and tears that often result when using woven fabrics. If you prefer woven fabrics, that is fine, but as the hands you make get smaller and smaller, you will have to really take great care when clipping, turning and stuffing.
EXTRA-EXTRA! Tip of the century! If you wet your 100% woven cotton doll parts, with hot water, after you turn them right side out, the little wrinkles between the fingers will work out really well as you stuff. The woven fabric becomes more pliable and you can actually do wrinkle free needle sculpture on it too! The wet fabric shapes almost like firm knit!
The fat, hilarious lady that will be pictured later has a sculpted muslin head and the smoothe side of velour for her body. I have made various doll parts this way with good results. It is something for you to try. Be sure to have CLEAN hands, and take care while stuffing areas that fall on the bias. The bias areas can stuff out of shape quite easily. I am going to practice more with this technique. I think it has a lot of potential. And you are the first to know about it. The cotton muslin type fabrics are easier to paint on for most people too. (I have just never liked them because they dont shape smoothly, or sculpture nicely like the firm knits, and I HATE little wrinkly places on my dolls.)
Dont sew around doll parts twice, especially tiny hands! You will never be able to sew right on the previous sewing line, so the chance of points and squared off parts is doubled. Sewing twice also weakens the fabric! Whenever you sew any fabric, some fiber breakage occurs. If you have sewn around twice, you have twice the chance of fiber breakage.
Because good hands and fingers are so important to more advanced cloth dolls, I will re-illustrate the sew-sew-lift-turn method. Bigger this time, than in the previous class. You always stop with your needle in the down position, before you lift the presser foot a little. If your machine doesnt have an automatic down position, you will need to hand turn the wheel, to put the needle into the down position.
This has proven to be very hard to draw, but you
get the idea that you only sew a couple of stitches at a time, before turning
the fabric
When I teach the design classes in person, we all make hands about 3 long. They make very nice lapel pins, by decorating the wrist edge. That size is quite easy to sew and turn, for a start. This would be a good project if you feel fairly comfortable sewing fingers. They also sell really well at shows!
A life-sized hand can be a fantastic conversation piece. It can even be a chair for a doll!
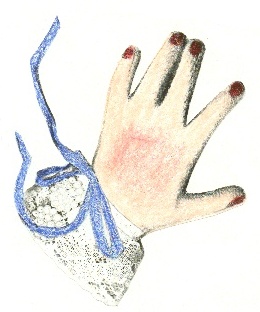
I have a life-sized hand that I use for a ring holder. The wrist edge has a cuff around it and it has real fake fingernails! This one lies on a shelf. You could mount one on a base, with the hand upright for another type of ring holder.
I have another life-sized hand with a little doll sitting in it. The little doll is reading a book. It is tacked to a base of three wooden books.
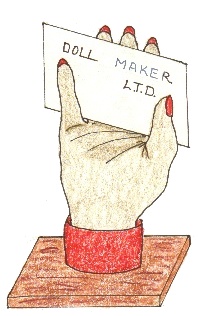
I had a 1/2 size hand, mounted on a base with the thumb bent around to the front to hold business cards. I had it with me on my last trip, showed it to a lady on the plane, and she wanted it so bad I sold it to her.
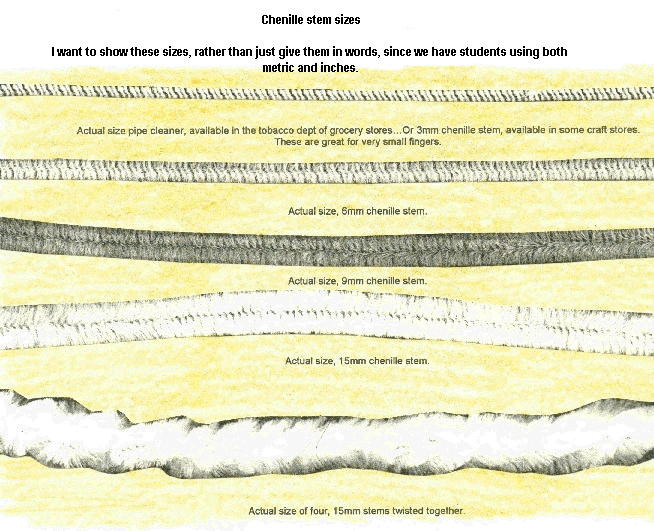
I use chenille stems in my dolls fingers, hands and arms a lot, and have done so since I designed Tara and Todd in 1982.
The beginner design class showed you how to use them. These same chenille stem techniques can be used in your dolls legs too. And skinny necks. Just think, with chenille stems in the neck, you can tip your dolls head up or down and it will stay.
They come in several sizes, from the kind for cleaning pipes, which work in very small fingers, to the big fluffy 15mm size. I use a lot of the big ones in fingers, hands and arms, because I like big dolls. If you cant find the big ones, the smaller ones work fine. You just have to twist several together. My chair hand has four, 15mm stems twisted together and then folded in half for each finger.
Note When you bundle the ends of the stems in the wrist area, on a large hand project, and then wrap them with thread, they will kind of pull the fingers together. (This is not so evident on small hands) You will need to carefully stuff and shape the hand, pulling the fingers into proper location as you stuff. Use very little stuffing on the back of the hand, and more in the palm area. Look at your own hand and see how there is extra padding at the base of the thumb. (Now, we dollmakers all have carpal tunnel syndrome, so we dont have much padding there) For the big hand projects, I like to put one small cotton ball in place for each of the big knuckles too. One large cotton ball makes a good wrist bone.
For the chair hand, or the other upright hands, you will need to bend them into shape. The stems in the wrist will hold the bend.
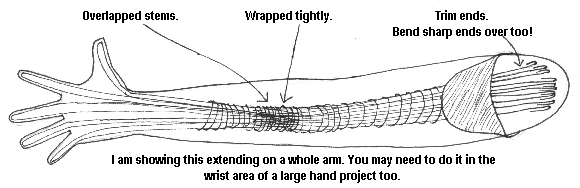
You may have to extend the chenille stems in the
wrist area. You do this by overlapping (by at least 2) the stems already
in the hand over another bundle of stems. Wrap thread tightly around the
over-lapped area. Cut the ends off so they dont extend beyond the wrist
edge. You can do this overlapping in arms and legs too, so that larger
dolls can have bendable elbows and knees. I personally find the chenille
stems more adaptable and more easily used than wire, for most doll articulation.
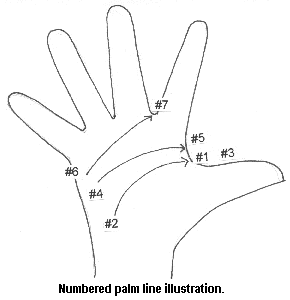
For the big hands, I also like to denote the 3
main palm lines with thread. Look at your own hand for the location of
the palm lines. Thread a 4-5 long doll sculpture needle, with 2 strands
of thread, each at least 1 1/2 yards long. Pull the thread 1/2 way and
tie all 4 ends together. You will be working with a quadruple thread. This
long thread will keep you from running out before you are through with
the palm lines.
Chenille stem sizes.
And also just for fun!
 A small lapel pin. |
 A business card holder. |
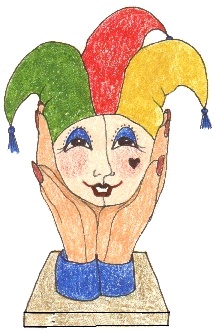 Hands holding a head. I think I saw something like this in a book somewhere. It was done in clay or porcelain. Mount them on a base. |
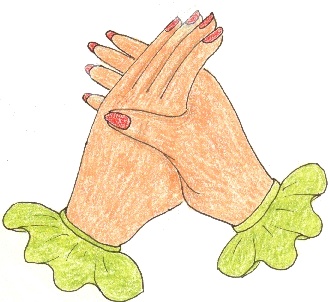 A pair of hands clasped together. Small for a lapel pin. Large for a table decoration. |
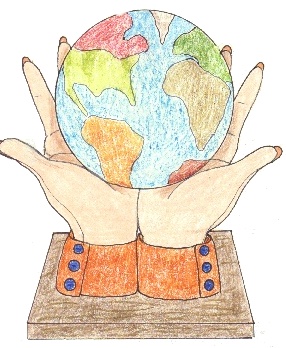 A pair of hands holding a small world globe. You can find small globes on key-chains. Or hand paint one on a blue play ball. Mounted on a base, or lying on a table. |
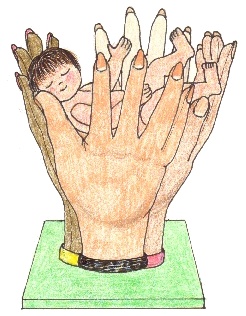 Four hands, brown, tan, cream and peachy, cradling an endangered species animal or a baby or child doll. These would look best mounted on a base. |
|
|
Im sure you will think of others too.
If finger sewing is new to you, I recommend starting with a larger size hand project. If stuffing is your downfall, make a smaller sized hand project.
Trim the wrist edges of your hand project/projects as desired. You can even use the real cuff from a shirt for the big projects.
In fact you may even get hooked on hands and
make lots of things for sale at shows! I know for sure that the hand pins
and the business card holders sell.
Judi Ward