
I sculpt with the polymer clays to make one of a kind art dolls, so I thought I'd try it as stuffing in the nose of a pointy nosed cloth doll. Great Results!!!!
If you plan to design pointy nosed dolls in this class, or if you already make pointy nose dolls, run, don't walk to your nearest craft or fabric store and buy a package of plain old Sculpey(r). The white stuff, not the flesh toned Super Sculpey(r). The Sculpey comes in quite a large box and costs about ten dollars. If you make quite a few dolls this would be your best buy.
If you only make a very few pointy nosed dolls,
buy a small package of white Fimo(r) ...or...white
Sculpey III(r)...or...white Promat(r). All of the
above are polymer clays that you bake in your home oven at a very low
temperature.
The reason you want white clay is because the nose filling needs to be the same color as your stuffing, or you will see where the clay ends and the stuffing begins. (...Note... If you are making ethnic dolls, using the new ethnic color stuffings, then match the clay you buy to your stuffing color.
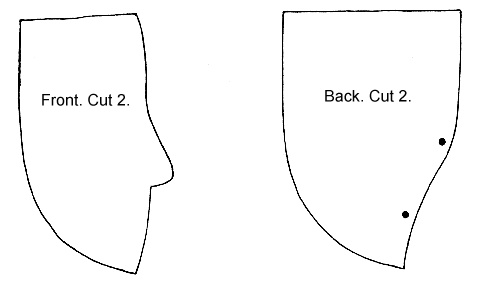
Make your dolls head as usual, up to the stuffing point. You can make it from muslin, broadcloth; any all cotton, or cotton poly fabric, felt, and even velour, or Doe Suede! I tested all of the mentioned fabrics with perfect results every time. Velour and Doe Suede are my favorite doll making fabrics, so I was surely hoping that they could take the oven baking, since they have a high polyester content. They took it fine.
After you sew up one or more of the practice heads, (patterns provided at the end of this chapter) turn your oven on to 225 degrees, not higher!!! Turning the oven higher won't hurry anything up. It will only burn your fabric and ruin your dolls head.
Now, knead a small (nose sized) piece of the clay, and push it into that pointy nose. The size will of course vary with each doll head. The practice heads use a piece smaller than a pea. Push the clay in hard to fill the pointy part fully. You can actually shape the nose thinner or wider, and give a hint of the nostril flare if you wish. ( Note You can even push thin needles into the clay in the nostril area of large doll heads, so you can needle sculpture the nostrils after it is baked, and the doll's head is fully stuffed. The clay is too thin in small doll heads to do this.) Just be sure that you push the clay completely into that aggravating point, and that you shape the clay in there so the nose matches on both sides. For small noses, I find that by pushing the back of the head fabric against the clay inside the nose, it is easier to get it fully into the point.
Don't stuff the head yet. Put a folded up towel in the oven, and then lay your doll head on it. Close the oven door and set a timer for 10-15 minutes. (Smaller noses 10 min. The practice head needs only 10 minutes) At the end of 10-15 minutes turn the oven off, open the door and let the head and oven cool. The reason it's best to let the head cool before you take it out of the oven is because the temptation to push on the newly baked nose is almost too much to resist when you first take it out of the oven. The clay is tender while it is still hot and can be broken easily. So just be patient and let it cool in the oven. It's real sturdy after it's cool. Stuff and finish the dolls head as you normally would, but you don't have to mess with trying to keep the stuffing in the nose and you don't have to worry about it ever backing into the head and leaving a wrinkled, baggy nose on an otherwise delightful doll.
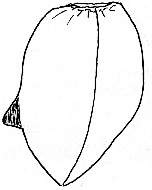
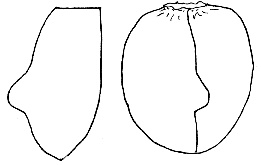
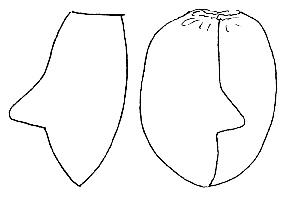
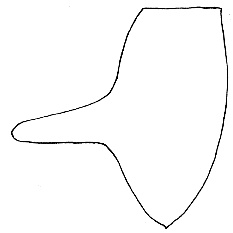
The practice head is designed from the tab head designs you did in the Beginning Design class, and is probably different than any profile head design that you have seen. It has an opening in the back of the head and another all across the top of the head. Stuff it fully and firmly, using large amounts of stuffing at a time. Shape as you stuff. When the head is full, run a gather stitch all around the open top. Pull the gathers up and anchor off your stitching, leaving a dime sized opening in the top of the head. Add more stuffing through the opening to fill out the head top more. You can really stuff this head design hard.
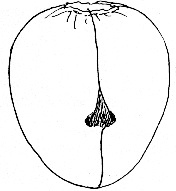
Now, using your stuffing tool and fingers, add more stuffing through the opening in the back of the head. Shape the chin and jaw area, and push more stuffing straight in, to push harder against the back of the clay nose. While you are doing this you will be opening up an area for a neck to fit up into.
Depending on the size of doll pattern you made
in the Beginning Design class, you may have a body design that will fit
one or both of these heads.
More clay nose miracles!!!
I decided to try some air drying clays for filling those pointy noses.
I tried dental plaster, play dough and Model Magic(r). Model Magic(r)
won hands down. It has been available at craft stores, and even at toy
stores because it is made by Crayola(r) for kids to play with. I was told
recently that it is being discontinued due to a storage problem. I have
a big bucket of it that seems to be just fine after a couple of years of
having it around, so I dont know what the problem is. If you can still
find some at your craft store, pick it up, and if it is in the small plastic
packet, store it in an airtight plastic container instead.
You can push it into, and shape the pointy nose,
even adding extra little balls at the sides for nostrils if you wish. Set
it aside for about 12 hours to dry and wallah! A perfectly filled
pointy nose. This stuff stays kind of spongy when it is dry, so you can
even needle sculpture through it!!!
If you can find the Model Magic(r) try both of the above clay methods. Some noses would be better with the harder oven baked clay and some would be better with Model Magic.
Experiment with the clays. They are the best fill for some nose types, but arent needed for other nose types.
Fatter, bigger noses can usually be made without
the clay. The clay is best for the truly pointy noses. You are the designer
here. It is your decision as to where to use clay. Or not to use it at
all. You have the options with your designs, and will find the best places
for clay in your future designs. This technique is just another trick to
add to your arsenal of problem solving methods.
The area that the clay takes up inside the nose for filling just the pointed part. |
The area the clay takes up inside the nose if you wish to add the nose flares for later needle sculpturing. This is best done for large fat noses. |
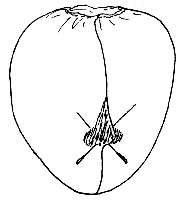
Optional needles pushed into and through the nostril area for later needlesculpture if you wish to define nostrils when using the baked clay. Best for larger, fatter noses. |
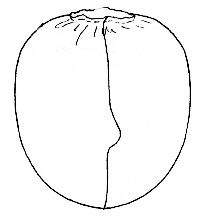
A finished head with a rounded jawline. |
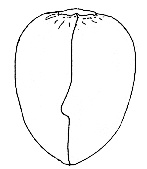
A finished head with the longer face and pointier chin. |
How about a re-design to make a bigger nose? This will sculpt O.K. Clay not needed. |
 How about a re-design to make a longer nose? Clay is a good idea in this nose end. |
How about a Pinocchio nose? Clay will keep it from flopping. Suitable for a small Pinocchio Clay may be too heavy for a large Pinocchio nose. |
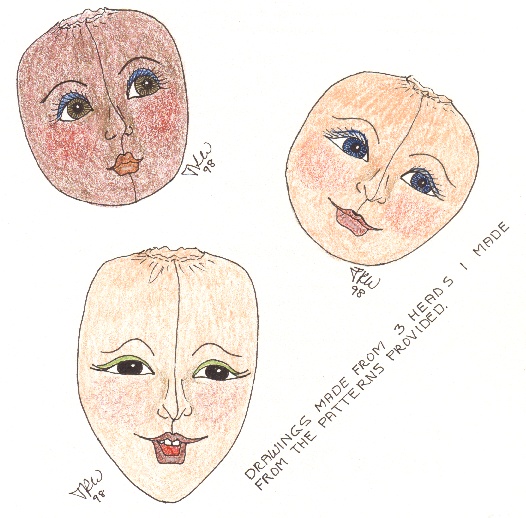
Examples made from the patterns provided.