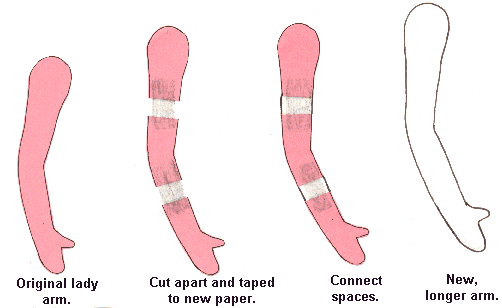
If you have designed a high heel lady doll pattern, you may already have lengthened the arms a little. As I mentioned in the Beginning Design class, the lady doll arms are sometimes too short on the vinyl dolls.
The lady dolls legs and arms, designed the way you have learned, are actually pretty perfect just the way they are. If you lengthen them you will achieve a taller and even thinner doll, but it will still be a lady doll. If you shorten them, you will achieve a slightly dumpy doll, which may be a type you want for a particular doll idea.
When we get to the body part of this class, you will learn ways to make the bodies 3 dimensional. At that time you may want some fatter legs and arms on your patterns to make completely different dolls.
The variations with just lengthening or shortening,
fattening or thinning are tremendous!
Adding a bend at the elbow or knee adds another dimension to your doll
and pattern. Designing tabbed knees and elbows adds still another look.
You will learn how to do all of these things simply and successfully, with
almost no art or design talent. Be prepared to find some things to draw
around.
I am using arm and leg patterns that I made by drawing around a kid type doll, and a lady doll, to demonstrate these techniques. These were reduced 50% for the class format. These are real patterns that I have made up into dolls, and they made up very well. The lady is the one in the black evening dress that was shown at the end of the beginner class. The little girl is up at Alumni Hall. If you want these patterns just take them to a copy machine and enlarge them 200%. That will bring them up to the original size. I know it sounds weird, but it works! I think it is new math! The bodies and heads will follow in later chapters.
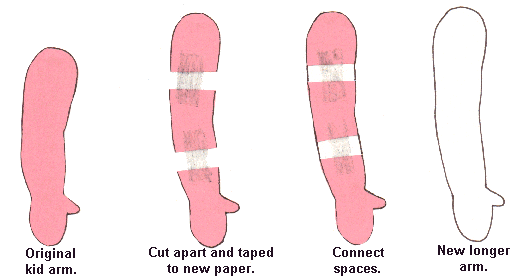
To lengthen an arm pattern, you simply cut it apart between the wrist and elbow, and elbow and shoulder.
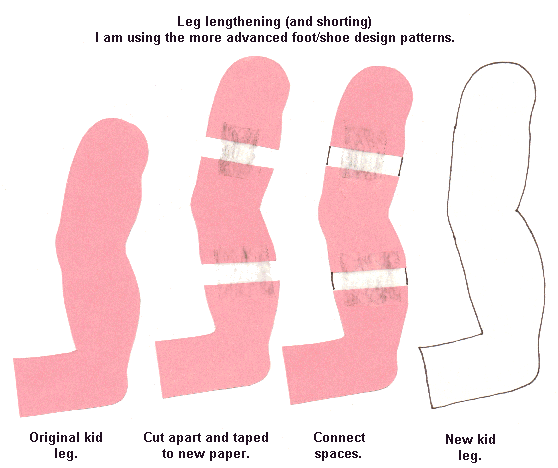
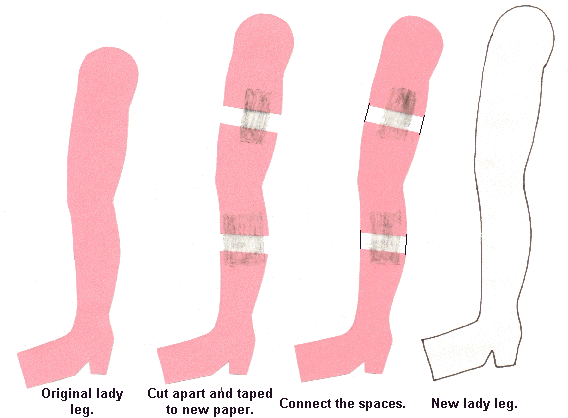
To lengthen a leg pattern, you simply cut it apart between the ankle and knee, and the knee and hip.
Separate the parts an equal amount on a new piece of paper, and then tape them to the new paper. (For instance, if you separate the arm parts by 1/4" do the same for the leg parts. This keeps the proportion, of the arms and legs in relation to each other. They will be longer in relation to the bodies now, giving your dolls the longer limbed look.)
Later you may want to experiment with fantasy proportions. There are not too many rules there. A strange and unusual fantasy doll can have a huge head and tiny body or vice versa. It can have hanging on the ground arms with terribly short legs, etc. But for now it may be best to stick with somewhat human proportions, with all their vast variances.
Before you start making these design changes to your doll pattern, you need a supply of copies of the pattern/patterns that you designed in the Beginning Design Your Own Doll class. You are going to be cutting them up, and you want to have your original one intact. Make 10 copies for now. Get 10 envelopes too, so you can file and label each design change. You are also going to want at least 10 free days!! So you can make up each design change. 10 copies and envelopes may not be enough if you really get on a roll, especially when we get to the bodies and heads.
Before we do any lengthening, have you put detailed hands on your doll patterns yet? If not, and you want to heres how.
You simply line up the thumb of the appropriate
size, detailed hand, with the thumb of the mitt hand, and then draw around
the new fingered hand, at the end of your dolls arm pattern. Doll hands
are usually slightly smaller in relation to the whole doll than people
hands. Here is where your observational skills are needed. If the hand
size you choose to apply to a certain arm turns out to look too big or
small when done, change it and make another arm. This design and change
process is simply part of being a designer. You must be open to trying
different things, and remaking things once in a while. With practice you
will start to feel the correct look.
The little Hispanic girl that is part of the metamorphosis coming in chapter 8 has hands that are actually too big for her. In my opinion, her head is actually too small. She is still a nice doll, and will go to charity, where a lot of the suitable for play, Design Your Own Doll class dolls go. Because I design and make a doll or two in each class I teach here in my studio, I end up with a lot of extra, very nice dolls. I just dont have room for them all. Since I am not making patterns for sale from the designs, I dont have a need for so many of them.
My Grand Daughters also love to have some in the summer to assemble, finish and dress.
If you start designing a lot, you will have surplus dolls and doll parts too. Dont think you have failed in the design arena when this happens. It is just part of the true design process. With the methods you are learning, you will have very few real failures though. Most everything you make will be quite useable, even if it isnt just what you had in mind.
Do use your own patterns for the following exercises. If you dont actually do the exercises you wont learn anything, and you wont have a variety of different limbs to work with later.
Now lets lengthen (and shorten) some arms and legs. I am just going to show the process in illustrations. It is very easy to do. The pink parts are the originals. Ive taped them to white paper so you can see the changes better.
The amount you add or subtract lengthwise, using your own patterns is up to you. You are the designer.
For the purpose of making these drawings easier
to do, I am doing them with mitt hands.
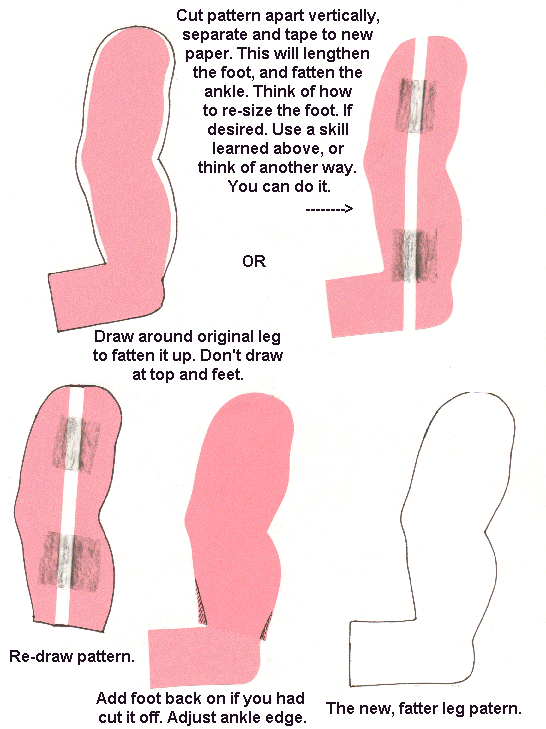
Use the same method as used for the arms to shorten the legs if desired.
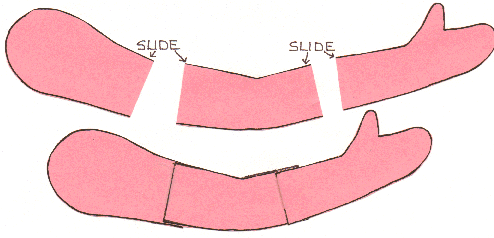
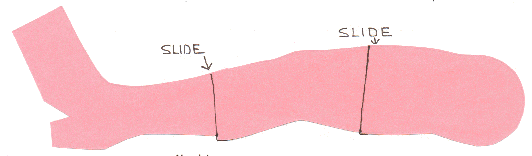
Slide the parts over each other and re-draw the
pattern. You may need to even out the parts where the pieces slide over
each other. (This shortened leg is not relative in size to any of the others.)
You will need a new set of legs and arms to cut apart.
I am going to demonstrate on the kid leg and arm. By doing this to a kid pattern, you can come up with a cute baby or toddler look. In chapter 8s metamorphoses, I did this to a kid pattern and came up with the fat funny lady! By doing this on an adult high heel leg, you will have a lovely, sitting lady doll who can cross her legs very nicely, without the need to articulate the knees in any way. The same methods work for kid or adult patterns.
Again, the pink parts are the originals.
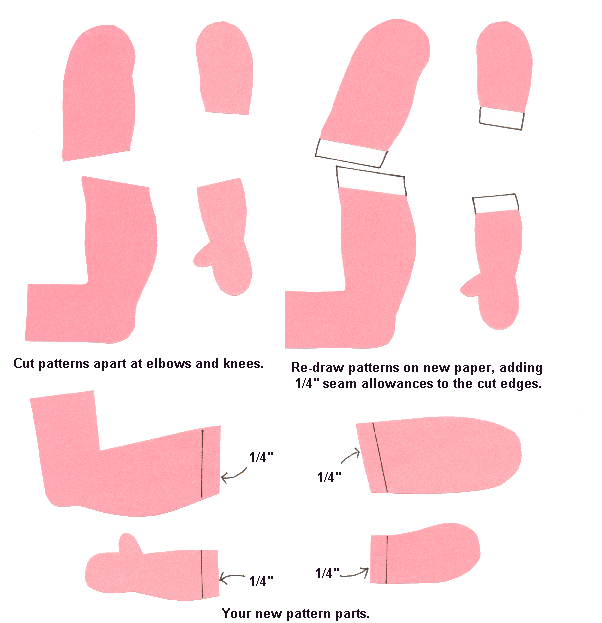
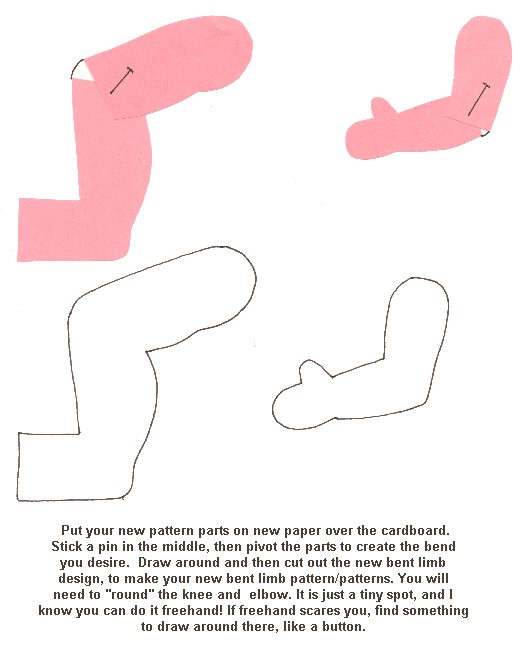
First, cut the arm and the leg patterns apart at the elbows and knees. Re-draw the separate parts, adding 1/4" at the cut edge of each piece. Cut the new parts out. Now, get a piece of cardboard that you can stick a pin into. It needs to be big enough for the arm or leg to fit on in any direction. (If you have a cardboard cutting mat that you dont mind sticking pins into, that works great.) Put a new piece of paper on the cardboard. Put the re-drawn parts on the paper with the ¼ seam allowance overlapping. Stick a pin right in the middle of the overlapped part. Now you can pivot the parts to create the bend. Make the limbs as bent as you wish. You can even bend the legs so much that they will be in a kneeling position. (A praying doll, with bent arms too?)
When you have the bend you desire, re-draw the part to create your new leg or arm pattern. You can make one leg or arm more bent than the other for variety. How about one leg bent and the other straight to make a skipping or hopping doll?
For practice, make bent legs and arms from all
of the patterns you designed. Either the originals, or the longer or shorter
versions. Or all of them. You are acquiring quite a variety of limbs now,
to add lots of variety to your doll making.
Now you also have the skills to cut, add seam allowances, and pivot at the ankle to make a ballerina foot. Try it.
Making thinner arms and legs can usually be achieved easily by simply sewing inside the lines you drew, when you drew around your patterns. It is pretty self-explanatory, and the patterns you designed in the Beginning Design Class usually dont need thinning.
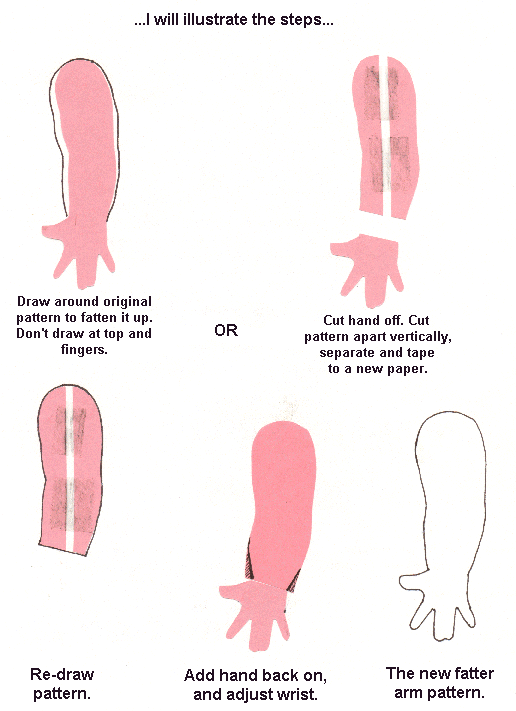
Now lets make a fatter arm. You can just draw around the sides of your original arm a little ways from the original outline. Taper your lines in at the wrists or cut your original pattern apart down the center vertically. Also cut the hands off. Separate the halves of the arms. Tape them to new paper and re-draw the new, fatter parts. Add the hand back on, adjusting at the wrists. The wrists will remain slim. If you look around, people usually dont get fat wrists. But, if you do decide that you want fatter wrists, you will also want to put a bigger hand on.
How much fattening you do is up to you. Remember, this is your design. You decide, and test. You are the designer, I am just guiding you. (Note. If you are going to fatten and bend a limb, fatten first, then bend.)
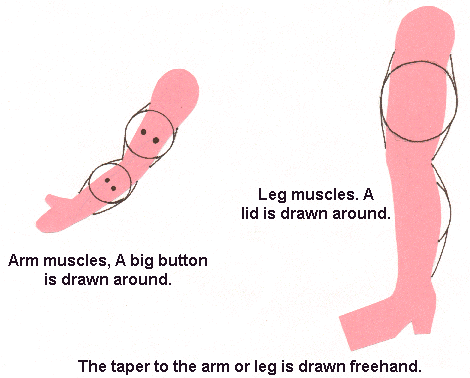
Lets add some arm muscles, to make a weight-lifter
doll. You can, of course add leg muscles too. By stuffing the muscles
with cotton balls, they will really hold their definition. Add cotton balls
to the sides of the thighs to define the muscles there. Cotton balls also
make great kneecaps.
If you dont feel confident drawing the muscles
freehand, find something to draw around. You will need to freehand the
taper from the muscle to the arm or leg. For most applications you dont
want the muscle too big. If it is the equivalent of a half circle it
will look like a growth, instead of a muscle! Here again, it is a
case of draw, test and decide what you want for your design.
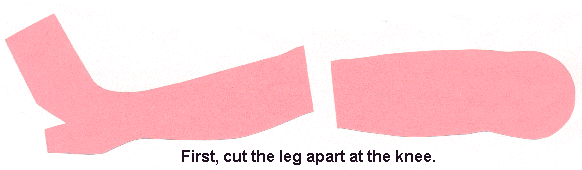
You can put the tabs on either the lower or the upper limb. It is your choice. The method is the same for either.
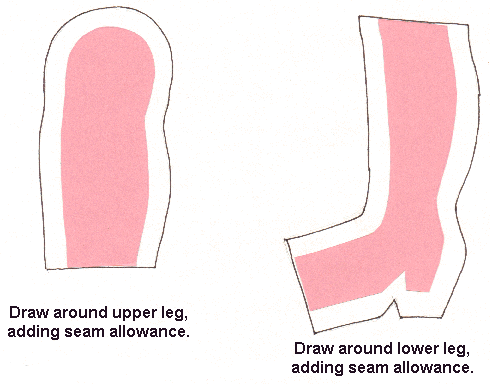
I am going to put the tabs on the upper leg. Place both leg parts on new paper. Add a 1/4" seam allowance all the way around, except at the cut edge.
After you draw around the parts as they are, the upper leg part is going
to get the tab. (You only have to make one tab, because your fabric will
of course be doubled, so you will end up with two.) The lower leg part
is going to get a knob. The original pattern is pink.
Now, you need to find something round to
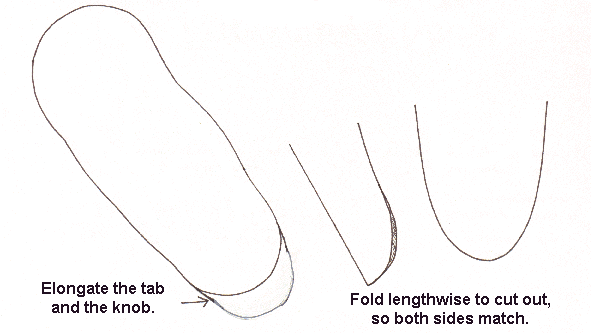
draw around to make the tab and the knob. You start with something round,
and then elongate it freehand. You may even want to make the knob come
to more of a point, for a more delicate knee. I found that a quarter was
just the right size for the tab and the knob.
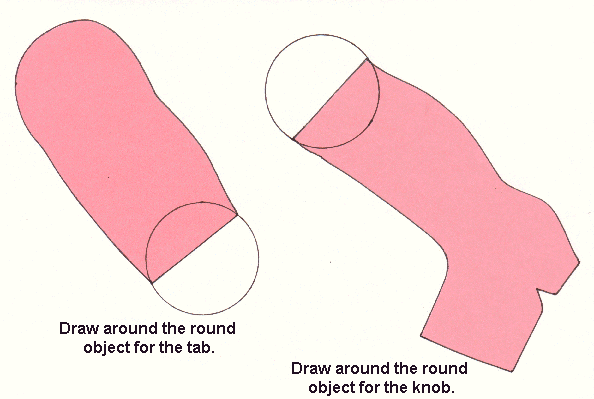
They are going to look like they are the same thing,
but you will sew them differently, and design the inset for the tabs after
you sew the upper leg.
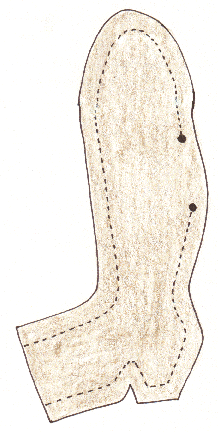
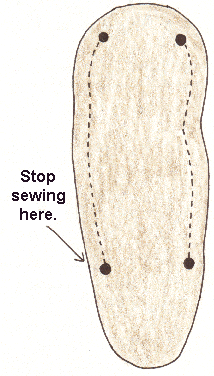
Sew the upper leg to where the tab was added, both
at the back and at the front. Leave the upper leg open either at the top
or at the back, to turn and stuff.
|
|
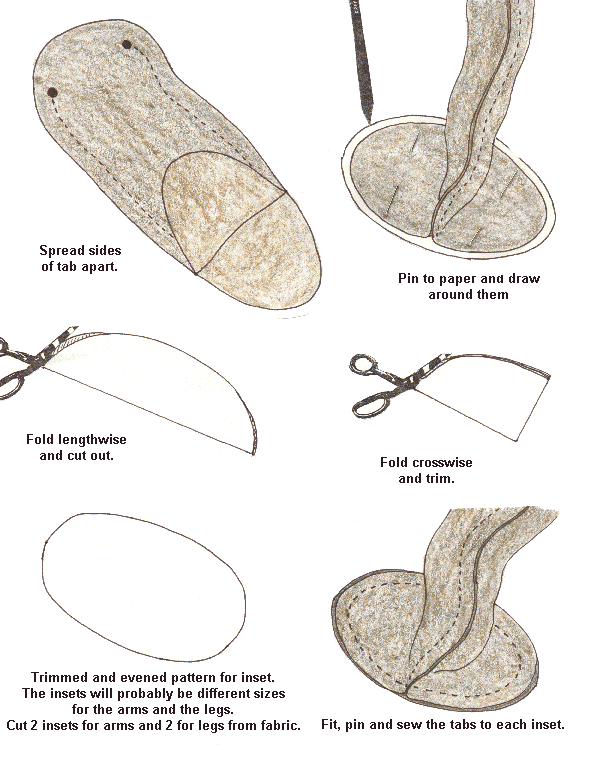
To design the inset for the tab, spread the two sides of the tab apart as illustrated below. Pin them to new paper, and then draw around them, making an oval shape. Add 1/8 all around the oval. The oval you make wont be perfect, so to cut it out, fold it in half lengthwise and then cut it out to even it up. If you wish, you can fold it again crosswise and trim it more, so it is a perfectly matched oval shape. The reason you added the 1/8 is to give you some leeway for the trimming. You dont want to cut all of the 1/8 off though. The tabs always seem to grow as you sew them to the inset, so the little extra is good.
Turn the parts right side out and stuff normally.
(Note
I like to put a plastic oval, ¼ smaller than the inset, cut
from a milk bottle, in the tabbed area before stuffing. Most of my dolls
are big, and the tabbed joint needs the extra strength the plastic provides.)
For smaller dolls, under 16 or so this isnt needed.
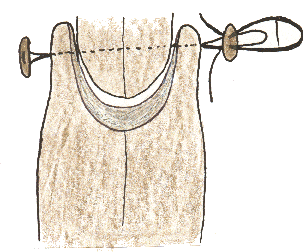
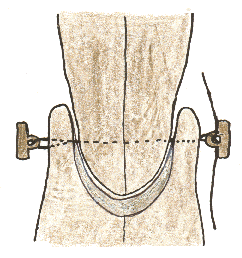
The tabbed joint will be connected with buttons and strong cord as illustrated below.
Notice that the tying is done under the button
if you use a button with holes. The cord is put back through the holes
to achieve this. If you use a shank button the cords are already under
the button.
|
|
If you have done the exercises and changed your
patterns, your head is swimming with design possibilities! Your envelopes
should be filling with variations for all kinds of dolls. Just wait until
we get to heads and bodies! You will need a year of free time just to try
all of the styles!
There is lots to do with this chapter, so the next chapter wont go on-line for a week to give you time to make some new patterns and some new legs and arms. Dont worry, they will fit the heads and bodies you will soon design, because we will still be using your original, Design Your Own Doll class patterns to design from.
Have fun designing an abundance of arms and legs. Get comfortable with cutting things apart and re-creating.