I dont want to teach you any one elses look, or mine. That cant really be done anyway.
As you design more and more, a look will start to emerge that will be yours. When you make other peoples patterns, you probably have a look coming into place already. Do you notice that it is nearly impossible to make your dolls look just like the pattern picture? Do you even want them to?
Most dollmakers who want to do their own thing have already got a look going. It just needs the freedom to start from scratch with a design all their own, to really emerge. Even if you will be using crutches at first for your designing, the dolls are still your own.
I am blessed with the ability to see with seams, and the ability to just draw what I want. I didnt realize, for many years, that most people dont have that ability. When I started teaching dollmaking back in the 70s, at my little craft and doll shop in Idaho, was when I realized that most people need concrete help in that area. I started looking for ways that the non-artist, non-designer, could achieve the technical part of drawing and design, to free them up for the creative part.
Over the years, I have developed dozens of these crutches for students. Many times, after using the crutch a few times, the shape, form and size, part of design just emerges like magic, and the crutches arent needed any more. If that never happens to you, that is fine too. After taking and applying the techniques taught in these classes you still have the technical skills in place to create and expand your doll designing. Every doll you make can be a one of a kind if you so desire.
The main head design I will teach you, takes off
from the basic, 2 piece tab head that you designed in the beginning design
class. This design is really versatile! It is also easy to draw with the
help of some magazine pictures and a copy machine, with reduce and enlarge
capabilities.
If you can draw a profile of a face freehand, draw one in any size you wish. You only need it from the top of the forehead to the tip of the chin for the design method I am going to teach.
If you cant draw a profile freehand dont despair, the solution follows!
 Go
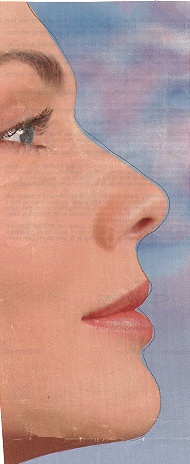
get some of your ladies magazines, or magazines like Life. Start looking
through them for pictures of face profiles. I found several just this morning
in one magazine. It makes no difference what size they are. The Claritin
allergy medicine ad has a great profile (Pictured to the left) . That ad
is in lots of magazines, if you want to get it yourself and use it. There
is an Oil of Olay ad that is nearly a full profile that will work, and
I found some cartoony drawings advertising coffee, that would make great
exaggerated profile faces. Even the old silhouette in a picture frame
on the wall will work. Remember making those as a kid? You will learn how
to adjust and change the profile here anyway, so please dont feel that
you have to have a certain one. To really get the most out of this design
class, you will need to EXPAND your thinking way beyond the it
has to be just like mindset. With that said, as an encouragement to use
other profiles, I am going to print the full sized Claritin profile here,
and show you how to use it or any other profile, for face design.
Go
get some of your ladies magazines, or magazines like Life. Start looking
through them for pictures of face profiles. I found several just this morning
in one magazine. It makes no difference what size they are. The Claritin
allergy medicine ad has a great profile (Pictured to the left) . That ad
is in lots of magazines, if you want to get it yourself and use it. There
is an Oil of Olay ad that is nearly a full profile that will work, and
I found some cartoony drawings advertising coffee, that would make great
exaggerated profile faces. Even the old silhouette in a picture frame
on the wall will work. Remember making those as a kid? You will learn how
to adjust and change the profile here anyway, so please dont feel that
you have to have a certain one. To really get the most out of this design
class, you will need to EXPAND your thinking way beyond the it
has to be just like mindset. With that said, as an encouragement to use
other profiles, I am going to print the full sized Claritin profile here,
and show you how to use it or any other profile, for face design.
You need to print your chosen profile, on a copy machine. Note: If you
are going to experiment with this profile, just print it on your printer,
and then proceed to the next step. Pencil the back of the paper the profile
is on, and then put the print down on a new piece of paper.
Draw the profile from the tip of the chin, to the top of the forehead.
Just skim over the mouth area, and the dent below the bottom lip.
The pencil on the back will act as a carbon, and your profile will
be on the new paper below. Darken the line on the new paper with a pen
or pencil.
The below drawings are not full sized. If you are using the Claritin
profile, it will be the same size as the original at the left. If you have
chosen your own profile to use for this step, It will still be the
actual size of the chosen profile.
 Draw on profile after penciling the back of the copy, to put the profile on the new paper underneath. |
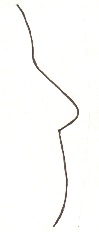 The new profile is now a simplified line drawing. |
First, get out the tab head pattern piece that you designed in the Beginning, Design Your Own Doll class. This method works for any tab head pattern. Big or small, rounded chin or pointed chin, cute shaped jawline or squared jawline. It makes no difference. The technique works for all! It gives you the ability to completely change your dolls head shape, by just changing the shape of the tab head pattern you start with. You learned how to change the tab head shape in the previous class.
Fold your tab head pattern in half lengthwise.
Then fold it into thirds as illustrated below. Unfold just the 1/3rd folds
and mark the fold lines with a pencil. (For this first profile face,
the bottom of the nose will line up with the bottom third fold. Later you
can experiment with placing the bottom of the nose at the halfway point
etc.) Remember that experimenting is a big part of designing. It is also
one of the most fun parts for me.
When your enlargement or reduction fits the length of your folded tab head pattern to within about 1/4" to 1/2" of the top and/or bottom, you have the right size profile to start with.
Now, take your tab head pattern, and line up the bottom 1/3rd line, with the bottom of the nose on your profile drawing. The top and bottom of the profile needs to be placed 1/4" from the fold of your tab head. Dont get confused, this has been diagrammed (Diagram Below), to clarify. Remember that I had to extend the forehead line. It is just a straight line, and very simple. You may not have to extend any lines, depending on the profile you have chosen to use. (Note.. The Claritin profile wouldnt have had to be extended if the forehead was complete in the original picture.)
You can sew this new, two piece, profile front
to a back made from the original tab head pattern if you wish. The new
doll head will have a profile front, and a flat back. It will be stuffed,
and gathered at the top like a flat tab head, and you can use the clay
method in the nose or wait for easy sculpting in the next lesson. Remember
the nose styles will determine the way you finish the nose. My Claritin
nose was best done in clay, or left completely unstuffed and turned to
the side for yet a different look. For me, it takes a bigger nose
shape to take well to sculpting.
You can also design a two piece head back similar
to the way you designed the new front. With lots of experimenting, I have
found that I like the head back to be wider at the top than the front is.
This gives the head a rounder back, and real doll wigs will fit on very
well. The rounder head back also looks more real in shape, and any hairstyle
looks better on this rounder head shape.
To design the new head back, put your flat tab
head pattern down on a new piece of paper. Start at the chin, and draw
a line curving away from the fold, and ending at the level of the head
top. Again, dont get confused, This will be diagrammed for you. If you
dont feel confident drawing this head back line freehand, you can easily
use a round object, to draw both the lower 1/2 and the upper 1/2. This
line doesnt have to be just so It is simply a lazy s curve.
If you use a round object to draw around for the
head back, you may want to freehand a tiny spot at the top. This is not
even necessary. I just like the top line to go straight up, rather than
curved in. A little free handing is also needed where the two circles converge.
Again, this is not a just so place on your pattern like fingers are.
Just finish out the lazy S curve if the circles dont converge smoothly.
See Figures Below:
Cut the new, two piece head back from doubled fabric.
Sew the back seam, leaving an opening at the lower back for the neck of
the body to fit up into. This opening needs to be about 1 long for most
dolls less than 15 tall. You will have to decide how big to leave the
opening. If it is too big, thats no problem, you just close it up more
as you sew the head to the body. Again, this is another place where its
O.K. if its not just so.
This head will be stuffed and closed just the same as the others. Refer back to the practice heads in chapter 2 for more directions on stuffing this style head. It is the same style head, but you can now design it yourself from ANY tab head. The legs, arms and later the bodies will all fit together, with the re-designs, as long as you use all of the patterns that you originally designed for the same doll.
The nice thing about this head design is that the
jawline can be changed. You can make so many varieties of face shapes,
by simply changing the tab head shape. Be sure to cut out the new tab head
shapes on the fold, so that both sides of the head match.
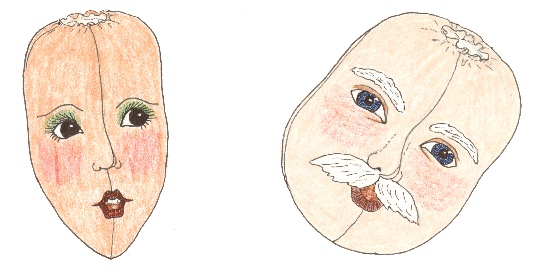
At the end of this lesson, there will be a page with three nose ideas on it, and the results of making heads with these nose designs. The results would be entirely different, if used with different tab head patterns. Remember, the idea is to design your own, and a good practice exercise would be to design head backs from the fronts I have provided.
Make up some heads with different noses for practice. You can always use the spare heads for dolls later. OR For Christmas decorations, by putting faces and hair on them. Add ruffles and hats or hair decorations, beads and flowers etc. Fasten a loop for hanging at the top and you have an original ornament. If you make the heads with flat backs, they can be turned into lapel pins. Decorate lavishly and wear proudly. (Note. The flat back will be slightly larger around the sides than the new profile front, because you made a seam in the front. I have found though, that if you add a seam allowance to the new front and back, the heads get too big for your original bodies. Simply pin the new front, to the flat back, allowing the back to stick out some all around.)
Now dont cheat, and just use patterns that I have drawn in this lesson. Design the heads yourself from the tab heads you designed in the beginner class. All the head practice is fun! Label and file the ones you like. I havent made a head using this method that I didnt like. Some were pretty, some silly, some downright homely, but they are all great heads!
Some of the heads need ears, and the ears are designed and made the same way you did in the Beginner class. For these heads, they need to be hand sewn on, just behind the side seam. If you put them in the seam, they are usually too close to the face. I have made some heads that would have been fine with the ears in the seam though. These heads were the ones with wider faces.
Remember where you find ear shapes to draw around, if you cant draw them freehand. Remember sizing on the copy machine.
I, personally love ears on my dolls; it just makes them more finished.
But lots of heads dont need ears, because the hair covers the ear area
anyway. You are the designer. Decide who needs ears and who doesnt. Decide
who gets big ears, small ears, elf ears etc. It is your decision entirely.
|
|
Now for a disclaimer. I have taught you a head
design method that I am almost positive is not stepping on any other designers
toes. I havent seen it in any magazine patterns. I have used the style
for many years, for one of a kinds and gifts, as I stated earlier. If this
is someones signature style, I am unaware of it. If I wish to use it in
any way, for dolls or patterns I still will. You may also use it, without
fear of stepping on my toes. Each head can be so different when designed
this way, that each one will be an original, derived from your own tab
head design.
I am going to show you some other profile head
designs, and very briefly outline the design. I have seen these types of
heads in other designers dolls, so I cant get real technical about their
design. Some cant be taught in a diagrammed way anyway. I couldnt teach
you how I do a child doll head, or how I change it to a profile, lady doll
head. I just draw it and do it.
If you wish to work out the techniques for these other styles, using crutches, or freehand, you may certainly do so. As long as you start from scratch, and dont simply enlarge or reduce anothers pattern, the design will be your own.
It will take on your look, in the face finishing etc. but will retain the design markers of the basic style.
One style I have seen, is the two piece profile. It is like a complete silhouette, sewn together like a side view pillow. This style almost always has a pointy, un-sculpted nose and a pointy chin. The head is usually attached to a neck.
It could be made without a neck though, and the body style with the neck attached could be used with this head.
You could use one of your profile face fronts, for the front of this style. Round it out under the chin area, and add a rounded head back. The diagram below will show you how it would look over your head front design. But again, you will need to do this free hand or decide upon crutches on your own. You would need to leave an opening in the lower back of the head, for a neck to fit up into.
Another style I have seen is 4 pieces, like the heads you have designed, but they come to a point at the top, rather than being open. I will diagram below this style over a head front and a head back designed the way you learned in this class.
Another head design, that makes very good Primitive faces, but can be for other faces too, is the very slightly protruding, top stitched and then stuffed nose. For this nose you just use your original tab head pattern.
You will need to draw a seam allowance around it first. Cut two from your chosen doll fabric. If it is woven fabric cut these on the bias. If it is a firm knit just cut them normally. Cut 1 from a tightly woven fabric, like poly-cotton broadcloth, in white. (Or a color to match your stuffing, if you are using ethnic stuffing)
Very lightly draw a simple nose shape on one of the headpieces, with colored pencil. Look at magazine pictures for front view nose shapes. You will put the firm woven fabric piece under one doll face fabric piece, and then sew on the line you drew for a nose. Sew the head parts together at the sides. Use your stuffing fork to put stuffing down into the nose area, between the face fabric and the firm woven fabric.
You can actually get quite a good nose this way, but it wont be big nose. If your doll fabric is a woven cotton fabric, try the wetting technique. You will get more nose with the fabric wet. Finish the head as you would any tab head.
The red haired doll, dressed in the slinky black
dress, from the Beginning Design class, has this type of nose. Its hard
to see in the photo, but added dimension to her very quickly.

There are of course MANY more head designs, but
they are mostly variations on these basics. Its the myriad of variations
that make the dolls look different. One basic style can be made into
so many different dolls that it boggles the mind!
I do hope you will work on these design ideas.
Do design some more tab heads to design profile heads from. Do make some
up, and play with variations on nose design. You cant design and work
on it too much. The more you do the easier it will get. And MORE FUN!
You will soon have characters all over the place.
3 Examples
Judi