 |
With the skills you are learning, you will be able to put the ideas to paper, and then to fabric with more and more ease. The more dolls you make this way, the easier it will get. You will be able to just make a head design from a picture, without even using a draw around doll, and match it to a body design. You will be able to mix and match parts within a size range, for a nearly unlimited supply of doll patterns.
Some of you will like one doll that you have designed, and will make that one over and over, changing the clothes, hair and face to make new dolls. Some of you wont be able to get enough of the designing, re-designing, changing, and experimenting. I am in the latter category. My studio is full of pieces and parts, and the heads literally roll!
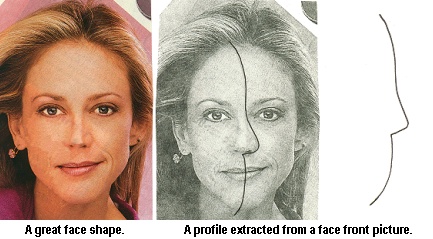
Below is a magazine picture with a great face shape,
and one with a profile outlined so you can see how to extract a profile
from a forward facing face.
|
|
Another nose stuffing tip: Put a little ball of
stuffing at each side of the nose while you are stuffing. This can then
be pulled into place with a needle for sculpturing the nostril flares.
You pull stuffing into place with a needle, by poking the needle point
deeply into the area that you want more stuffing in. Slant the needle sideways
a little and pull up. The stuffing under the needle will come up some,
into the area you want it. You can do this to accentuate eyelids, mouths,
cheekbones etc.
Now lets get started with some easy needle sculpture.
As I stated previously, this will not be Lisa Lichtenfels type of needle
sculpture. Lisas methods are very advanced, and use nylon stocking along
with a myriad of other things. (She does have books available, on her methods.
Amazon books and the Doll Net bookstore on-line, probably has her books)
This will be easy, basic and useable for a variety of dolls.
First lets sculpt a nose. I like my dolls to have the fatter nose designs for sculptured noses. The very pointy nose designs always look pinched when I sculpt them. Some dolls need that pinched look though. Remember these are your designs. Sculpt any nose you wish to sculpt.
Start with a very firmly stuffed and shaped head, with a stuffed nose. (The clay noses, with the needles in them, sculpt the same way, but your thread has to pass through the holes you made for nostrils.)
Thread a long thin needle with 2, 36 long strands of ordinary sewing thread, or 1 strand of quilting thread, to match your dolls skin. (A thread note: Many of the bargain threads, and even our old standby, brand name threads, break very easily nowadays. Use Metrosene if possible. Gutterman is a second choice) Pull the thread 1/2 way through, and knot the end. You will be sewing with 4 strands of ordinary thread or 2 strands of quilting thread. (Another thread note: Quilting thread will sometimes cut your fabric, if your stitches are too close together. Stitches placed one weave or knit apart, are a little too close, when using quilting thread.)
Look at the face you wish to sculpt the nose on
and visualize a line down each side of the nose. I cant give you the dimensions
for these lines, because we are all making different size heads and noses.
VERY LIGHTLY draw the lines with colored pencil a little lighter
or darker than your dolls skin.
 |
Next, using the point of a needle, pull stuffing up into the nostril area from within the face. If you stuffed a little extra ball of stuffing at each side of the nose, you can pull that up. If you didnt put the little balls of stuffing in place, there is usually plenty of stuffing to pull up anyway, its just a little harder to get it up.
Just for an example, I will draw some nose flares
on the same faces as above. You may want to draw bigger or smaller nose
flares on your face/faces.
 |
 . .
|
For some noses, You may not want the bridge of
the nose to be started up in the eye area. You may want it to start
very near to the nostril flares. It depends on the look you desire
to achieve.
If you wish, you can retrace the stitches you already made, but
place the new stitches in between the previous ones.
I, personally, dont find this necessary, the first
lines of stitches hold the sides in just fine, and adding more weakens
the fabric. Remember when I mentioned wetting 100% woven cotton to
facilitate
shaping the fabric better? This works really well for sculpting
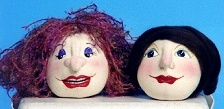
noses on woven fabric dolls. The 2 heads In the photo below are both made
from 100% cotton muslin. The one with the wild hair, has a wet, then sculpted
nose. The other was done dry. The wet and sculpted nose is bigger and has
more character. Of course you dont want to do this if you are making a
dainty lady doll!
A note about profile heads, with or without sculpted
noses. This type of head design doesnt make good child or baby dolls.
It is best for fantasy and adult dolls. A childish look can be achieved
by making the shaped head back, and flat front. Add the little gathered
ball nose, and you retain
the childish look.
 |
Next, the nostril flares need to be sculpted. I do it a fewer stitches way. See Drawing Below.
First, enter where you ended your last nose bridge stitch (#A for this drawing) and exit out in the nostril area. #B.
Enter back in at #A, leaving a loop of thread that will follow the nostril flare shape. Exit back at #B. Dont pull the loop tight yet.
Now re-enter at #B, and exit at the side of the nostril flare, with the loop on the outside of exit thread.
Dig some more stuffing up into the nostril area,
and pull on your thread, so the loop starts to pull the nostril side in.
Re-enter right next to where your thread exited, catching the loop in the
stitch. Dig under the stuffing, and exit on the other side of the nose,
at the top of the other nose flare.
Carefully pull the thread tighter, pulling on
the loop thread if needed too. The sides of the nostril flare will pull
in, and the little stitch you took will hold the loop out to the side of
the nostril flare. At this point the nostril flare will come to kind of
a point where the stitch holds it out to the side. Dig up more stuffing
to fill out and round the nostril flare.
Now stitch a couple of times from the top of the other nostril flare, #C, to the nostril, on the side you just sculpted. This secures all of the previous stitching.
Repeat the above for the other nostril flare. And then exit out at the back of the head and stitch in place.
I have illustrated the above procedure fairly large so it is more easily understood. Bear in mind, this is not the only way to sculpt a profile nose. It is just the way I do it, and it turns out very well for me. I can sculpt a nose this way in less than 5 minutes. The drawn lines keep you directed, so you dont get one big nostril flare and one little one. By digging into the face, and pulling stuffing into the nostril flare area with your needle, you have control over how fat you want the nostril flare to be.
Once in a while, I will make a couple of extra stitches over the loop, spaced at about 2 oclock and 5 oclock, for the left side, and about 8 oclock and 11 oclock, for the right side, to hold the loop out better. This is sometimes needed for big noses.
After the nose is done, VERY LIGHTLY draw eyes and mouth on your dolls face with colored pencils. Do this freehand, or use a technique learned in the Beginning Design Class. (read through all instructions for another mouth version)
Now you may decide to do some other needle sculpturing on your dolls face. I will explain and diagram some other sculpture stitches, and places where you may wish to do some sculpture. First I need to tell you about a method I use to eliminate the problem of trying to get your needle to exit at a certain spot in the face. It always wants to exit anyplace but where I want it to! My sculpturing needles are usually bent! They start out straight, but dont stay that way for long. This works for the single stitch methods that I use, not for noses sculpturing like you just learned.
I find it easier to control where the stitches are put, by always entering on the face side. If I enter at the back of the head, to sculpture a mouth for instance, the needle keeps coming out in the wrong place. If you have done any needle sculpture you will relate.
What I do is enter at the corner of the mouth and come out somewhere at the back of the head. Then I cut the needle loose and thread the other ends of the threads through the needle, and enter at the other mouth corner, exiting somewhere in the back of the head again. Where you exit in the back of the head isnt so crucial, so if your exit spot isnt exactly next to the other exit spot it makes no difference. You then just tie the thread ends while gently helping the sculptured spot pull in, by pushing on it with your fingers. The drawback to this method is that you have to thread your needle twice. For me, that is a small price to pay to eliminate poking a dozen holes in my dolls face, trying to get the needle to exit where I want it to exit.
I use a single stitch method for most face sculpturing. One stitch pulls in one part. It may be a mouth or a dimple, or to pull in the eyes. All of the stitches tie in the back of the head.
I also use either 2 or 4 strands of thread, just like for the nose. I personally dont like using one strand, and stitching back and forth several times. Invariably, when the second stitch is pulled, it pulls a little tighter than the first one, and leaves a little loop in the first thread. This is just my experience. If you do single strand, multi stitch, sculpturing with success, please continue! There is not just one right way to do this. Different designers use, and teach, different methods. You are the designer now, so you choose the methods you prefer.
For most features, that are low on the face, for example mouths or cheek dimples, the ties should be high in the back of the head. For features high on the face, for example eye corners, the ties should be low in the head back. The exception to this is eyelids. The sculpture thread needs to be tied high on the back of the head for eyelid sculpture.
Use this same method to make dimples and jowls and eyelids. These would all need to tie at the top of the head. The drawings (Below) show the method using 2 needles, so I dont have to draw the pictures twice.
Use the same method to pull in eye corners, wrinkles across the bridge of the nose, or all the way across the lower part of the eye. These sculpture stitches will tie low on the back of the head. The drawings (Below) show the method using 2 needles, so I dont have to draw the picture twice.
Note: It is actually best to have your head attached to the body, before doing this low on the head tying, because the tying will distort the opening for the neck to fit up into. If you have made a head that you really want to put on a body, it would be best to wait for the body lesson before doing the sculpturing that ties low on the head. If you are just practicing with various heads, go ahead and do it now. Or, make up a few more heads to practice on.
If you have pulled the mouth in, or made an eyelid sculpt, you may need to hold the sculpture thread down with your fingernail, and then with the point of your needle, pull some stuffing into place above the thread, to make the mouth more smiley and/or to make the eyelid puffier. After you have done a few heads like this, and have decided beforehand what look you desire, you can add in extra stuffing in just the right places for pulling it down later.(Examples Below)
If you have sculpted all the way across the lower
eye, you may want to pull stuffing up under the sculpture thread to define
cheekbones. If you have defined jowls with sculpture, you may want
to pull stuffing from the cheek area towards the sculpture thread, so the
jowls puff over the thread a little.(Examples Below)
All of the sculpture stitches above are simple to do, and with 1 or more of them used on a face, you can create lots of characters from just one head pattern. Experiment with placement, and thread tension to achieve different looks.
It is usually best to paint your dolls features after sculpting. The one exception that I find, is in the painting of the eyes that have just the corners pulled in. It is very hard to get paint down into the corners after they have been pulled in. Trying to work the paint into the corners often results in thick corners rather than nicely tapered corners.
Sometimes it is best to draw the mouth on after sculpting. After you pull the mouth in with the sculpting thread you may decide not to draw or paint lips on at all! Just a bit of blush, or colored pencil, under the sculpting thread may be just the look your doll calls for.
Now let me share with you the sculpture method for eye shapes that I mentioned before. The basic method is the same as the single stitch method, with all stitches entering from the front, and tying in the back.
What you do is draw an eye shape, and then outline it with several pulled in stitches done with black or brown thread. The whole eye shape is defined this way, and you can make quite an array of different shapes. The middle of the eye will actually bulge up a little, and look like a rounded eyeball. The eye shape will be kind of angular. It makes great eyes for fantasy dolls, but I have used it on ladies and babies too.
Let me diagram (See Below) some eye shapes done this way. I will just number each stitch that is tied at the back of the head. Different eyes take different numbers of stitches. After the eye shapes are defined and pulled in, you paint the whites very carefully, so as not to get paint on the thread that is outlining the eyes. Finish painting the iriss, lashes etc., as you desire.
These eyes are fun to do, but if threading a needle
isnt your idea of time well spent, this type of eye may not be for you.
They are fun though!
 |
I do this sculpture with either 2 or 4 strands of thread, just like the other sculpture. If you wish to use a single strand, that is of course your decision, since these are your designs.
Some of the dimple or crease sculpture will be
achieved by making the stitch, tying, and then losing the ends.
 |
 |
Next you will learn how to change the body
you designed in the Beginning Design class, from a 2-piece body to a 4-piece
body, and even make a belly button and bottom.