Diagram of the above steps.
One will be an add-on. You only need the body pattern for relative size purposes. You can use these boobs on a body with or without a center seam.
One will be a deeply darted design, and for that you will need at least 3 copies of your body front pattern with the seam allowances added all around. This gives you extras in case you make a mistake or wish to practice making different sized darts.
One will be my favorite boob style, that can be designed from a body front on the fold or from one with seam allowances all the way around.
You will need 3 copies of the front with the seam allowances added at the sides but not on the center front fold. You will also need 3 copies of the pattern with the seam allowances added all around. The 3 copies are for the same reasons as the 3 copies above.
If you dont use the 3 copies you didnt do anything wrong or miss anything. Its just easier to have them ready.
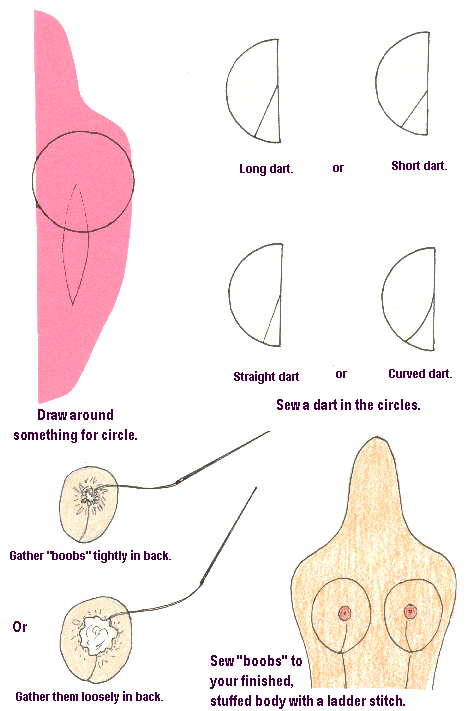
First lets do the add-ons. These are basically the same as perfectly round add-ons, but they have a dart sewn in them to make them perky rather than like little round buttons.
Use the width of 1/2 of the upper body for the size of the circle. You can probably find something to draw around for the circle. Cut two circles from fabric. Fold the circles in half and take a dart as illustrated in the fabric circle. You can curve the dart or make it straight. You can make it short or go clear to the center of the circle with it. Make the dart as deep as you wish. The deeper it is the pointier the boobs will be. Each dart change will change the shape of the boobs. Trim the fabric close to the dart seam.
Run a gather stitch around the outer edge of the
circle, pull the gathers up as you stuff the boob as full as you wish.
You can pull the gathers tight or leave an opening. Its up to you. stitch
the boobs in place on your doll using a ladder stitch. Blush the tips
or paint nipples on if you want to be a little naughty! You can make bigger
boobs by simply making the circles you start with bigger.
Diagram of the above steps.
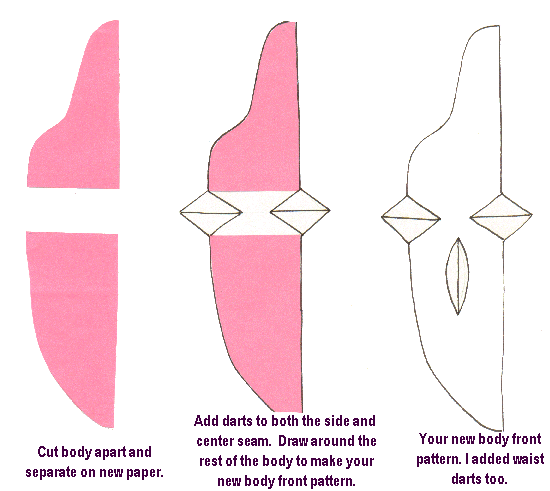
You will need to get those body front patterns out. They need to be the ones with a center front seam. You can use a lady body or a kid body. The Kid can be turned into an adult with the addition of boobs (AHHH! Every junior high girls dream!). You may wish to add waist darts to this design for a shapely lady doll, or dont add waist darts for a different shaped doll. The addition of the waist darts will add to the boob size though when using this design.
Remember in the body design part of this class, where you cut your body pattern apart across the chest, separated the parts and added darts at the sides? You will be doing that again, but you will be adding darts at the sides and in the center. And of course you can add the waist darts too.
This new front can be used with your matching re-designed body backs. You must be sure that you sew the darts accurately so the front will fit the back again. If you cut the front, and separate it, say 3/4" and then only sew the darts in to take up 1/2", the body front wont fit the body back. It will be too big. If you take up that same dart 1, the body front will be too small.
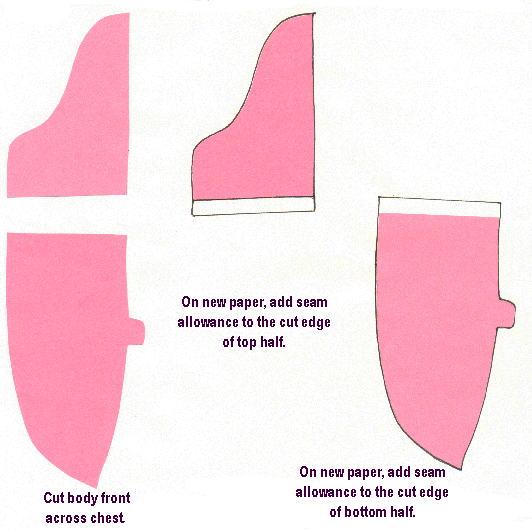
Cut your body front pattern across the chest just like you did before. (The chest area is about 1/2 way from the shoulder to the waist) You can of course practice and experiment with where you cut it, to get different looks. Remember! you are the judge here, it is your design and your ideas. You may make some busts that just dont work and some that are great! Designers test, try and experiment. You are the designer now.
Separate the parts and add darts as shown in the diagrams (Below). The wider you separate the parts the deeper the darts will need to be and the larger the boobs will be. The longer you make the darts the pointier the boobs will be. Hmmmm, pointy boobs bring to mind what? Sweater girls? Madonna? Xena, Warrior Princess? Hmmmm. Oh No! The mind is spinning again!
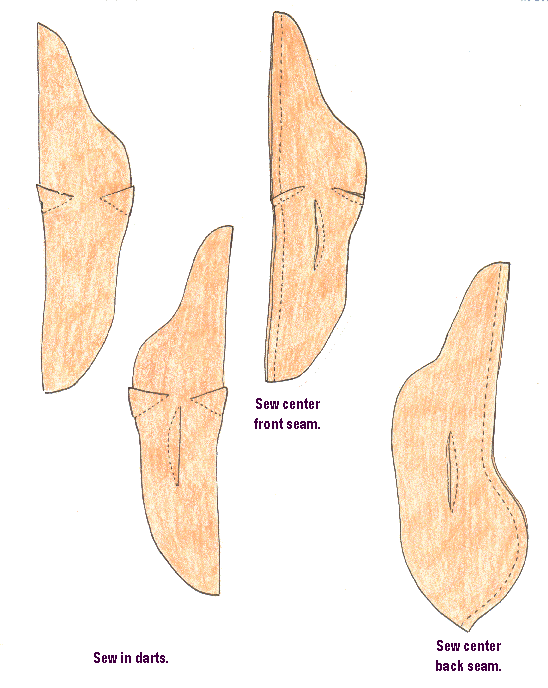
Cut the new pattern from doubled fabric. Of course,
cut an appropriate back too! Sew in the darts, and the waist darts too,
if you wish to add them (They make the boobs stand out more) Trim the
extra fabric from the darts.
Diagrams of the above and below steps.
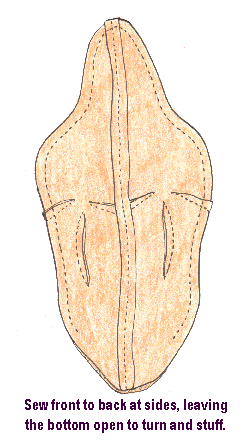
Stuff the neck VERY FIRMLY. Stuff the shoulders
and upper chest and back firmly, shaping nice matching shoulders. RESIST
the temptation to start stuffing the boobs until the neck and upper chest
are stuffed really well. I know you want to get right to those boobs!
Its almost too much temptation to resist putting just a little in there
to see what will happen! But trust me, the boobs will stuff so much easier
and nicer if the boob stuffing has something to press against, IE, the
upper chest stuffing. Is the upper chest really firm and smoothe? Is the
neck Hard?
Diagram for stuffing.
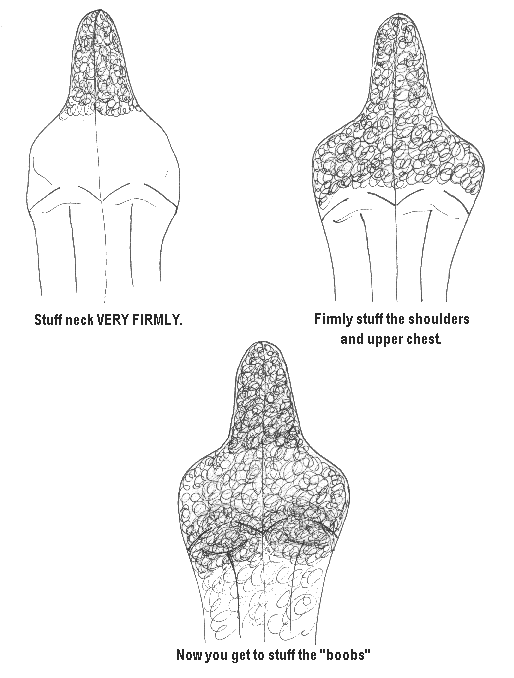
O.K. now you can stuff the Boobs. Stuff each one individually, dont try to put a big bunch of stuffing in the chest and divide it between each boob. They each want their own bunch of stuffing! Shape as you stuff, adding more stuffing to give them more shape and form. Properly stuffed, they will be Bodacious! They may be modest, they may be big, they may be pointy, they may be rounded. They will be your design! Finish stuffing the rest of the body and finish the bottom in the manner it was designed for.
Ask yourself some questions here. Are these boobs located where I want them for a doll I have in mind? Are they big enough? If I want them bigger, what do I do to achieve that? You have all the skills to make changes easily to adapt each pattern to each idea.
This boob style can be added to any number of
patterns you might have on hand, and Wa-La a new doll!
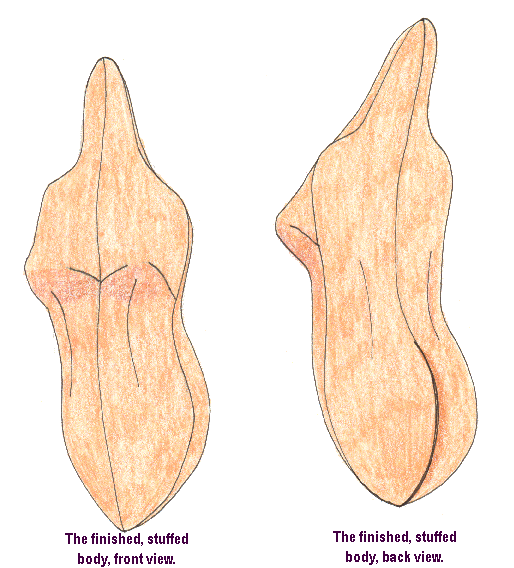
Diagram stuffed body.
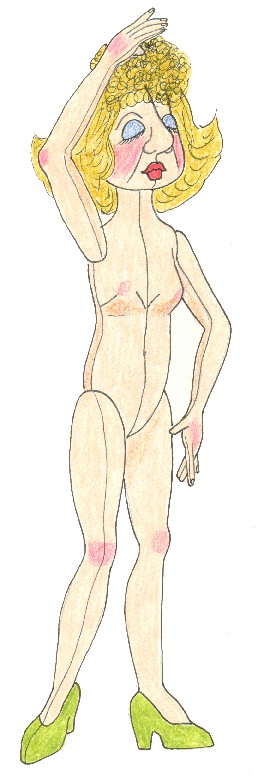
A nude drawing of her follows too. Diagramming the pattern changes I did to get to her from a basic, flat tab head doll, that originally bore no resemblance to this finished doll. In fact this doll didnt even know she was going to happen! I love dolls that just happen! Often they are the best!
|
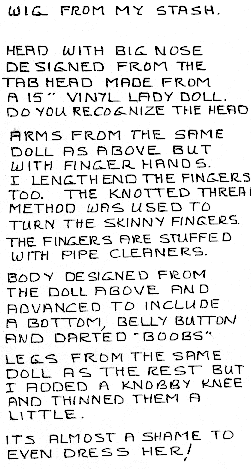 |
And here she is finished: "The Has Been Show Girl"!
Accessories? Do I want the arms and legs wired with Chenille stems? Do I want this to be a fairy doll? An elf? A fancy, pretty lady? Ideas are flooding again, and now you have the ability to put them to paper, to patterns and on to dolls!
There is still one more type of Boob design I want to teach you. It will allow you to even make saggy droopy boobs. This design also makes lovely, high, well-formed boobs. It depends
on how you shape them for your pattern. You can make one doll one way and
another a different way, with easy small changes.
First, get one of your body front patterns with
the seam allowances all around, including the center front. Cut it across
the chest, just like you did for the darted bust design. Add a seam allowance
to the cut edge of both edges (Diagrams Below). (Note
The same method will be used for a body
front with a seam down the center and for a body front that is placed on
the fold. I am going to diagram the method on the center seam body. You
can then use the technique for the center fold bodies too.)
What you will be drawing is simply a U shaped curve
that tapers to the cut edge of the top portion of the body. You can use
a draw around if you wish or just freehand this easy curve. The bigger
the curve, the bigger the boobs.
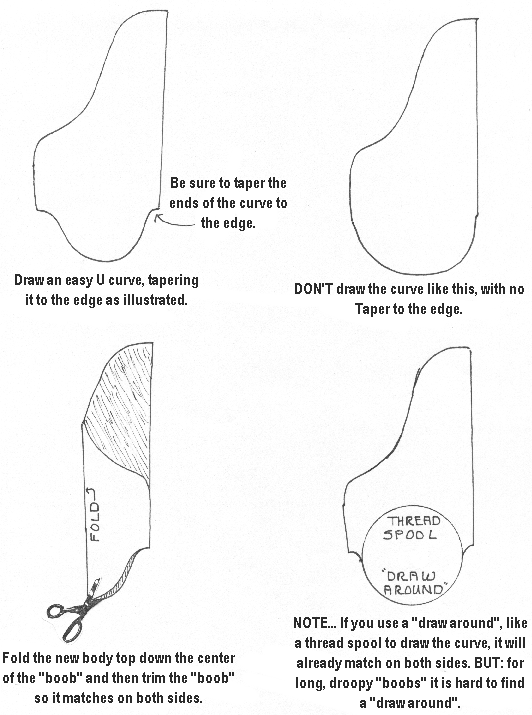
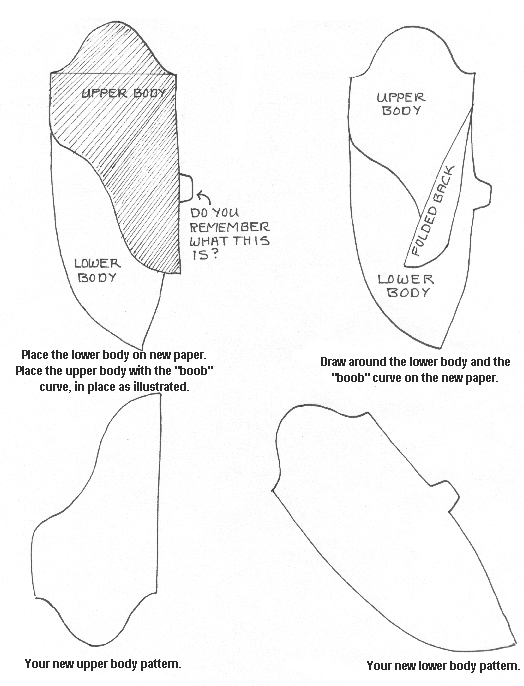
You only need to draw this once, because you will simply turn it upside down and draw around it at the cut edge of the lower body. After you draw the curve for the boob on the upper body, cut the upper body out, and fold the new pattern piece right down the center of the boob curve. Trim the curve so that it is even, just like you did for the head pattern in the beginner class. The following diagrams will illustrate all of the above, and remove the fuzzy cloud that is now hanging over your eyes due to all the words and no pictures! This really is easy! I promise. You only need to draw one curved line to make the pattern for both the upper and lower boob parts for both sides of the body.
Now get the new lower body pattern you made a minute ago, and follow the illustrations for putting the boob curve on the lower body. I will draw little lines on the upper body pattern so you can tell it from the lower body for the first illustration. In the second illustration the neck of the upper body is folded back a little so the lower body can be drawn around.
Cut the new body fronts out on doubled fabric. Sew the center front seam on the upper body. Sew the center front seam on the lower body. Sew the lower body to the upper body at the boob curves. Sew the new body front to the appropriate, assembled body back at the sides, leaving the body open at the bottom to turn and stuff. Sew in waist darts if you marked them and want them.
This body is stuffed the same as the darted body. Dont stuff the boobs until everything above them is stuffed firmly and smoothly. If you have made the curve and boobs big they will take extra care in stuffing them. You can even choose to stuff them lightly and let them sort of hang.
I will illustrate some other shapes you may wish to play with for these boobs. I have an old lady doll whose boobs hang down and are stuffed with rice. They look so natural!
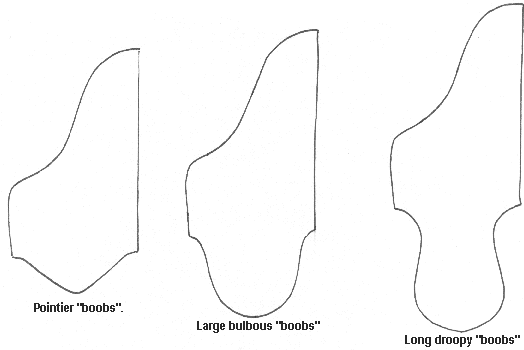
I am only going to draw these new shapes on the body top part (See Below). You now know how to transfer the shapes to the body bottom. Try some different sizes and shapes of boobs. Its fun and sort of addicting! Some of these boobed bodies may fit some of the heads you should have rolling around. Hmmmmm: What kind of legs and arms are needed for this one? For that one? Is this one a fairy? Is that other one a comical old lady? Is that one begging to have the droopy boobs? Oh No! Brain overload again. Too many dolls and not enough days or weeks or years!
You now have all the skills to make whole dolls, with a huge variety of arms, legs, heads and bodies. There is no end to what you can make now in the art doll arena. These patterns dont lend themselves well to floppy play dolls, or cute baby dolls. Baby dolls need the rounded three-piece heads. I make most of my baby and child dolls that way but dont know how to teach the design of that type of head in a way that can be diagrammed. As mentioned before though, you can make sweet child and baby dolls by making the flat front and curved back head pattern. Add a little nose as taught in the beginner class, and the cute look can be achieved.
Have fun with this designing, and do make up some
dolls, now that you have all the parts, and the ability to re-design, re-size,
re-shape and change all of them endlessly!
You will also receive the patterns for the dolls
above in reduced form. You can size them up as you please. They wont have
instructions with them, as designers you dont need them! They are copyrighted
patterns but you are free to make them up for yourself or for sale at shows.