Here we are in the final stages of doll and brain meltdown. If you have been following along, and doing the homework, you will have designed a BUNCH of patterns, for a BUNCH of dolls! You should have envelopes full!
You should have parts and pieces all over the place! Heads here, bodies there, legs and arms everywhere. Thats just part of the design process! Some great dolls will result from combining the parts. Sometimes the best designs will come about this way. Sometimes you will have leftover parts that never get used. Thats O.K. That doesnt mean you failed, it just means you designed, tried, and tested. I have MANY parts like that. I have whole dolls that are perfectly good, but not finished. Perhaps it wasnt just what I was aiming for, or perhaps it was too big or small.
My most recent was one that needed bigger boobs and a smaller head. She will be finished someday, when I want to make a fairy or elf. But when I was designing her she was to be a fashion lady.
With all of the sizing and adapting and changing lessons you now have under your belt, any mistake can be easily corrected. You are free!
Of course I cant teach you
every style and type of doll design known to the natural world, in one
class 2 classes or 10! There are just too many, and a lot of them are not
teachable. The designers style is just something they do automatically.
You have the technical skills to build on now
though, even if you are using crutches. In reality, we all use crutches.
Its just that some can just look at something and draw it free hand and
others need to draw around it.
I do want to leave you with some more ideas to play with though.
Magazines contain are a wealth of ideas and crutches. As I have mentioned before, dont use doll magazines though. The tendency to indirectly copy is too great. Ladies magazines have great ads that can sometimes be turned directly into whole profile dolls. Also, using the face design methods you learned in the beginner class, the wealth of faces in magazines is limitless!
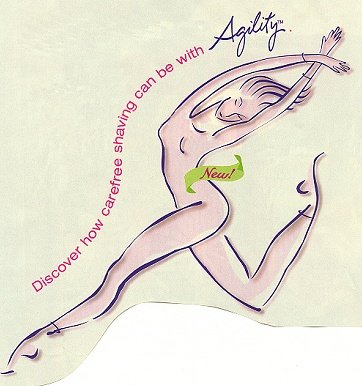
Following is a Gillette Shaver® ad that would make a great wall-hanging doll. She might look kind of gross mounted on a dowel due to her positioning! You would need to re-draw the arms so they werent crossing (you could cross them after you made the doll) Why would you need to un-cross them before sewing and trying to turn the doll right side out? The answer is in the word trying. I would also fix the hands, so they match and are pretty. You have all the skills needed to do this. The ad even suggests a name for the doll. Agility.
I would make the tab head, and straight leg separate. The rest like a pillow doll. All of the parts could be draw around, then sew style. You will need to add a little extra width around all of the parts to make up for the fact that you will be stuffing them, and they will look skinnier stuffed. You will need to employ your line finishing skills in a few places too.
Ive seen other ads that
can be done this way too. Even real people pictures that can be done as
full profile dolls. Remember that the size of the original drawing doesnt
matter. You can size up and down on the trusty copy machine.
How about animal dolls?
They are very easy to extrapolate from the human form. Go back to the simplified
mitt hands and rounded feet. Usually the animal dolls look best with bigger
heads, hands and feet in relation to their bodies.
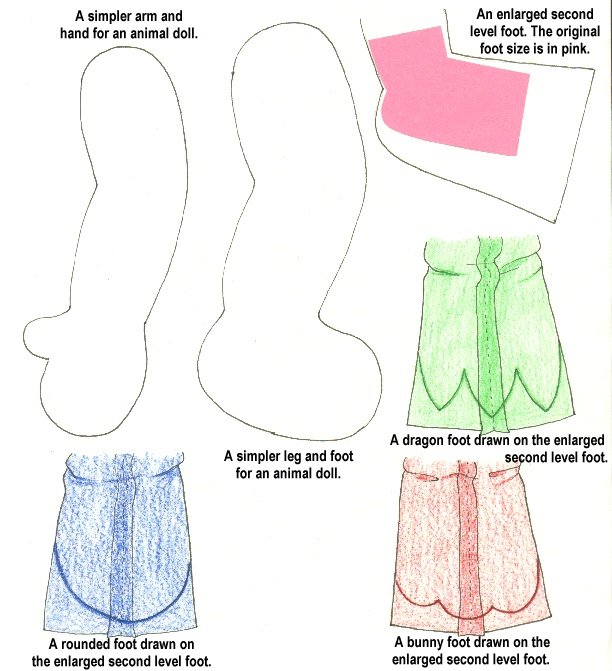
You can also enlarge the
second level foot style, and needle-sculpt toes for an animal doll.
Think-Think-Think, what other types of fantasy
feet can you make from an enlarged second level foot style? How about a
dragons foot? Or a strange forest creatures foot? Can you think of other
feet that can be drawn on the enlarged second level foot design?
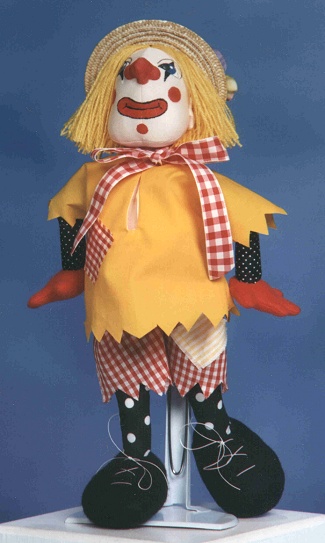
You can use the flat tab head style for simpler more country look animals (Examples Below), but might want to round out the head top, rather than gathering it at the top. You dont have to though. Leave it gathered and add the ears, then pull the ears through slits in a straw or cloth hat.
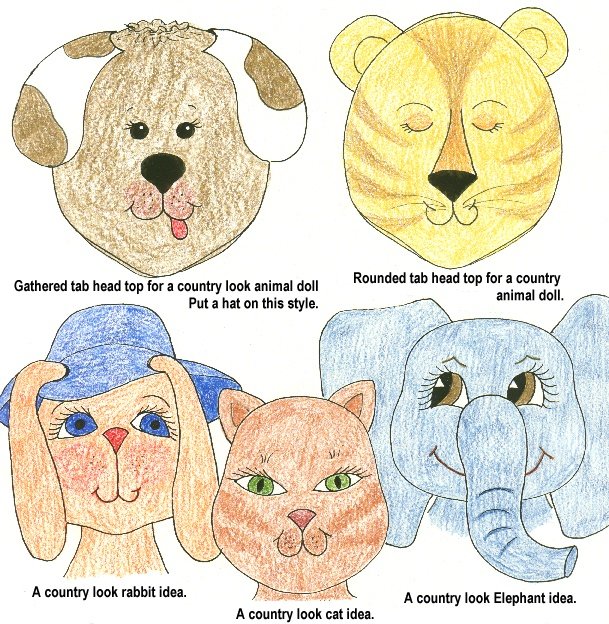
Look in coloring books for cute faces for animals, if you cant draw them freehand. Animal faces can be very simplified, or if you are a painter, they can be very detailed and portrait like. There is a wonderful cat at Alumni Hall, done portrait like.
The Country look animals are done with the flat, tab head design. Another idea for animal heads is to make the faces flat and shape the head backs. That way the neck can be stuck up inside the head back opening and stitched in place. You shape the head backs just like for a dolls head.
Ears for animals are easy! Inverted Vs, inverted U shapes or long U shapes. You could even use the fonts on your computer to print out the shapes! Just use capital letters and enlarge the font to super huge. If it still isnt big enough, remember the copy machine. Elephant ears may need to be found in a coloring book, if you dont feel confident about free-handing them.
Ears can be sewn into the
head seam or ladder stitched in place on the finished, stuffed head. You
can even slit the head perpendicular to the side seam, and insert the ears,
and then sew them in by machine, so they hang down, This is good for rabbit
and dog ears.

You can also do the 4 piece profile head, and make animals. The head shape and nose shape can be easily adapted to animal faces. The high nose, coming directly from the forehead, works best for most animal applications.
Before I sculpted the nose on the Has Been Showgirl, it could have been a rabbit head! Actually, just bringing the center of the profile to an easy V, as shown in a following diagram, works for lots of animals. The cute Bunny shown later in this lesson was done with the easy V, face front. She was designed from the doll pattern that was designed from the plastic doll shown in the picture too! Would you ever guess that they are basically the same pattern? The bunny is made from Osnaburg woven fabric. It stretches quite a bit, so she is taller than the doll. I wanted her head big, so when I designed it from the original tab head, I first added 1/8 extra around the tab head. She also has the 4 piece body design, and enlarged feet and hands. Her toes are 3 round bumps and are needle sculpted. I liked her wearing shoes though.
I did her face in colored
pencils, but I am going to re-do it in paint. Colored pencils are too muted
for all of the features for me. I like them for shading only. I like the
clarity and vibrancy of paint.

They do make an impact, and sometimes they even make one feel uncomfortable! How close we are linked to the animal world may suddenly come into focus.
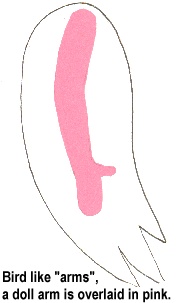
Animal dolls are an additional area of cloth doll making that can be lots of fun and very creative. There arent as many rules of anatomy for their design as with people dolls. All kinds of animals can be designed from your basic tab head doll patterns. The sky is the limit! ( Hmmmmmmm, How about a bird?) No hands, just tapered points, resembling wings.
Following, are one easy V shape, and a Bird beak idea.

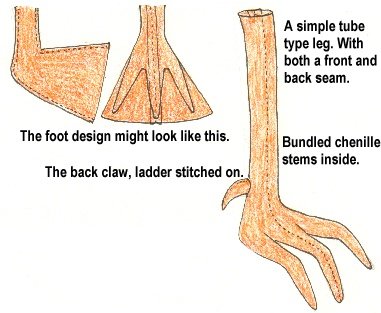
With the chenille stems in the legs they can be bent into more bird-like shape if desired. The toes can be splayed out, and if you joint the legs tightly to the body, your bird doll will stand alone. In fact you may have noticed that most of your jointed dolls will stand alone, as long as they are very firmly stuffed and very tightly jointed.
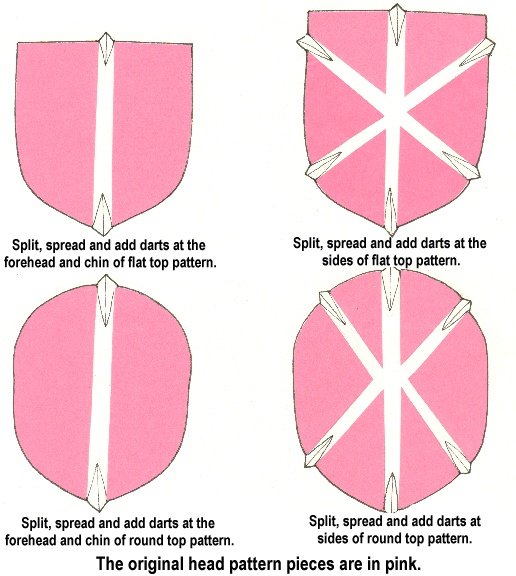
Now, lets look at another shaping method for tab heads. Darts. These give the flat front and back, tab style heads depth, without adding the profile face. This method is good for child, and even baby dolls.
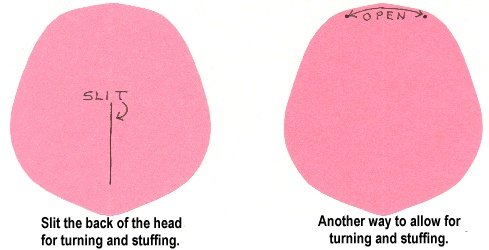
You can use the gathered
top style, or round the top. If you round the top you will need to slit
the back of the head where the neck will cover the slit, or be pushed up
inside of the slit. The slit is for turning and stuffing. Can you think
of another way to allow for turning and stuffing, instead of the slit?
A place that wont show when the dolls hair is on.
Get out one of your tab head shapes. If you wish to round it out at the top of the head, do so now. Or do one of each kind.
You will have to cut the patterns apart, separate the parts, and draw in the darts. Usually one at the top of the head and at the chin and then one near the forehead and one near the cheek on each side are plenty.
Its kind of like cutting a pie in half, or into 6, close to equal pieces. All of the darts have to be across from each other. When you sew them in, dont make them too long, or they will intrude on the face. Both the back and front of the head need to be darted and sewn the same way, so they will fit together around the sides. This is a very easy way to add depth to a dolls head; I am just going to diagram it for you.
Yet another turning and
stuffing method. Add a seam allowance to the center back head piece. Sew
the seam, leaving an opening for the neck to fit up into.
For all types, sew the darts carefully, in both the front and back head pieces. Sew the head front to the back at the sides. Turn and stuff. This type of head takes well to the added on nose, either the round ball with nostrils sculpted in, or the shaped nose with nostrils sculpted in.
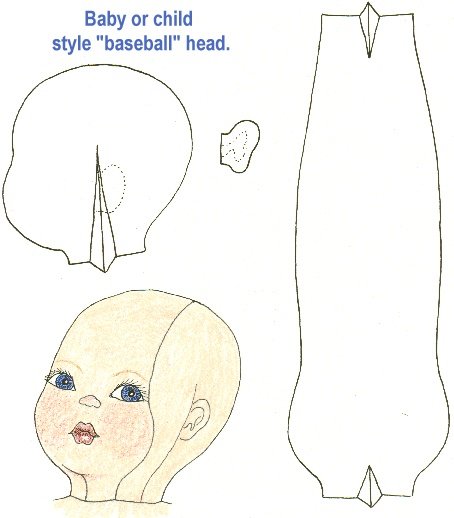
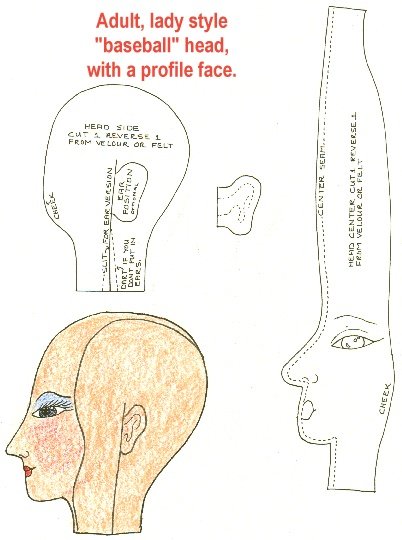
The type of head that I use for most of my child and baby dolls might be referred to as the baseball style. This is in my opinion, the easiest type to make childish or babyish looking. I have also adapted the style to some of my profile face lady dolls. The pattern consists of 2 sides, and a center panel. In the case of my profile face ladies designed this way, the center panel is split, and the profile is done in the center panel.
I will draw the types for you, but I cant think of any way to diagram their designing. I just draw them, fitting the center to the sides visually.
For the ladies, the head sides and centers have to be made much smaller, in relation to a head design without the center seam, due to the size increase attained by the center profile seam.
I also use the profile head design we have been having fun with for my adult and fantasy dolls. The design style we have been playing with in class is actually far more adaptable and controllable for various face shapes. It lends itself much better to character dolls too.
The two head designs following are reduced size patterns from my pattern line. Both are the baseball style.
Both have necks on them,
so would need to be sewn to a body that doesnt have the neck on it. If
these are enlarged 200%, they have 1/4" seam allowances. One very nice
thing about this style is that the ears can always be set into a dart on
the head sides.
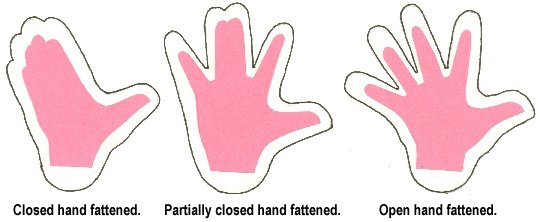
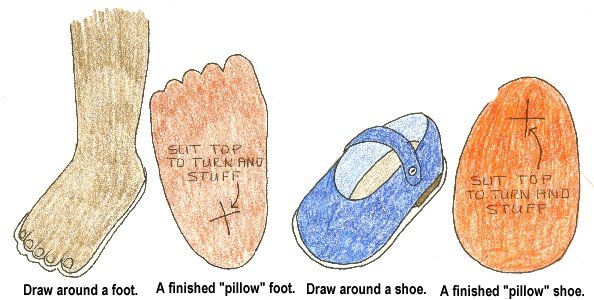
Both the hands and feet should
be oversized for this comical look. They will be made separately and
the arms/legs will be ladder stitched to the top of them. You
can design the hands from your real hand patterns. Simply fatten them
up and round off the wrist area. Draw around, and sew the hands on doubled
fabric. Make a cross slit in the top of each hand, near the rounded wrist,
to turn and stuff through. The arms will sew over the slits, so the slits
wont show. These hands will be like little pillows.
How about feet, either with or without toes.
Where can you find feet to draw around? Remember, you can size them up and down for use with your dolls. You can draw around your own foot, or a childs foot, or a plastic dolls foot, for feet with toes. Exaggerate the toes for the comical look.
What could you draw around for a rounded foot that will be a shoe on the finished doll? How about a shoe! A real people shoe or a doll shoe.
This type of foot/shoe design, will assemble, and be slit to stuff, just like the hands. These feet/shoes will be little pillows too.
The following drawing is for a fun Clown Doll with the pillow feet and hands. His head, hands and feet are big for his body. I chose to make his feet using the shoe foot. He has a big needle-sculptured nose, painted red . He has a fattened, 4-piece body, and I chose to just make his legs and arms as tubes. I made the stitched on type legs and arms, and stitched across his knees and elbows. He has yarn hair, simply stitched down the middle and sewn to his head. I glued the under layer of his hair to his head, and fluffed the rest up. A purchased top hat adds just the right jaunty touch.
He is dressed in baggy drawstring pants, with ragged, torn bottoms. A baggy, frayed shirt, belted below his fat tummy finishes his really simple outfit. His clothes were designed from the beginner class methods, but enlarged to fit big.
He is a floppy, play type
doll done in this manner. You could make him a more artsy clown
by making him jointed, very firmly stuffed, wired with chenille stems,
and with a smaller head in relation to his body.
Anatomy Of A Clown
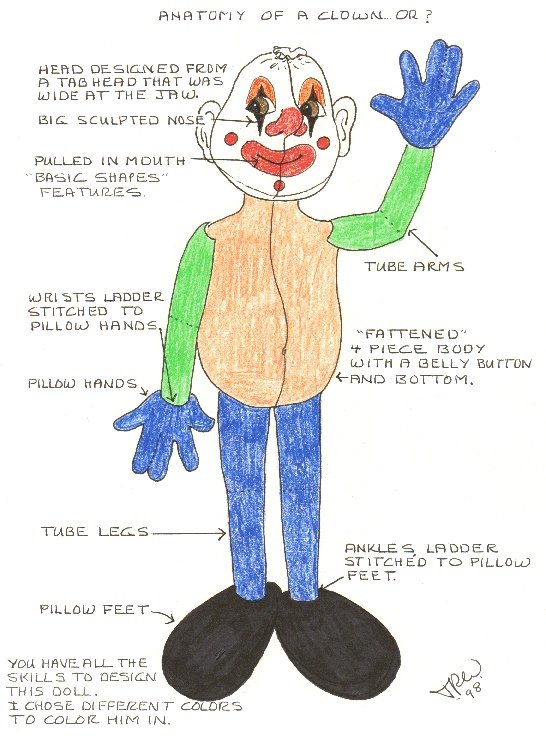
Drawing of Clown
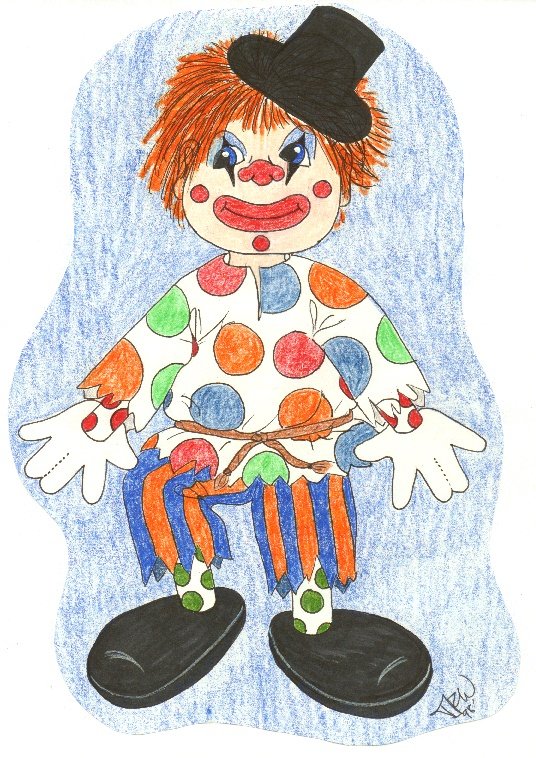
Example Clown Doll
Could he be a Ho-Bo? Could he be
a she?
I could go on and on forever, with ideas that can be implemented with the skills you have learned from both of these design classes. You now have the ability to design and change almost anything into almost anything else, simply starting from the basic tab head patterns that you designed in the Beginner class.
A few questions in parting:
Go for it in a big way. Impart your own style and creativity to everything you do. Do you love fairies? Now you can design and make them. Do you love angels? Now you can design and make them. Do you love ladies? Now you can design and make them. Do you love elves and gnomes? Now you can design and make them. Do you love animal dolls? Now you can design and make them. Characters? Old People? Young girls? Men? Santas? Father Christmass? Now, the sky is the limit!
The dolls will be YOURS! They will probably start to take on your look only if you do several dolls, to let the look emerge.
Think of the challenges you can enter now. The swaps you can participate in. All with dolls of your own design!
Work on quality sewing, finishing
and stuffing with all of your doll work. Someone said once at a cloth doll
show, that the concept is the most important thing about cloth dollmaking,
that the quality of the finished doll matters little. I feel that they
were very wrong! The premier cloth dollmakers have the quality down. One
does not go far in any medium, without putting out a quality product. If
you enter shows and challenges, the judges look for quality work. You cannot
sew to carefully, stuff too lump free, close too invisibly, and finish
too beautifully!
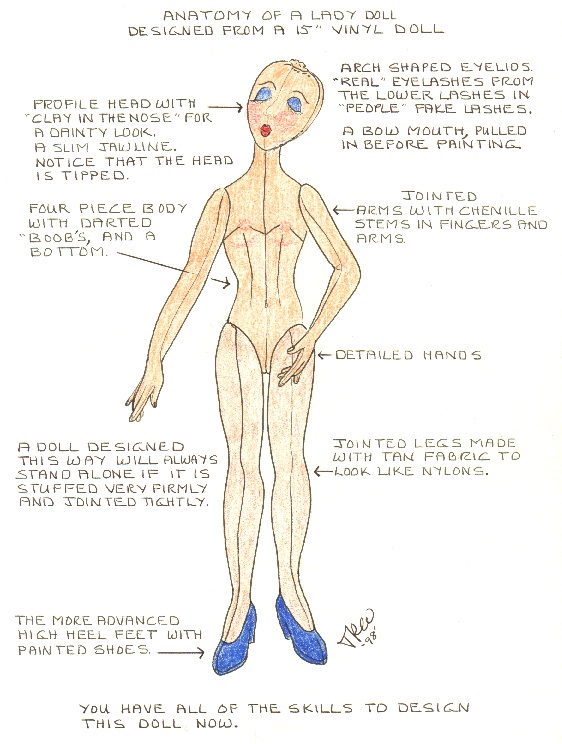
Following is an anatomy
of a pretty lady doll.