Lesson 2
General Preparations
If you will be using fresh flowers your container will need to be prepared with Oasis foam. This is anchored by placing an "X" of waterproof tape across the top of the container and the Oasis. The Oasis is carved to fit the container and should be equal with the top of the container except in the horizontal arrangement where you will want it approximately an inch above the container to allow for the side florals.
In the case of tall glass vases marbles or aquarium gravel or similar materials of your choice are used. These hide the stems and hold them firm in water.
Styrofoam blocks, half balls or balls are anchored in the container with floral clay. This material is easily carved to fit the container and like the Oasis should be level with the top or slightly above in arrangements like the horizontal.
In a flat container the Oasis or Styrofoam is anchored and then covered with Spanish or sheet moss. The important consideration in all cases is that the mechanics of your arrangement are concealed whether by the florals themselves or additional materials used just to cover the mechanics.
Picks are used to lengthen the stem or strengthen it. There are several types on the market and they are all fairly interchangeable. In an emergency a drinking straw can also be used but it will be somewhat harder to camouflage. Floral tape can be used to cover any picking necessary but as a general rule the picked florals will not need taping since they are concealed within the arrangement.
Long firm wire (about 18 gauge) can be used to strengthen the stem of fresh flowers. Pierce the base of the flower with the wire and floral tape to the stem. Since it is to add strength the taping helps. If you are not going to tape, wrap the wire in a long spiral around the stem.
In the design process an odd number has a tendency to make the arrangement look finished where an even number of flowers gives the feeling that it needs something else. The odd number can be achieved with foliage, flowers or filler material.
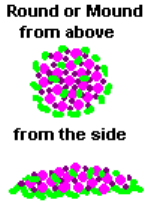
The first arrangement we will consider is the "Round" or "Mound" shape.
Round or Mound Arrangement 
These instructions are to form a Round or Oval smooth ball shaped arrangement. In the diagram shown the entire container has been covered, but you can use any low open container bringing the flowers down to the lip of the container where part of it will show below the arrangement.
This arrangement is generally composed of form flowers. Any filler flowers used are kept even with the form flowers. The idea is to form a smooth round or mound. You can vary the color and size of the flowers used so it becomes a very colorful arrangement. All of the arrangements can be made using fresh flowers in which case you will use the Oasis foam or with silks use Styrofoam.
Prepare your container. Choose the largest, tallest form flower, place it in the center. This will be the highest point in the arrangement. This arrangement containers varied colors and sizes of form flowers. The arrangement is built from the center out to the edge of the container in circles or ovals following the shape of your container. Each circle of flowers will be slightly shorter than the one before so you form a smooth graduated slope from the center tall flower to the lip of the container.
Use additional foliage and small form flowers to fill any spaces keeping in mind always that you do not extend beyond the shape line curve from the tallest center to the lip of the container. This arrangement is generally a bright colorful mixed bouquet.
Equilateral Triangle
This design can be compact by being filled in with mostly form flowers and foliage or it can become lighter with the use of more filler material and not as many of the heavier form flowers.
Right Triangle
The container for this arrangement is generally very flat and low. A tray or a mirror can be used with silks and a small piece of Styrofoam as the base anchored with floral clay. If using real flowers a very low edged bowl can be used. The addition of Spanish or sheet moss should be used to cover the mechanics.
This design is formed by placing two line florals at right angles to each other. The horizontal piece will be slightly longer than the vertical. Three large form flowers are placed at the point where the line materials meet. Smaller form flowers are graduated along each leg of the angle. The filler material is used to soften the whole. This arrangement looks great as a mirror image on a mantle or hall table with a piece of sculpture or art work between the two.
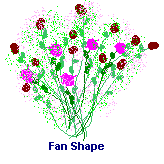
The Fan
This arrangement is generally the one used to display roses. A tall crystal vase is gorgeous filled with clear or colored marbles and if needed a piece of chicken wire can be incorporated into the opening of the vase to help hold the flowers in place (unless the vase has a very wide top nothing but the marbles is needed). "
Pick" one of the roses to give it a little more height and place it in the center of the arrangement. The remaining roses should be fanned out in all directions gradually decreasing the height but still well above the edge of the vase. Babys' breath, gyp and asparagus fern are used as filler. They can extend slightly above the roses so each rose is "framed" by some of the filler material. A floral bow can be added in the top of the base to cover any additional mechanics you may need.
**Tip: In place of the chicken wire, green or white net can be taped to the opening of the vase and a small slit cut where each rose is added. The filler material should slide through the natural net holes.
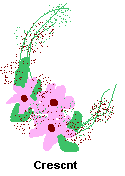
Crescent Shape
The crescent shape is formed by your line material. This can be dried material that is soaked and curved before you use it or you can use the natural curve in some leaves. Three graduated lengths are placed up and curving down toward the right from your foam base and three more extend to the right curving up from the base. The shorter material is placed inside the longer pieces.
A single large exotic flower or three slightly smaller flowers with a small amount of filler at the base where the line materials meet. Spanish or sheet moss is used to cover the base. The simplicity of this design makes this a very striking arrangement.
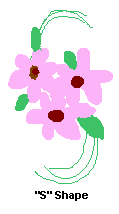
"S" Shape
The "S" shape is generally used on a tall pedestal
type display. The curve on the top is similar to the first part of the
crescent shape with the second portion being the same length curved back
in the opposite direction to form the lower part of the "S". This will
extend down below the edge of the container. A simple design will use the
same exotic flowers as in the crescent design. This design can also be
used in a formal presentation adding more line material and form flowers
or novelty to fill in and expand the simple "S" curve.
Click HERE for Information on Fresh Flower Preparation.
Basic Florals
Bluebonnet Crafters
Bluebonnet Village Craft Network
http://www.BluebonnetVillage.com/