©1998
Taught by Nora Creeach of Bluebonnet Crafters
Florists Bow
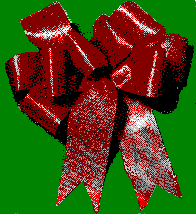
Florists Bow
The amount of ribbon required to make a bow is more or less a personal decision. Use as much as you need to make it look right to you. Below we will give some suggested lengths, but again they should be adjusted to your personal preference.
Approximate length for different size ribbons.
A 10" bow with 12 loops takes 4 1/2 yds. of 3" ribbon.
An 8" bow with 14 loops will take 3 yds. of 1 1/2" ribbon.
A 5" bow with 14 loops takes approximately 2 yds. of 7/8" ribbon.
Step1: Make a small loop placing your thumb inside the loop, your forefinger on the back of the ribbon to hold it in place. If you are right handed your left hand will hold the ribbon. If left handed the bow will be held in your right hand. Hold the ribbon with the wrong side facing you.
Step 2: Grasp the extended ribbon and twist once to turn the right side facing you. Bring the ribbon out and back to the center forming a loop half the diameter of your finished bow. At midpoint turn the ribbon one twist so the right side is again facing you.
Step 3-5: Extend in a loop to the left bringing the ribbon back under your finger at the center. One twist again to bring the right side of the ribbon up facing you. Repeat this until you have as many loops as desired.
A good bow should have a minimum of six loops, three on each side of the center but can have as many as you like to achieve the look you want.
Decide the length of the streamers. Approximately four times the width of the bow looks good but they can be made longer or shorter if you choose.
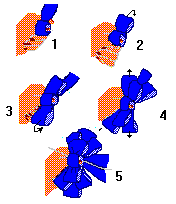
Take the remaining loose ribbon and form one huge
loop twice the length of your streamers. With a U shaped wire place it
beside your thumb through the small loop, around all the other ribbon loops,
and inside the large streamer loop. Grasp the two ends of the wire, pull
away with the bow and turn the bow, not the wire, to tighten. Cut the large
loop in a long diagonal or fold and cut from the outside edge up to the
fold to make a V shaped cut. 
Puffy Bow
Step 1: The puffy bow is made beginning with a circle that is the size that you want your finished bow. Tape the end to the ribbon to hold the circle and continue wrapping the ribbon around the circle until you have a minimum of 6 circles (there is no maximum except the reasonable). Tape the second end to the circle when you have completed the number of rounds you want. Be sure that the ribbon passes the original taped spot by at least an inch and a half. In other words there should be that much cross over.
Step 2: Fold between the two taped areas and clip both sides. Repeat the fold and clip on the opposite side of the circle.
Clipping the bow: The first set of clips is between the 2 ends where they overlap on the circle. The second set of clips is on the side of the circle opposite to the first set of clips. You then open the circle and place the two sets of clips together (as if the circle is divided like a clock, the ends of the ribbon are at 7 & 5, the clips are at 6 & 12, then bring 6&12 together and place the wire around the clipped areas).
Step 3: Place both clipped areas together anchoring with a U shaped piece of wire. Twist the ribbon as you hold the two ends of the wire ** do not twist the wire **
Begin in the center of one side of loops and pull the first loop out and toward the top of the bow (towards you), the second loop is pulled out and toward the bottom, or wire side (away from you), of the bow. Continue pulling out the loops and alternating top or bottom until you have completed the one side.
Turn and repeat for the second half of the bow. Grasp the wires in one hand and shake violently. This will help to shape your bow. The bow can be wired to a package and the wires trimmed.
This type of bow also works well on a corsage.
***Tip***
Double sided sticky tape makes a neat invisible
joint but if not available wrapping clear tape sticky side out around your
finger and pressing in place is the next best alternative.
Corsage  &
Boutonniere
&
Boutonniere
Material:
To make the puffs for embellishment fold a 5" length piece of flat lace or tulle in half. Add wire or chenille stem and wrap with floral tape to secure. Make a puffy bow with the ribbon. Use a piece of light wire or chenille stem to secure the bow.
Begin with one of the puffs, place a flower with leaves and filler flowers on top of the puff and begin securing with floral tape. Add a second flower with tulle puff and some of the filler flowers to the right of the first and staggered down slightly. A third is placed to the left and slightly below the second. Continuing to wrap with the floral tape so all three flowers and an occasional silk leaf are joined to a single stem in the center.
Begin wrapping with floral tape by stretching and turning the tape so it will stick to itself (a piece of chenille stem or 20-gauge wire can be added to make the stem longer). Set each flower aside until you have 3 flower corsage for attendants and the mothers of the bride and groom or 5 flower corsage for the bride.
Place the bow in the center immediately below the last two roses twisting the wire around the main stem and securing it with floral tape.
If using only 3 flowers, now coil the end of the stem and add a corsage pin.
If using 5 flowers: before adding the bow begin a separate grouping by placing the sixth centered on a puff of lace or tulle with leaves and filler flowers, with number 7 slightly to one side and slightly lower. Wrap with floral tape just enough to secure. Place the combination of flowers number 6 and 7 in the opposite direction of the first 3 flowers. Wrap to secure and cover all wires with floral tape. Place the bow between the groups so the larger number of flowers will face up and the other two will face down from the bow. Cover the wires with floral tape and add a corsage pin.
Place in a zipper type bag until presentation.
The Boutonniere is made the same as the first flower above using one flower, a small amount of filler flowers and a leaf sprig. After wrapping with floral tape add a shoestring bow and a corsage pin.

| Lesson 1 |
| Back to Classroom |