|
created by: Helen-Carol Soucy Building the mini-dolls (each mini-doll measures approx.: 6.5 inches tall) Body, Arms and Legs The body: Using a plastic tube (recycled from empty paper roll
used for cash register or adding machine) measuring approximately 3/4"
diameter by 1 3/4" long. (Ask a grocery or convenience store clerk to keep
them for you.) If it's a little bigger, just adjust the pattern to fit
your plastic tube. When I created these mini-dolls, I kept in mind, to
use recycled material. If you're unable to obtain such plastic tube, as
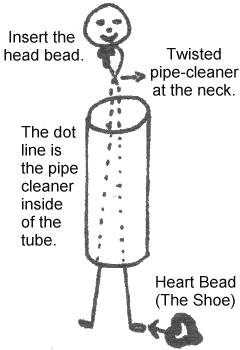
an alternative: you may use an empty coin container filled with a little ** Don't forget the neck, to hold the head bead, let approximatly 1/2" of the middle part of the folded pipe-cleaner (used for the legs), the middle part will become the neck, let the middle part of the pipe-cleaner 1/2" to 3/4" out of the top of the body to hold the "head" bead.
Note: For the arms and legs, if you can't find 2 tone pipe-cleaners
in stores near you, you can come out with the same result by twisting together
2 pipe-cleaners of different colors, using one of the 3 following combinations:
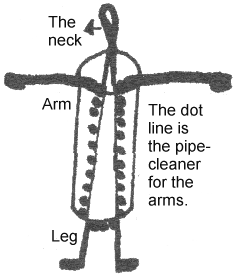
Refering to the first diagram (above), and the second diagram on the left, fold one pipe-cleaner in two. Let the middle part (the fold) stick approximatly 1/2" out of the top of the boby, it will become the neck into which you will slip in the "head" wooden bead, and glue it in place. (Tip: wait to glue the head in place, after gluing on the hair, and putting on the clothes.) The rest of the two half portions of the pipe-cleaner will go through two oposite sections inside of the plastic tube, for the legs. To secure it in place, give a twist at the neck level. Then, using a wire-cutter, cut 2" off the second pipe-cleaner. Fold it in two. Refering to the diagram on the right, pass it through the same two sections inside of the plastic tube, but the oposite direction, so the two half lengths will come out at the top of the tube to form the arms. Bend down the two lengths of pipe-cleaner at shoulder level, so the arms will stand normally on each side of the body. Now, secure the legs and by putting a dab of glue at the lower exit of the plastic tube, to hold the legs in place. Let dry. Then, fold the tip of each leg approximatly 1/2" to form the foot. Place a drop of glue in the hole of each heart shape bead and slip them on at the end of the legs, for the shoes. Fold the feet just above the heart shape beads, to form the ankles. Fold the legs slightly at knee level. Now, fold the tips of each arm approximatly 1/4" to form the hand. Glue the pony beads in place for the hands. Fold the arms slightly at the elbow level. Go to Next Page ..... Building the mini-dolls - Head and Hair
 
Copyright Notice: All pages and graphics are copyrighted by the Internet Visions Company and/or instructor. You may print these out for the use of the class only. All other users or distributions are forbidden. Crafty College is a division of the Internet Visions Company. © 1999, Internet Visions Co. All rights reserved. All trademarks are owned by Internet Visions Company. |
 polyester
fiberfill;
or as another alternative: use a clean empty plastic
grocery or bread bag folded lengthwise on itself until it measures approximatly
1 3/4" to 2" wide, then place the folded pipe-cleaners near the edge of
the plastic bag * (refering to the arms & legs section, how
to fold & place the pipe-cleaners), roll the plastic bag tightly around
the folded pipe-cleaners **, until you obtain the proper diameter
for the body. Cut off the excess of the plastic bag, if necessary. Secure
with some scotch tape. If you wish to obtain a more "plump" body, adjust
the clothing's pattern to fit the body of your mini-doll. You may define
the waist by placing a rubber band around the waist area of the doll. To
space the legs a little, just use a little piece of scotch tape on the
plastic bag, between the legs. Don't worry about the look, it will all
be covered by some beautiful clothings.
 The arms and
legs: