Your supplies will need to be stored where you can get to them easily, yet they should not be left open where anyone can get to them. Before each class or meeting a sample project should be finished and kits made up so each child will have all the supplies they need to make the project. It is also helpful with the older children to supply a copy of the instructions.
If the storage area is not in the same place as the children will be working it will probably be more convenient to place everything they need for that particular project into a sack so each one will have their own. These can be recycled grocery sacks or paper sacks, but if you need to purchase sacks it would be better just to lay the material out without packaging. You don't want to waste any of your budget.
In a program like this the number of assistants will depend on the number of children.You should have no more than 6 children (8 and under) for each assistant. Your assistants do not necessarily need to be adults. Older children or teenagers can work with the youngsters. Ages 8 and older, it is possible to have twice as many children to each assistant.
Your assistants should have gone over the instructions for the project and if possible even made one so they are familiar with the project, the instructions and what the finished project will look like. This is particularly true when older children are helping with the younger one.
This can be set up as the original class to teach the older children the project and then a second class for the younger children with those older youngsters acting as your assistants. I recommend using the younger assistants only if you can not get enough adult help. The older children enjoy the importance of showing the younger but often it is more hassle than it is worth.
A number of the craft stores have free project sheets that you can use in your classes. Remember that their projects are written to sell merchandise. Read the project sheet through and look for ways to use recycled materials you have collected instead of having to buy more supplies.
Pinwheels
Instructions:
Using your pencil and ruler mark and cut out an 8" square on the back side of the wrapping paper. Draw a line from one corner to the other and repeat with the other two corners forming a big X on the back of the paper.
Center your penny or button on the paper where the lines cross on the back and draw a circle. Fold the four corners to the center creasing each fold as you go. Cut between the folded triangles up to the edge of your circle being careful not to cut through the circle.
Using the marking pens decorate your 12" piece of balsa in any design you like. Glue jewels and embellishments to your own design. Cut several pieces of curling ribbon about 8" long. Use the edge of the scissors to curl the ends (adult assistance necessary).
Bend, do not fold, every other point of the wrapping paper to the center of the square. Push the pin through the center of the curling ribbon, then through all four points of the pinwheel one at a time, then through the center of the square of paper, through the hold in the pony bead and then through the 1/4" square of balsa wood close to one end or about 1/2" from the end. Using a toothpick apply a small amount of white craft glue to the end of the pin and carefully push the eraser or cork over the point of the pin
Paper Garland
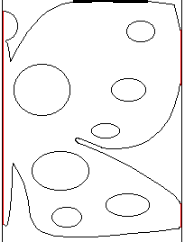
Trace the pattern piece beginning at the very end of your adding machine tape. Fan fold the tape to exactly fit the traced image(the red line should touch the folds on both sides).Cut out the top portion of the pattern through all layers. Do not cut either side (red lines) where the folds are.
Now cut the bottom half of the pattern through all layers leaving both folded ends intact. You can use a hole punch, any of the craft punches or cut out the circles shown to add interest in the center of your shape.
Open out the folds and color using your crayons or pencils.
Paper Mache Hand Puppets
This can be a very messy project.You can use prepared
glue or you can make your own. (Instructions follow) The project calls
for torn strips of newspaper. Tearing the strips really does work better
to hold but be sure you save enough newspaper to protect your work area.
A large plastic garbage bag cut open on three sides also makes a good drop
cloth for this type of project. This project will take several meetings
to complete. The paper mache must dry between layers and you will need
at least three complete layers.

Inflate the balloon to approximately 5" in diameter (depending on the character you are making it can be larger or smaller). Tie off the balloon. Mark a circle around the knot of the balloon about 3" in diameter.
Dip each strip of paper into the glue and spread it smoothly over the balloon crisscrossing and overlapping the strips as you go. Make one complete layer covering the balloon except within the circle. Allow to dry and using the same instructions make a second complete layer crossing in the opposite direction of the first layer leaving the circle uncovered. Allow to dry.
Add the features to the head. A nose could be a crumpled piece of paper shaped with strips of glue dampened newspaper that are shaped as you place them. Eyebrows are formed using a worm shaped piece of glue dampened paper and held in place with a strip over the eyebrows. Ears are done the same way with a larger worm shaped piece curved on the side of the head and held in placed with wet strips of paper mache.
When you have the features in place another complete layer of crisscrossed strips is added to finish the head. Allow to dry thoroughly. Place a base coat of paint over all and then paint the hair, eyes, mouth etc. as you like
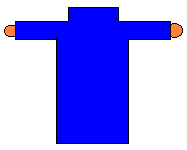
Scraps of fabric are used following the pattern piece to make the shirt. Hands can be two "U" shaped pieces of felt or cut 4 pieces of other fabric sew turn and glue in place.
Option: Hand stitching can be taught or an adult can machine sew this portion before the class. Glue the neck of the garment into the opening of the head and allow to dry thoroughly. Embellish your hand puppet to your own design.
Glue
One cup water in a quart jar. Add 1 cup of flower. Cap and shake the jar well until the glue is the consistency of gravy. Always add the flower to the water. If it is not quite thick enough add a small amount of flower at a time until you reach the correct consistency. Do not try to add water to the mixture.
Collage
Paint the cardboard backing color of your choice. Cut the pictures in different shapes and sizes and arrange them in a pleasing pattern on the cardboard backing. Beginning at one corner glue down each picture overlapping some and leaving spaces between others.
You can add pieces of lace, ribbon or trim to embellish your collage as you go. You can also add found objects, glue on jewels and buttons to form a pleasing picture.
Additional buttons, found objects, etc. can be glued around the outside edge as a frame. Allow the glue to dry thoroughly, then coat the entire collage with water based acrylic varnish.
Go to... ~ Lesson 4 ~ Classroom Page ~ Other Classes
Bluebonnet Crafters
Bluebonnet Village Craft Network
http://www.BluebonnetVillage.com/


 |
Crafty College is part of the virtual arts and crafts community, World Wide Visions!