Presented by Crafty College, Bluebonnet Crafters and Heartfelt Traditions 2000 Blessings Angel Cloth Pin or Ornament
Unbleached muslin, tea dyed muslin or flesh colored cotton fabric 5" X 10" Glittery or Angelic fabric for dress 4" X 8" 1/2 yard of 1/2" lace for hem, sleeves and wings 1/4 yard of 1/8" gold braid for neck edge, waist and halo Glitter fabric for wings 4"X 8" Coordinating sequins (or confetti) in stars or iron on studs (Michael's Crafts) Small-scale doll hair (I used a brand called Stringlets) Small wood star or plaque for sign Gold paint for star 6 inches 1/4" wired ribbon to go behind star Confetti stars Braid or ribbon for hanging ornament or 1 1/4" pin back Thread to match fabrics Micron pens in black and red Crayon, colored pencil or makeup blush Sparkle fabric paint Tacky glue Basic sewing supplies 
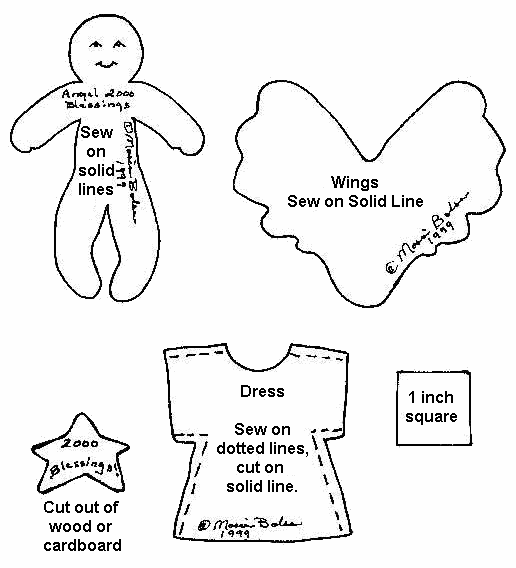
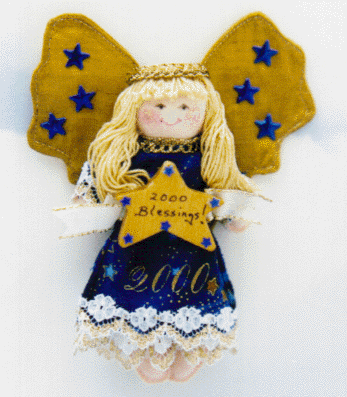
To print the pattern on a separate page click HERE. Instructions: This is a simple cloth angel that can be made into a pin or an ornament. The body and dress are sewn wrong sides together and not turned. The wings can also be done this way depending on the effect you want. The sign the angel is holding can be changed for different effects such as "Blessings for Babies First Christmas", or possibly a sentiment for a first communion or a wedding. Angel Body Cut out pattern template for body. Fold fabric wrong sides together and place template on top. You can draw around the piece using an air erasable pen, or I just put two straight pins in the pattern and fabric and take it to the sewing machine and stitch around the template. You may have to reposition the pins as you sew and you have to make sure you don't pull the fabric while sewing. Use a small stitch length. After stitching, cut out the body leaving a 1/8" seam allowance. Cut a slit down the back for stuffing. (Body will not be turned). Stuff firmly and whip stitch back closed. Draw on eyes and mouth with micron pens. Blush cheeks with crayon, colored pencils or makeup blush. I also put some glitter fabric paint over the blushed areas for sparkle. Angel Dress Fold fabric wrong sides together and place dress template on top. Pin down and sew shoulders and side seams leaving neck, arm hems and hem open. After stitching, cut out leaving a 1/8" seam allowance. Slide dress on to angel. You may have to squeeze a little to get her into the dress without an opening at the neckline, but she will go into it! Thread a needle with a matching thread and hand gather edge of neck and tie off. Gather edge of each sleeve and tack in place on the arm so "hand" is showing. These gathering lines will be hidden by the lace and braid. Hand sew lace to hem of skirt and sleeves. Tack gold braid to neck edge and around waist. Hair Bangs Place about 1/2" X 1/2" of hair material on a scrap of body fabric and sew down the center across all the threads. Trim fabric close to stitching and glue in place on forehead with stitching line going across top of head. The rest of the hair will line up with this stitching line. Hair Place about 3" long pieces of hair on a scrap of body fabric so that you will have about an inch wide of hair material. Sew across the center of the 3" pieces creating the "part". Trim fabric close to stitching. The part stitching line will run from the bang stitching line across the top and down the back of the head. Glue in place. Trim bangs and trim and arrange the rest of the hair. Wings Fold fabric right sides together and place wing template on top. Pin down and sew around edge. Trim edges to 1/8" seam allowance. Cut a slit about an inch long in the side of the wings that will go against the body. Turn the wings and press. Glue sequins or iron on studs on wings. Hand tack or glue wings on back of angel. 2000 Blessings Paint wood star or plaque with gold paint. With black Micron pen, letter 2000 Blessings! on star. Glue ribbon to back. Arrange small confetti stars on star or plaque. Glue ribbon/sign on angel having ribbon glued to angel's hands also. Finishing Make a circlet of braid trim for halo and glue
on head. If you are making an ornament, tack a hanging string on the back,
if a pin, glue or sew a pin back on angel.
| Back
to the Classroom at Crafty College | Designed and Created by Marion Bolson Heartfelt Traditions
Copyright Notice: All pages and graphics are copyrighted by the Internet Visions Company and/or instructor. You may print these out for the use of the class only. All other uses or distributions are forbidden. Crafty College is a division of the Internet Visions Company. © 1999-2003, Internet Visions Co. All rights reserved. All trademarks are owned by Internet Visions Company. |


