 |
Web
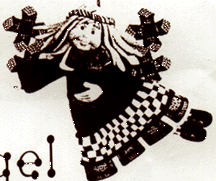
Of Angels! |
|
©1998
Presented by Crafty College,
Bluebonnet
Crafters and Amaco, American Art Clay Co. Inc.
Patchwork Angel
Supplies:
-
FIMO Polymer Clay: gold, flesh, caramel
-
FIMO soft Polymer Clay: blue, white, green violet, red
-
AMACO Millefiori Quilt Squares: Churn Dash and Star Patchwork
-
AMACO What A Character Push Molds: # 7 and # 21
-
AMACO Design Push Molds: Teddy Bears
-
Polymer Clay Template
-
Music Box "Touch 'n' Play"
-
Acrylic Paint: black
-
Wire: 26 gauge, 5 inches
-
Baby Powder or Cornstarch
-
Blush or Pink Chalk
-
Friendly Plastic Arts and Crafts Goop Adhesive

Equipment:
-
Rolling pin, brayer or pasta machine
-
Round toothpicks
-
Sharp blade
-
Foil
-
Index card
-
Oven
-
Pliers
Instructions:
-
Condition FIMO soft and FIMO by warming, then kneading until smooth and
elastic.
-
Brush molds with powder. Shake out excess powder. We will make all four
molded pieces, then set them aside to use later. Before removing the pieces
from the molds, clean up the edges by pressing all excess clay towards
the center back of the piece. Lift from the mold by pressing a separate
ball of clay against the back and then using it as a handle. Trim away
excess clay.
-
For the face, roll a scant 3/4" ball of flesh FIMO into a short cone shape.
Place the point of the cone into the nose in the mold, then press to fill
mold. Lift face from mold. If desired, use toothpick to carefully indent
nostrils and to add detail to corners of mouth.
-
For the hands, roll Flesh FIMO into two scant 1/2" balls. Press into molds,
being sure to fill the thumb. Remove from mold and roll wrist to make it
smooth.
-
For the bear, roll a 1/2" ball and a 5/8" ball with caramel FIMO. Roll
the 1/2" ball into a short cone shape and press into the head part of the
little bear mold. Fill only the head part. Remove. Now fill the body part
with the 5/8" ball. Remove from mold and press the two pieces together.
-
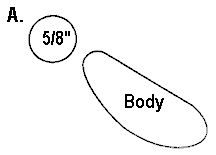
For body, roll a 5/8" ball of blue FIMO. Roll ball into a short pear shape,
then flatten between palms to create pattern (see illustration A). Lay
body onto an index card. Twist wire to create a loop, then press loop to
top of neck edge. Cover exposed loop with foil to keep it from getting
stuck in the clay.
-
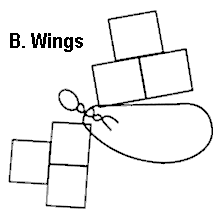
For wings, use sharp blade to cut six 1/8" thick slices from the Star Patchwork
Quilt Squares cane. Press three together to form each wing, (as in illustration
B) and press onto body.
-
To create back of head, from gold FIMO roll a 1/2" ball. Press ball to
top of body (over wire loop), flattening it.
-
The collar and bottom dress trim are made from the Churn Dash Quilt Square
cane. You will make a white border around it to create a new design. To
do so, flatten some white FIMO soft into a 1/16" thick sheet. From this
cut a 4 X 1" rectangle. Lay one of the Churn Dash pieces on the rectangle,
then wrap all four striped sides with the rectangle. Trim at one corner
so as not to overlap the edges. Cut five 1/16" thick slices. Set aside.
-
To create green and white checkerboard, roll a 1" ball from green FIMO
soft and one from white. Roll each into a very even 4" long rope. Place
side by side (see illustration C)
-
Roll across the ropes lightly with a roller. Cut ropes in half; flip one
half and place the two parts together like a checkerboard (see illustration
D).
-
Roll each side with the roller to flatten slightly, then pull and stretch,
then smooth with the roller, then stretch, until the cane is 8 inches long.
Keep it even. Trim ends. Cut into four equal parts and reassemble (see
illustration E). Smooth and stretch slightly until the cane reduces to
approximately a 1/2" X 1/2" checkerboard. Cut eight 1/16" thick slices.
Set aside.
-
To create legs, lengthen the rest of the checkerboard cane by laying it
on its' side and rolling it gently until it is a 3/8" thick rope. Now it
will look striped. Cut two pieces, each 1 & 1/2" long and press to
bottom of body (see illustration F).
-
For shoes, from violet FIMO, roll two scant 1/2" balls. Roll each into
an egg shape and press to bottom of legs. Add buttons by pressing two tiny
red balls against the front of each shoe. Use toothpick to press two holes
in each button.
-
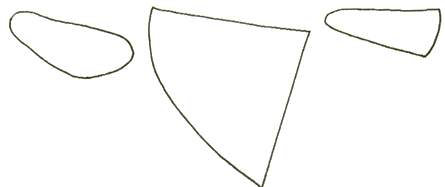
For dress sleeves, from blue FIMO soft, roll two 5/8" balls and one 1 &
1/8" ball. Roll each into a pear shape, then flatten balls between hands
to match patterns G and H.
-
Press four of the Churn Dash squares to the bottom of the dress. Press
a row of checkerboard squares above that. Roll a very thin rope from violet
FIMO soft and lay a rope on each side of the checkerboard trim. Press in
place. To create texture on the dress and camouflage imperfections, press
dress between two pieces of paper toweling.
-
Position dress overlay body. Position a hand under wide end of each sleeve.
Press arms in place, curving over left one. For collar, press one Churn
Dash slice to front of dress.
-
Follow picture for positioning bear.
-
Press face in place. Use blunt end of toothpick to make shallow eye holes
in both angel and bear. Barely dip blunt end of toothpick into black paint.
Tap on paper to nearly remove all paint, then press into eye indentations.
-
Use Q-tip to pat some pink chalk onto cheeks.
-
For hair, roll 10 to 20 scant 3/8" balls of gold FIMO. Roll each into a
rope then flatten them slightly. Press these strands to the angels head,
varying the length and style as desired.
-
For the halo, roll some of the left over checkerboard clay into a rope.
Twist it, then place around the angel's head.
-
Bake angel on index card in a pre-heated 265 degree F. (130 degrees C.)
oven for 30 minutes. Cool in oven. Remove. Tie green string to wire loop.
-
To attach music box, use pliers to break off the support legs on the back.
Glue in place with thick glue such as "Friendly Plastic Arts and Crafts
Goop.
| Back to the
Classroom at Crafty College |
Amaco, American Art Clay Co. Inc.
Fimo and Fimo soft are available at your local
craft outlet.
American Art Clay Co., Inc., is located in Indianapolis, Indiana, and
was founded in 1919 by T. O. Philpott. AMACO® manufactures many modeling
materials.
Copyright Notice: All pages and graphics
are copyrighted by the Internet Visions Company and/or instructor. You
may print these out for the use of the class only. All other uses or distributions
are forbidden.
Crafty College is a division
of the Internet Visions Company.
© 1998, Internet Visions Co. All rights reserved.
All trademarks are owned by Internet Visions Company.
|
