Presented by Crafty College, Bluebonnet Crafters and Miles of Country Smiles Angelina Bear Bag by Christina D. Miles
15 by 6 ¼ inch piece of fabric - Victorian fabric is great! 15 inches of 2-3 inch wide flat lace 15 inches of decorative trim - sequins, beads, lacey stuff 10 inches of 2in. Wide wired ribbon for wings 10 inches of 1in. Wide sheer ribbon 3x3-in. square piece of fuzzy felt for head 3 small glass beads for eyes and nose 1 small heart charm 1 small satin rose 2 inches of decorative trim for halo 2 ft. of thin yarn or twine for hair 2 sewing needles, embroidery needle and a sharp end needle Fabric glue (a must!) Black carpet thread or quilting thread. Blush It will take about 1 hr. or so to make this cute bag. It's real easy and goes faster if you have a serger. But if you don't, a regular machine will work just fine. (1) The first thing you are going to do is to put
the lace trim on. Zigzag stitch works great! Next is to mark where the
middle of the fabric is. You can use either a pin, fabric marker or chalk
(2) Now, the next thing you want to do is to sew the fabric together. Make sure you turn the fabric inside out so your lace is in the inside. *If you use a decorative trim that can not be sewn on with a machine, then wait to add it later with either fabric glue, or hand stitch it on. It should look like this:
(3) Now, either zigzag or use a serger and topstitch on the top seam. Fold ½ inch and topstitch all the way around leaving a small opening in the back seam to put the crochet thread through later on. Topstitch close to the edge of the seam (not the fold) so you have enough room to run the thread through. I only fold it over once so the fabric does not become too bulky. (4) Next fold the bag so that the seam is now in the center stitch the bottom. The next thing to do is to sew the bottom seam. Fold the bag in half so that the seam is in the middle. Stitch along the bottom seam to finish up the bag. This also shows placement of the head and wings.
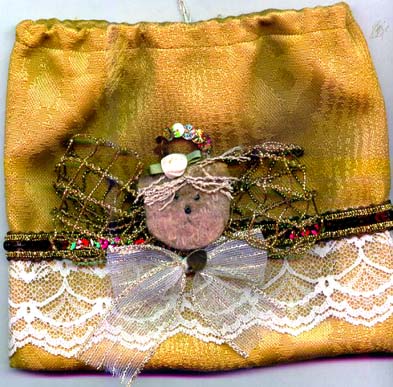
Now is the fun part, adding all of the goodies
to make the bear real cute. First you want to make both bows and hair,
tie them all like a regular bow (on the hair, cut the ends after you attach
it to the head). Set them aside. Trace the head pattern on the back of
the fuzzy felt and cut it out. Stitch on the eyes, nose and mouth.
Next, glue on the hair, bow, then the halo in this order. Attach the wings by either gluing or sewing them on to the center of the bag as shown in picture (4). Attach the head by gluing it on top of the wings. Let this dry for about 10 Minutes. You may have to hold it for a few minutes to set the glue. Next, attach the charm to the center of the sheer ribbon bow by sewing it on. Now glue or hand stitch it to the bottom of the head. Add a little blush to the cheeks. You may want to trim the fuzz off from around the eyes and nose so they can be seen easily
The last step is to add the crochet thread for the tie. The easiest way to do this is to use a tapestry needle. It has a large eye and a blunt end. Run the crochet thread through the eye of the needle. Pull 1/2 of the thread through it and tie a knot at the end, using both ends. Next, run the needle and thread through the hole on the top seam of the bag. Go all the way around till you get to the hole again. Pull the needle up through the hole so you now have both ends coming out of the hole. Make sure not to pull the knot through the hole. Cut the thread where the needle is and tie a knot on that end. Both ends should have a knot. Now you should have a completed cute little bag. Just a reminder, this bag is not designed for small children since it does have small parts that can be swallowed. I hope you enjoyed making this bag, you can make it so many different ways. One of my bags, I stuffed with fluff and put real nice paper roses sticking out of the top. You can add potpourri, soaps, or just about any thing you want. Chris. | Back to the Classroom at Crafty College | Miles of Country Smiles Designed and Created by Christina D. Miles
Copyright Notice: All pages and graphics are copyrighted by the Internet Visions Company and/or instructor. You may print these out for the use of the class only. All other uses or distributions are forbidden. Crafty College is a division of the Internet Visions Company. © 1998-2010, Internet Visions Co. All rights reserved.All trademarks are owned by Internet Visions Company. |