Arlene's
Original Designs
HOPE, Angel Ornament
© 1997, Arlene's Original Designs
Free Instructions and Pattern!
Materials and Supplies:
-
New, white 'T' shirt, can be plain or have writing on
it.
-
Rit Dye, see flesh tone for proper combination. * Measurement
is in caps as in bottle tops, not measuring cups.
Light Caucasian.. 1/2 cap Rose, 1/2 cap Tangerine
Medium Caucasian. 1 cap yellow, 1/2 cap Cocoa, 1/2
cap Tangerine
African. 2 caps Cocoa
Asian. 1 cap Cocoa, 2 caps yellow
American Indian. 1 cap Rose, 1 cap Cocoa, 1 cap
Tangerine
Try other combinations for different skin tones.
-
Thread to match skin
-
Washing machine and hot water
-
Transfer paper
-
Stylus or ball-point pen
-
Wavy Locks or hair fiber of choice*
-
Clear acrylic finish, i.e. Right on or Right-Step (Satin)
-
Acrylic paint for face. For lining eyes, month, and
eyebrows use light brown for light skin tones, medium brown for medium,
and dark brown for dark skin. Use brown, blue or green for eyes, pink for
mouth, black for pupils and white for highlight and to blend colors.
-
Paint brushes, very small, i.e. 10/0 to 5/0
-
Thick tacky glue, i.e. Aleene's Designer Tacky Glue
-
18 inches of 2" white organdy ribbon for each ornament
-
12 inches of 1 1/2" shaded, wire-edge ribbon for each
(I use pink to wine)
-
1 pair of small iridescent angel wings*
-
6 inches of gold wire for each Gold glitter (I use gold
hologram and Prisma Stardust mixed)
-
Assorted white flowers, ribbon, pearls, beads, feathers,
etc.
-
Soft lead pencil
-
Light weight card-board or manila folder
-
Fiber-fill (stuffing)
-
Plastic wrap covered card-board, approximately 12" by
12"
-
Powder blusher with eye shadow applicator or cotton
swab
-
X-Acto knife
-
Clear thread or clear fish line
-
General supplies, needle, scissors, pliers, pins, nail
file, plastic wrap
Pattern
-
Click HERE
for pattern. Your computer/printer may print the pattern a little
smaller or bigger then the original pattern. So that you can resize there
is a 1" scale mark on the page. Just enlarge or reduce the page until
that mark equals one inch long.
Head and Shoulders
-
Pre-wash 'T' shirt and dye color of choice in washer,
small load, hot.
-
Turn 'T' shirt inside out and press with steam iron.
-
Trace all pattern pieces onto light weight card-board
and cut out.
-
Place pattern on fabric and draw around with pencil.
-
Cut out head pieces and trace face onto right side of
front piece.
-
Machine stitch directly on line on neck and shoulder
piece.
-
With right sides together, stitch one side to the front
and one side to the back, then stitch side front to side back, leave opening
to stuff.
-
Turn and stuff head and shoulders and stitch closed.
Wings
-
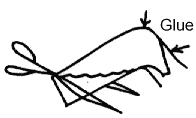
Glue outside of wings along the pale side of the wired
ribbon, on both ends and let dry.

-
Bend ribbon along top of wings, glue and let dry.
-
Carefully cut away ribbon from the bottom edge of wings.

-
To apply, spread tacky glue along center back of ribbon
and onto the inside edge of wings, pin to back of shoulders, let dry, remove
pins.
Halos
-
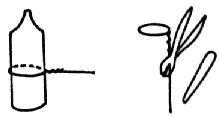
Cut 6" piece of gold wire and wrap around an object
that is about 4 1/2" around. (Large spool or small glue bottle.)

-
Twist ends together, leaving one end longer.
-
Pull loop off bottle, bend tail down at right angle
and diagonally cut 3/4" from the end, file smooth with nail file.
-
Run a thin bead of glue all around the top and bottom
of loop.
-
Pour about 1/4" of glitter into a small bowl and sprinkle
a thin layer on the plastic covered card-board.
-
Holding the halo by the stem, dip the loop into the
glitter in the cup, then set it to dry on covered, glittered, card-board.
Ruffle
-
Gather down the center of white organdy ribbon with
white thread to fit bottom of shoulders and tie off. (about 4 inches)

-
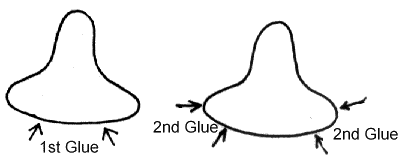
Spread tacky glue along center bottom of shoulders and
pin ruffle in place, then spread glue around bottom and back, pull the
ruffle around shoulders and pin in place.

Hair
-
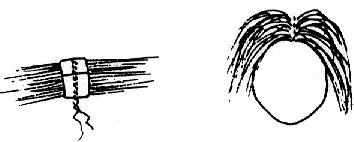
Measure 8" of Wavy Locks, wrap a small piece of paper
around center and machine stitch back and forth 4 or 5 times over the paper
with thread to match the skin or the hair.

-
Tear off paper, trim thread and brush through to remove
loose hair.
-
Smear head and hair line with tacky glue, position hair
on head, press hair into glue and let dry.
-
If the hank of hair looks large, you may divide it in
half before sewing
-
For Asian hair, iron black wavy locks with a warm steam
iron.
-
For African Angels I have also used, mini curls and
wavy wool roving.
Sculpting The Face
-
For Asian Angels, eliminate eyelids. For African Angels
make the nose a little broader and the mouth a little fuller.
-
With a needle, work some of the stuffing into the nose
area while holding the stuffing with a needle, push a pin through from
the side.
-
Single thread and knot the needle with a yard of matching
thread. Take a couple small stitches behind one eye.
-
Push the needle through the head and out above the nostril
on one side of the nose, take two tiny stitches to secure.
-
Bring thread under pin and insert needle up nostril
and out at same point above nostril, pull to indent.
-
Bring thread under pin and insert needle into nostril
and out at mark above nostril on other side.
-
Bring thread under pin on other side and insert needle
into nostril and out at mark above nostril, pull to indent.
-
Bring thread under pin, re-insert needle into nostril
and push across to mark above nostril on the other side, pull to indent.
-
Push needle back across to opposite side above nose,
pull to indent and take 2 tiny stitches to secure.
-
Push needle back into same space and across to corner
of opposite eye, take 2 tiny stitches to secure.
-
Insert needle back into corner, push needle through
the head and out at back seam opposite eye, pull to indent and take 2 tiny
stitches on back seam to secure.
-
Push needle across back to other seam, take 2 tiny stitches.
-
Push needle from back seam through head to inside corner
of other eye, take 1 tiny stitch and push back through head to same seam,
pull to indent slightly and take 2 small stitches.
-
Push needle back through head to outside corner of eye
and take 2 tiny stitches.
-
Push needle from corner of eye to corner of mouth, take
1 tiny stitch at corner of mouth and push needle, deeply through cheek,
back to corner of eye, pull to indent and take 2 tiny stitches to secure.
-
Push needle back through head to seam, take 2 small
stitches and push needle across back of head to other back seam and take
2 small stitches and repeat steps 13 and 14.
-
Push needle back to back of head, take 3 stitches and
cut thread.
-
Use the point of needle to lift the nose, cheeks and
chin, use fingers and needle to shape the face.
-
Check for symmetry and shape and when you are satisfied,
coat the front and sides with 2 think coats of clear acrylic finish, one
coat after the other, do not let dry between coats, Let this dry for at
least 24 hours before beginning to paint the face.
-
Paint one coat of clear acrylic finish over the neck
and shoulders of the bottom piece and let dry.
-
Apply blush to cheeks and paint face, then finish with
one light coat of clear finish.
Finishing
-
Cut a whole in the back of the head with X-Acto knife,
push the stuffing back into the head, push some glue into the hole and
insert the neck, pin in place until dry.
-
Apply the ruffle, wings, hair and accessory flowers,
trims etc.
-
Thread needle with clear finishing line or thread and
push needle under hair and form loop for hanging on tree.
-
Put a drop of glue on the back head and push sharpened
end of halo stem into head
Sources:
Wavy Locks is from All Cooped Up, 934 N. Industrial
Park Dr. Orem, Utah 84057..Phone: 801-226-1517
Angel Wings are from St. Louis Trimming. Inc. 5040
Arsenal, St. Louis, Missouri 63139..Phone:314-771-8399
© 1997, Arlene's Original Designs
Arlene's Original Designs
P.O. Box 307
Burbank, CA 91503
Fax 1-(818)-563-2446
Arlene@TheDollNet.com
http://TheDollNet.com/arlene/
Back to....
Hope
Angel's Page 1
|


