Presented by Crafty College, Bluebonnet Crafters and Carolyn Englert Carolyn's Angel 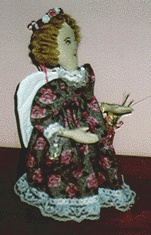
Face 9 inch square of 25 count Bone Lugana or 28 count Jobelan in skin shade DMC embroidery floss, in the following shades: 3031 930 931 932 white 632 318 415 407 632 350 351 899 817 size 24 to 26 counted cross stitch needle 
muslin for body, 1/2 yard, tea dyed or dyed to skin shade Dress 1/2 yard cotton fabric Wing fabric 1/4 yard, white on white, or metallic Quilting thread to match or contrast quilting needle lace, trims braided roving for hair sewing thread poly pellets or aquarium gravel for weighting oval wooden plaque, about 5 inches in diameter doll needle button and carpet thread Pattern - Click Here for Pattern
Align pattern piece over worked cross stitch, matching marks for eyes. Pin to fabric and cut out. Sew dart at chin. Sew front of face to back of face, leaving open at neck and top of head. Fold under 1/4 inch at top of head, and sew with running stitch, gathering as you go. Hand sew top edges together. Stuff, easing gathers at top of head. Cut out body shape, arms. Sew body front and back together, leaving bottom open and leaving opening on side for stuffing. Sew arms, leaving side opening for stuffing. Fold bottom of body piece around the plaque, and either hot glue or staple shut, easing fullness with pleats. (Ill) Fill bottom of body, from side opening with weighting material, to about 2 inches. Stuff body firmly, whip stitch side opening closed. Stuff arms firmly, whip stitch opening closed. Using small stitches, sew on finger lines. To attach to body, if using buttons, thread needle with button and carpet thread, or any strong thread. Make invisible knot on front side of right arm, go through arm to underside, through button, body, button, left arm. Pull till firm, but not tight. Go back through left arm, into other hole of button, body, empty button hole on right side, and right arm, pull tightly, make invisible knot. Cut thread. Arms can now be posed. If using button joints, follow directions on package do not sew openings closed before using joints so you can get inside the body and arms. Sew them closed after joints are in place. Place neck opening over neck on body, and ladder stitch closed. Lightly needle sculpt with strong thread, matching face color. Make an invisible knot at back of head, go through to inside corner of right eye, take a tiny stitch, go back through head, indent with finger, pull firmly and knot. Go to outside corner of eye, and do the same, but do not pull as tight. Go from back of head to inside corner of left eye, using needle to lift stuffing, take small stitch from inside corner of left eye, to inside corner of right eye, forming bridge of nose. Go to back of head, come out at inside corner of right eye, go back through, indent, pull firmly, knot. Go to outside corner of right eye, take small stitch, go through to back of head, same as left eye. Take a small stitch at each corner of mouth. Hair Unbraid roving by pulling heavy thread. Separate gently by hand to make hair fuller. Place a length to go across forehead, and up the back. Glue with hot glue or tacky glue. Halo Form a pipe cleaner into a circle, closing ends, glue to head. Cover by gluing ribbon roses around it. If you wish to make curls, wrap a length of roving around a knitting needle, or piece of dowel using the diameter you want for curls. Dampen, and place in 200 oven for 20 minutes. Cut the curls the size you want, and glue to head. Wings: Cut 2 wings out of white fabric white on white looks especially nice. Cut one set of wings from lightweight batting or fleece. Layer fabric, right sides together, with batting on top. Sew around, leaving an opening to turn.Turn right side out. Sew opening closed. Quilt along quilting lines either by hand or machine. Set aside. Dress: Cut out front and back bodice, sew right sides together. Cut out sleeves, gather top edge. Attach lace if desired. Sew arms to bodice at underarm seam. Sew side seams of bodice and arms.. Cut out skirt, 8 1./2 by 40 inches. Hem bottom, attach lace if desired. Sew back seam to 4 inches from top. Gather top edge. Attach to bodice, gathering to fit. Place on angel, and whip stitch or glue back opening closed. Glue wings to back of dress at shoulder.. Angel can hold bouquet of small silk flowers or
a basket. You can also make a circlet of flowers for her hair. For Christmas
angel, take a 3x5 card, using fine tipped marker, write the title of a
Christmas Carol, fold in middle and glue to angel's hands.
| Back to the Classroom at Crafty College | Carolyn teaches at Crafty College. Please check
out her profile at http://craftyCollege.com/faculty/
Copyright Notice: All pages and graphics are copyrighted by the Internet Visions Company and/or instructor. You may print these out for the use of the class only. All other uses or distributions are forbidden. Crafty College is a division of the Internet Visions Company. © 1998, Internet Visions Co. All rights reserved. All trademarks are owned by Internet Visions Company. |