| Web Of Angels! |
( From Crafts 'n Things Magazine, November 1996 )
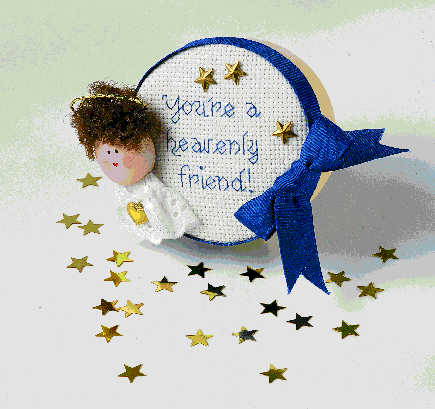
Stitch a cute box for a special friend!

Instructions:
1. Stitch the design. To find center, fold Aida cloth in half, then in half again the opposite way; mark center with contrasting thread. Following chart, work all backstitch and French knot above letter "l" and at exclaimation point with one strand of floss. Press stitched design on wrong side
2. Paint the angel. For head, paint front, back, and sides of plug with flesh; let dry. To paint eyes, dip toothpick in black paint; touch toothpick to center of face for each eye. For mouth, make two small dots of red paint side by side approximately 1/4" below eyes; pull bottom of dots down and together to form heart-shaped mouth. Let paint dry thoroughly. With cotton swab, apply blush to cheeks. Apply varnish to head; set aside.
To make hair frizz, rub curled hair between fingers. Using glue gun, attach hair to upper sides, top, and upper back of head. Set angel head aside.
3. Finishing. (Note: Use thick craft glue unless otherwise indicated.) Place stitched design, right side down, on work surface. Center box lid over stitched design. With pencil, lightly trace lid on back of stitched design. Trin stitched design 1/2" larger than traced line. Clip stitched design almost to traced line.
Cut batting to fit top of lid. Glue batting to lid. Apply a thin layer of glue on lid band. Starting on right side of lid band, wrap grosgrain ribbon around band; cut excess ribbon and overlap ends. With remaining ribbon, tie a two-loop bow with 1" loops and 1 1/2" tails; cut ribbon ends in a "V". Glue bow to top right side of box.
With glue gun, glue angel's head to left side of box with head slightly extending over edge of box. For halo, bend wire into a 1 1/4" diameter circle, twisting wire ends together. Glue halo to back of head, arranging hair over wire ends.
For dress, apply a no-fray solution to cut edges of eyelet lace. Fold each raw edge under 1/2"; apply a thin layer of glue to fabric edges to secure. With glue gun, attach dress to box beneath head.
With white ribbon, tie a small bow; cut ends at a slant. With white sewing thread and needle, sew heart-shaped charm at bottom center of bow. Glue bow with charm to neckline of dress.
With wire cutters, trim loops from each star. Glue two stars to top center of box and one star to top right of box.
| Back to the Classroom at Crafty College |

Clapper Communications and Crafts 'n Things Magazine are proud to be a part of the Web of Angels this year! We hope you will enjoy the projects that we have selected for you. After you download our special Angel projects, please come and visit our site at: http://www.craftideas.com . You will be able to download other FREE project sheets, subscribe online to our magazines, chat with other crafters on our discussion forums, subscribe to our FREE online newsletters, and get information about other online crafting resources from our Craft Directory. We wish you and yours a wonderful holiday season!
Clapper Comunications
 |
|
|