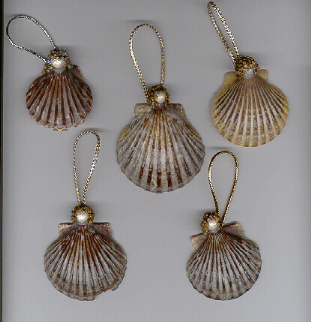
Presented by Crafty College, Bluebonnet Crafters and Meryl Rudzinski Scallop Sea Shell Angels
Body: Scallop Sea Shells - either purchased or found. Head: ½ inch wooden beads (no holes) Hair: Pastina egg noodles (teeny pasta stars) Brilliant Gold spray paint White pearlized (or white iridescent) acrylic artist paint Gold or silver cording cut into 8" pieces for hanging. Hot glue gun and glue sticks Mod Podge (or other clear drying glue) Old cookie sheet or large box lid Parchment or wax paper Toothpick Glitter (optional ) White acrylic spray paint (optional)* Preparation:
Scallop shells have "natural wings" at the top. Hot glue the prepared bead to the top of the shell between the wings. Hold until set. Place 50-100 stars in a pile and mix several drops of Mod Podge. Using a toothpick, carefully place the stars around the top, back and both sides of head, leaving the front open for the face. This may need to be done a little at a time, letting one portion set up before adding more. If stars fall off easily, or don't stick together enough to be able to place on head, you need more glue. Hold the ends of 8" chord together and hot glue to middle of back of shell for hanging. Hold until set. Variations: *If you want the angels to look like white bisque, assemble them leaving out the painting steps for each item, and spray them front and back with several thin coats of white acrylic spray paint, letting dry between coats, and coating as many times as it takes to make it opaque. They can also be spray painted all gold, or all silver. Glitter can be sprinkled on top of head before glue dries for halo. | Back to the Classroom at Crafty College |
Meryl
Rudzinski: MGRtist@aol.com with questions
My name is Meryl Rudzinski. I am married and have a 16 year old daughter. I'm a 45 year old crafter who's been through every craft imaginable since the age of 5. I've narrowed my crafting to mainly Christmas Tree Ornaments (which always include angels), wreaths using materials from my garden, and crafts using items found in nature. I don't currently sell any of my creations, because I give them as gifts. Everyone tells me I should start selling them, and ask me to make extras so they can buy them, but I think a part of my joy in making them would be lost if I knew I was making them for profit. I work for a specialty chemicals company as a Business Information Specialist, which includes doing online database searching, and surfing the Net.
Copyright Notice: All pages and graphics are copyrighted by the Internet Visions Company and/or instructor. You may print these out for the use of the class only. All other uses or distributions are forbidden. Crafty College is a division of the Internet Visions Company. © 1998, Internet Visions Co. All rights reserved. All trademarks are owned by Internet Visions Company. |


