Presented by Crafty College, Bluebonnet Crafters and Sue Ellen Zollinger Roses and Ribbon Angel
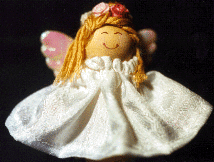
1 Little man (wooden body ) 2 3/8" 6 Small Silk Roses (2 mauve, 2 light pink, 2 white) approx.10 mm in dia. (halo) 1 Skein of embroidery floss DMC # 738 1 8" piece of 1/8" light pink ribbon 1 Iridescent, puffy Angel Wing (approx. 2") 1 Piece of white silk or Taffeta material 3" X 10" 1 Liner brush Brown Tole paint (eyes & mouth) Light Pink Tole Paint (cheeks) Krylon matte finish spray Hot glue gun and glue 1 small stencil sponge for cheeks Scissors Wire cutters White thread Sewing machine
Use a stencil sponge to paint light pink tole paint on the wood bead for cheeks. There should be a small gap in the center of the bead between the cheeks. ** Tip **
Dip tip of paintbrush (liner) into brown tole paint. Make two eyes by making two small half circles placed right on the top edge of the cheeks. Then make a larger half circle near the bottom edge of the cheeks to form the mouth. Being sure to use the tip of the paintbrush to place dots at each end of the mouth (Dimples). Allow to dry completely. When dry spray front of face with clear finish spray. Let dry. Angel Dress Take a piece of white silk or taffeta material (or pattern of your choice) 3" X 10" (for dress). Fold the both ends of the dress under 1/4" (length wise) and then fold again 1/4" to make a 1/2" seam on both sides with out raw edges showing. Sew both ends in place. Take one seam that you have sewn, using large stitches on the sewing machine make the gather at the top of the dress. When done sewing take the threads in your hands and pull so that the dress is gathered tightly. Attaching Dress Hot glue dress at the gathered end around the neck of the wood angel body. (Follow the groove around the neck), gluing only along the gather. Leave about 1/4" unglued on each end of the dress. Next turn the unfinished edges of the dress under and glue together and glue to the wood body. When you are finished gluing there you should not be able to see any of the wood body, The dress should meet together at the back and be glued together. This hides the unfinished ends. It is not necessary to glue any more of the skirt to the body. ** Tip ** When using hot glue it is a good idea to have a long skinny object (like a pencil) handy. Use it instead of your fingers to hold the pieces in place while the glue hardens. Less fingers get burnt this way. Add Hair Pick up the skein of embroidery floss leaving the paper wrappers on. Take one end in your hand and cut off about 2'' still holding it between your fingers, keeping the end intact. Use the folded end of the embroidery floss that you cut as the hair for the front of her head. Put some hot glue in a small line on the front of her face and lay the folded edge on the glue line. Adjust the hair to the desired look before the glue dries. Proceed to glue under the remainder of the hair and lay the rest of the hair flat against the head. Halo of Flowers Cut the stems of the silk roses off just under the head of the rose, being sure to leave a small portion of the stem. (If you don't do this the whole rose could come apart) After cutting all of the stems start hot gluing the roses in place for her halo. Making sure to alternate the rose colors. After you have made a halo and the glue is dry, cut a 1 & 1/2" piece of the embroidery floss from the center of the skein. Take it in your hand and divide it in half. Leaving you with a small amount of embroidery floss to use for the hair that you twist around in a circle in the center of the roses to form a bun. Gluing in place as you twist around to form a circle. Add The Wings Attach wings with glue to the back of the angel neck. Add Ribbon Tie a small bow in ribbon and attach with glue
to the center of the wings. Cut off ribbon at the edge of dress.
Finishing Touches: Sign your work. | Back to the Classroom at Crafty College |
Email
Sue Ellen Zollinger, whzoll@worldnet.att.net.
Hello I am Sue Ellen Zollinger, a self-employed crafter, designer and have been interested in crafts as long as I can remember. My grandma was the first to teach me crafting and I have been doing it on my own ever since. I started tole painting and wood working about 10 years ago. Since then I have created several original items such as family trees (one with angels, one with hearts), inspirational plaques, wood ornaments, nativity scenes and several other items. I have sold my crafts through craft boutiques, craft bazaars, craft malls and through a regular customer base that I have built up over the years. I have taught craft class to several church groups, women's clubs, and youth groups. I am currently teaching crafting workshops 2-3 times a month. I am a self-taught seamstress and have been designing and selling soft-bodied dolls for over 6 years. I have created dozens of original dolls, including an annual collection. I have sold these dolls in craft malls and an upscale gift store. To further market my crafts I am in the process of creating a website. I am pretty versatile in the knowledge of crafts from cross-stitching, crocheting, quilting, stamping, scrap-booking, floral arrangement, and stenciling just to mention a few. Plain and simple I love crafting and I love to teach people new ideas and techniques. I am thrilled to have the opportunity to share my knowledge with you! Sue Ellen Zollinger
Copyright Notice: All pages and graphics are copyrighted by the Internet Visions Company and/or instructor. You may print these out for the use of the class only. All other uses or distributions are forbidden. Crafty College is a division of the Internet Visions Company. © 1998, Internet Visions Co. All rights reserved. All trademarks are owned by Internet Visions Company. |