|
created by: Helen-Carol Soucy
Building the mini-dolls Head and Hair The head: Some "head" beads have already some painted face features on them, such as eyes & mouth. Some even have hair painted on top. If you are not using a pre-painted "head" bead, you should paint the face features before glueing the hair and putting the doll's clothes on. Just get a plain wooden bead, then use some acrylic paint to color the bead (skin color of your choice). You will probably need 2 coats of paint. Let dry after each coat of paint. Then, just add 2 small dots of paint for the eyes (blue, green, brown or black) or as an alternative, glue two (5 mm) wiggled plastic eyes, using tacky glue. Then paint a small pink or red curved line for the mouth. You can paint a very fine brown curved line above each eye, for the eyebrow, (optional). You may paint a tiny nose or glue a small seed bead for the nose, (optional). Let dry. Using a Q-tip, in a round motion, apply a little blush on the cheeks. You may spray some acrylic satin finish varnish to seal. If you don't feel confortable painting, keep it to a minimum. Further, you will find different choice of hair-do, to help you complete your mini-dolls. Also, make sure to glue the "head" bead after sliding it onto the neck. The doll's clothes: refering to the pattern and instructions for each specific doll. The hair: If you are familiar with the acrylic curly hair sold in craft store, you may use it. But personally, I prefer to use thin wool or embroidery floss. Different hair-do can be made, according to the "gender" and "age" of your mini-dolls. Next, you will find a few examples for different hair-do: Curly hair: soak a small length of wool (approx.: 1 yard or 1 meter) in cold water, then wrap it around a thin kneeting needle. (You may use a few drops of hair-do setting lotion or gel mixed within the water.) Use a cloth pin at each end to secure the wool around the kneeting needle. Let dry, or use a hair blower to dry faster. Then when the wool has dried, cut into small curls and glue them on the head bead, using either tacky craft glue or a hot glue gun (use carefully). Short hair-do: (for boy or man) cut about 2 to 3 dozens (or more if necessary) of small pieces of wool approx. ½" to 3/4" long. Then, with a Q-tip or toothpick, spread a thin layer of glue on the top of the head bead, over all the area to be covered by the hair. Then, starting by the outside, place each piece of wool one by one, next to each other, using tweezers, leave no space between, it will form a small crown all around the hair-line. Then, place a second row of hair toward inside of the same crown, overlaping a little on top the previous row of hair. Do the same for a 3rd row of hair toward the inside of the crown, until the suface is all covered. Let the glue dry completly before cutting any excess off, to even the hair-do.
"Bun", a sophisticated lady's hair-do: (on top of the head, or behind the neck for another look): Refering to the previous hair-do, start by doing a "swirl" to cover the head. Let dry the glue very well. In the meantime, cut 9 to 12 lengths of wool, each will measures approximatly 18" long. Fold them in two. With a piece of invisible thread (or thread matching the hair color), wrap around the middle part of the wool a few times, and tie a few knots to secure. Now you got a pony tail, lay it on a flat surface. Place a paper weight on top of the pony tail, or ask someone to hold it for you while you will braid the hair. Divide the lengths of wool into 3 equal parts. Braid the hair. Secure the end of the braid with another piece of thread, long enough to thread in a needle. Then, according where you wish to see the bun, start tacking the end on the braid, either behind the neck or on the top of the head, by seewing the bun to the glued swirl of hair. Continue to roll the braid around and secure with a few hidden stitches in the hair, until you reach the end of the braided hair. Hide the end inside the bun and secure with a few stitches and knots. Cut the thread off. If you prefer, you may sew the braid into a bun, hiding the ends under the bun, then glue it in place on the head or behind the neck. "Afro" hair-do: To get a different look for the hair, you use
black or brown mini pompoms (5 mm) to get an "afro" hair-do. Using "tacky
glue", with a toothpick spreed a fine layer of glue to cover all the hair
area. Place the first pompom on the top of the head, in the center part
of the hair area, then glue about 5 pompoms tightly around that first pompom
to form the 2nd row, add a 3rd row of pompoms, and so on, until all the
hair area is covered. Let dry.
Go to Next Page ..... Elf's Costume

Copyright Notice: All pages and graphics are copyrighted by the Internet Visions Company and/or instructor. You may print these out for the use of the class only. All other users or distributions are forbidden. Crafty College is a division of the Internet Visions Company. © 1999, Internet Visions Co. All rights reserved. All trademarks are owned by Internet Visions Company. |
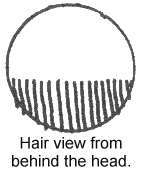 Half-crown
hair-do: (elderly men often have hair only in the back of their head):
Cut about a dozen (or more if necessary) of small pieces of wool approx.
½" to 3/4" long. Refering to the diagram, with
a Q-tips or toothpick, spread a bit of glue only behind the head, just
to cover the area between the 2 ears (there are no ears on our mini-dolls,
but it's just to help locating where the glue should be spread).Then place
each piece of wool one by one, next to each other, using tweezers, leave
no space between, until it forms half-crown. Let the glue dry. Then trim
the hair evenly.
Half-crown
hair-do: (elderly men often have hair only in the back of their head):
Cut about a dozen (or more if necessary) of small pieces of wool approx.
½" to 3/4" long. Refering to the diagram, with
a Q-tips or toothpick, spread a bit of glue only behind the head, just
to cover the area between the 2 ears (there are no ears on our mini-dolls,
but it's just to help locating where the glue should be spread).Then place
each piece of wool one by one, next to each other, using tweezers, leave
no space between, until it forms half-crown. Let the glue dry. Then trim
the hair evenly.
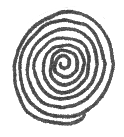 Another short
hair-do: in a "swirl"! (suitable for boy or man) Refer to diagram,
with a Q-tip or toothpick, spread a thin layer of glue on the top of the
head bead, over all the area to be covered by the hair. Then, starting
by the middle, place the end of the wool length, in a swirl motion, turn
the wool around and press with the finger tips to glue well on the head.
Continue to turn around evenly, and as tightly as possible until all the
hairsurface is well covered. Finish the hair in the back of the neck, cut
off.
Another short
hair-do: in a "swirl"! (suitable for boy or man) Refer to diagram,
with a Q-tip or toothpick, spread a thin layer of glue on the top of the
head bead, over all the area to be covered by the hair. Then, starting
by the middle, place the end of the wool length, in a swirl motion, turn
the wool around and press with the finger tips to glue well on the head.
Continue to turn around evenly, and as tightly as possible until all the
hairsurface is well covered. Finish the hair in the back of the neck, cut
off.
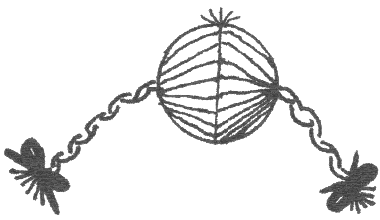
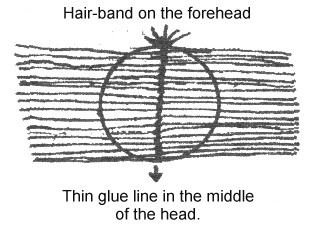 Braided hair-do:
(young school girls often have braids on each side of their head): Cut
3 or 4 stands of wool ½" long. Refering to the diagram on the left,
using a toothpick, spreed a bit of glue on the forehead just on the hair-line,
then glue only the tip of each stand of wool, the loose end of the stands
toward the forehead to make a small hair-band. Let the glue dry. In the
meanwhile, cut a dozen or more of thin wool stands 8" long (according to
the size of the wool, you will need more if you are using embroidery floss).
with a toothpick or Q-tips, spread a fine line of glue in the middle of
the head, as if the hair would be divided on the top of the head into 2
parts. Then lay the middle of each stand of wool onto the line of glue,
so the hair are laying on each side of the head. Let dry. Now gather the
hair on each side of the head, (at the ear level), wrap a piece of invisible
thread (or matching color) around the hair, secure with a few knots, cut
of the excess of thread. Then divide the hair into 3 equal parts, braid
the hair, wrap another piece of invisible thread around the end of
the braid, secure with a few knots. On the other side of the head, proceed
the same way to make the second braid. At the end of each braid, you could
wrap a small piece of narrow ribbon 1/8" wide, or
use a contrasting color embroidery floss, tied into a small bow.
Braided hair-do:
(young school girls often have braids on each side of their head): Cut
3 or 4 stands of wool ½" long. Refering to the diagram on the left,
using a toothpick, spreed a bit of glue on the forehead just on the hair-line,
then glue only the tip of each stand of wool, the loose end of the stands
toward the forehead to make a small hair-band. Let the glue dry. In the
meanwhile, cut a dozen or more of thin wool stands 8" long (according to
the size of the wool, you will need more if you are using embroidery floss).
with a toothpick or Q-tips, spread a fine line of glue in the middle of
the head, as if the hair would be divided on the top of the head into 2
parts. Then lay the middle of each stand of wool onto the line of glue,
so the hair are laying on each side of the head. Let dry. Now gather the
hair on each side of the head, (at the ear level), wrap a piece of invisible
thread (or matching color) around the hair, secure with a few knots, cut
of the excess of thread. Then divide the hair into 3 equal parts, braid
the hair, wrap another piece of invisible thread around the end of
the braid, secure with a few knots. On the other side of the head, proceed
the same way to make the second braid. At the end of each braid, you could
wrap a small piece of narrow ribbon 1/8" wide, or
use a contrasting color embroidery floss, tied into a small bow.