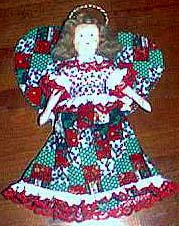
Presented by Crafty College, Bluebonnet Crafters and Carolyn Englert Christmas Angel
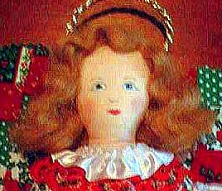
Fat Quarters of Christmas fabric-you may use anywhere from 4 to 8 pieces* Fat Quarter of flesh-colored fabric or unbleached muslin for a country look 9 x 12 pieceof felt-I used white Wonder Under or other bonding material Stuffing Braided mohair roving for hair Paints or colored pencils for face Lace, if desired-about one and half yards Halo can be made with a gold chenille stem, metallic mini-garland, or gold braid Sewing thread Strong thread, such as button thread or quilting thread Doll needle Stuffing Glue-either hot melt glue or Tacky Glue Optional-Rotary Cutter and mat, pinking shears Piece or ribbon to hang. This little angel, who measures 10 inches high, can be used as a wall hanging or a treetopper. While I have made her a Christmas Angel, by using other fabric, she could be for any season. Instructions: Print out patterns-since not all printers reproduce at the same size, I have given the correct size the pattern pieces need to be. If your printer does not print them at this size, take the pieces to a copier and enlarge until the measurements match. The outside line on the body and wing pieces are the outside dimensions. I usually trace the body pieces onto freezer paper-on the dull side. Cut out, and iron the pieces onto your fabric, shiny side down. It will adhere temporarily. Sew around outside edges of pattern pieces, leaving open where marked. Cut out body and arms, turn, and stuff. If you wish, you may do the face before it is stuffed. Either do your own, or trace the one provided. There are several ways to do this, one is to lay the head down first, place a piece of fabric carbon paper over it, then the pattern piece. Trace over the outline of the face, transferring the marks to your body piece. You can also trace over the features onto a piece of paper, using transfer pencils, and iron the traced features onto the head. Sew opening closed at bottom of body. Sew top of arms closed. Attach arms to body at shoulders, using a doll sculpture needle. Sew through the right arm, body, and left arm, do not pull tight. Then, go through the left arm, body, and right arm and back through all 3 pieces again, pulling thread tight. This will make a type of joint, allowing you to pose the arms. Unbraid a length of the roving, place on head, having it hang down on both sides, make it as long as you wish. Cut roving. Cut two more pieces for the back of the head. Place glue all around the head, from front hairline to back of neck. I like to use the tacky glue for this. Place the roving for the back of the head on the top seam line. Make sure the roving covers the head at the back. Glue down. Place the hair for the front of the head over the raw edges of the back hair, at the top, covering the raw ends, fluff out a little, glue down. Let dry.
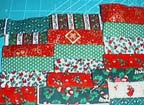
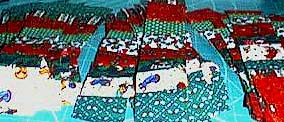
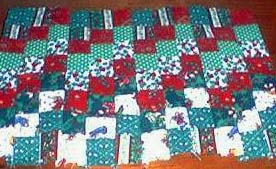
Make the halo-either make a circle of the chenille stem, twist the ends together. Do the same for the garland. If using braid, cover the ends tightly with a small piece of scotch tape to prevent ravelling, glue or tape ends together. Place on doll's head, glue down. Dress Cut out bodice pattern pieces. All seams are 1/4 inch. Sew shoulder/sleeve seams. Narrow hem the bottom edge of the sleeve, and attach lace, if desired. Sew sleeve/side seams. Narrow hem the bottom edge of the bodice, attach lace. Gather neck edge to fit neck of doll, attach lace. Set aside. Skirt Cut strips of fabric, 1 1/2 inches by 22 inches long, making 3 strip sets of 7 strips each. If using full yardage, cut the strips 1 1/2 by 44, then cut into 22 inch widths. Use as many colors as you want-I used 7. I also staggered the rows, forming a pattern. To do this, sew the first set of strips in order, then move row 2 into first place, and put the former row one at the bottom. For the third set, move row 3 into first place, and put the former ones at the bottom.
Cut strip sets into 1 1/2 inch widths-now it will
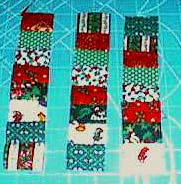
look like a row of blocks.
Sew these block sets together. The easiest way to keep them straight is to lay them in piles.
Now you will have 3 pieces of fabric, made of blocks.
Sew two of these together to use for the skirt, the third piece is for the wings. Layout of skirt pattern.
Fold the larger piece of pieced fabric in half width-wise, place skirt pattern on fold, pin and cut out. Gather top edge. Narrow hem bottom edge and attach lace. Sew back of skirt to marks. Place on doll body, adjusting gathers. Overcast or ladder stitch the back of the skirt closed. Place bodice on doll, overcast or ladder stitch back opening closed. Wings Using the wing pattern, place over the smaller pieced fabric, cut out. Cut out back piece of felt. Iron bonding fabric to felt, peel off paper backing, and iron onto wrong side of pieced heart. Trim edges with pinking shears for a decorative effect. Glue to back of body. If using as a wall decoration, attach a loop of ribbon to back of wings to hang. Now your angel is done-enjoy!
| Pattern Page 1 | | Pattern Page 2 | | Pattern Page 3 |
| Back to the Classroom at Crafty College | Carolyn Englert Hi! My name is Carolyn Englert and ever since I can remember, I have been intrigued by the magic that happens when needles, threads and fabric come together! I still have the needlepoint sampler I made when I was 6, and the doll clothes I made for my Ginny doll when I was 8 years old, so in addition to loving crafts, I never throw anything away. The motto around my house is "You don't know when that could come in handy." I did my first quilt square at the age of 5-an embroidered block that went into a quilt for my new baby brother, and have continued to embroider, sew, and quilt, as well as knit and crochet. I guess I never met a craft I didn't try at least once, but some have earned a special place in my heart. Over the years, I made doll quilts for my dolls, then graduated to baby quilts for my real live "dolls", continuing the tradition with the quilts I have made for my adult children, close relatives, dear friends, and last, but not least, grandchildren. And, lately-I've even gone back to making doll quilts! I've taught craft classes on a volunteer basis for church groups, schools, scouts, and homeschoolers. I am proudest of the last graduating class of quilters. These ladies are fellow homeschool mothers, and between them, they have gone on to make dozens of quilts, many of which have been donated to worthy causes. I think that's really why I love teaching-it is a way of continuing the dream, of passing on skills that have come down through generation after generation of women. Carolyn Englert
Copyright Notice: All pages and graphics are copyrighted by the Internet Visions Company and/or instructor. You may print these out for the use of the class only. All other uses or distributions are forbidden. Crafty College is a division of the Internet Visions Company. © 1999, Internet Visions Co. All rights reserved. All trademarks are owned by Internet Visions Company. |