Presented by Crafty College and Bluebonnet Crafters Paper
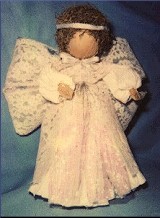
Twist Angel
Materials:
drilled in it or a Styrofoam circle) Spanish moss for hair Instructions: If using a wooden heart base, drill your 1/8" hole in the center. Dip one end of the 1/8" dowel stick in craft glue and place it into the drilled hole or center it on the Styrofoam base. Dip the top end of the dowel stick approximately an inch to an inch and a half into the glue and center the Styrofoam ball on the dowel stick. *Tip*For ease in untwisting Paper Twist place it in a zip type plastic bag, spritz lightly with water, seal and set aside for 15 to 20 minutes.Untwist all of the Paper Twist with the exception of the 12" piece for the arms. Spread glue on the center 3" of the flesh colored Paper Twist and place around the ball smoothing the wrinkles to the sides and back. Your Paper Twist should be extending down from the ball at the front and back of the angel. Place a piece of covered wire around just below the ball to form the neck. Set aside. To make the arms fold back each end of the still twisted flesh colored paper twist forming a loop at each end and wire the fold in place forming a hand (the arms should be just long enough to meet on the front of the angel with a slight curve for an elbow). Take the 7" piece of white Paper Twist and wire it just above the hand extending away from the body. Curve it back up and glue the two edges together to form the sleeve. Repeat for the second arm. Tuck the sleeved arms under the flap from the head apply craft glue to help hold in place. Center the Paper Twist (arms) under the back flap of the head covering. Bring both extensions down and place a piece of wire just below the arms to anchor in place. Center the first 12" bodice piece on the right shoulder bringing it down to the waist on the left side in the front and back. Repeat with the second piece forming a "X" on the front and back of the angel. This is the top of the angel's dress. The 18" pieces of skirt material are centered over a piece of covered wire and folded forming a 9" skirt that is gathered along the wire. Place the skirt around the angel's waist and pull tightly to anchor the bodice and skirt. Twist the wires, clip and bury in the skirt. Arrange the gathers evenly. Repeat the skirt instructions with the iridescent Paper Twist. To make the wings, form two large circles with the final piece of iridescent Paper Twist. Gather the center of the two circles crossing them to form a four loop bow. Wire in place and glue to the angel's back using wire to anchor if necessary. *Tip*After you apply the craft glue you can use a corsage or straight pin with a head on it to hold the wings in place. The pin can be removed easily if you twist it and pull it out holding the wings in place as you pull.Spread glue over the hair area of the angel's head and add the iridescent shreds or Spanish moss for hair and allow to dry. When dry trim the angel's hair and place the gold ribbon around the forehead for her halo using glue to hold it in place. *Tip*In place of the thick craft glue recommended you may use a glue gun and glue sticks but for a permanent bond use some white craft glue as well. Extremes of hot and cold can cause the hot glue to release. It is a good rule to follow when crafting to use both hot glue and craft glue together. While hot glue hold at once the addition of craft glue makes the bond last over time.Options: Form the gold glitter chenille stem into
a circle approximately 5" in diameter twisting the ends along the circle
for reinforcement and glue the gold chenille stem in place with the doubled
area to the back of her head as a halo.
This shows how a few changes in material can give the angel a really different look. I made her in miniature. she is about 5"tall. Her head is a 1" ball and the finished length of her arms is about 3 1/2". Her skirt panels is not glued together but are gathered over the wire the same as her larger sister. The wings are 10" of gold metallic twist and are reduced to one circle gathered and glued in place. A gold cord circles her forehead and the addition of a large gold foil seal halo and a star on the gold cord suspended from her hands completes the "Littlest Angel". Actually her halo and star are each made of 2 identical seal glued back to back so they are finished on both sides.
Source for Paper Twist
| Back to the Classroom at Crafty College |
Copyright Notice: All pages and graphics are copyrighted by the Internet Visions Company and/or instructor. You may print these out for the use of the class only. All other uses or distributions are forbidden. Crafty College is a division of the Internet Visions Company. © 1998, Internet Visions Co. All rights reserved. All trademarks are owned by Internet Visions Company. |


 Optional
Paper Twist Angel
