

The type of Ribbon Roses studied in this lesson will be
Rolled Rose, Concertina Rose, Gathered Rose, and Wired Ribbon Rose.
The ribbon sizes are not exact since the width of your
ribbon and your preference will determine the size of your rose. The
materials list gives suggested sizes only. We also
suggest that you use recycled ribbon for practice.
Materials:
Always use wire cutters to cut through the wire portion of wired ribbon. Nothing ruins a pair of scissors faster than to use them on even fine wire.
*******
Rolled Ribbon Rose
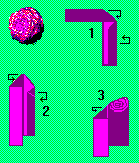
Instructions:
Roses can be made any size depending on the width
and amount of the ribbon used.
Use needle and knotted thread and take a few stitches
through the rose base to anchor as needed.
Step 1: Begin with approximately 20" of ribbon. If the ribbon
has a right and wrong side hold the right side away
from you and fold a 3" tail at right angles to the rest of
the ribbon. Fold the tail portion from the top toward
the bottom several times forming a roll of the entire
width of the tail.
Step 2: Hold the rolled tail and fold the extended ribbon
backwards so that the right side is facing you again.
Continue to roll the tail along that fold allowing it to
relax slightly as you go. Continue rolling until you have
almost reached the point created when you folded the
ribbon backwards.
Again holding the tail securely fold the ribbon
backwards again. The right side will now be away
from you. Roll the tail along the ribbon as you did
before until you have almost reached the end of the
fold.
Step 3: You will continue by folding the ribbon backwards
rolling the tail along the fold. As necessary take a
stitch through the base of the rose to help hold it in
place. This also prevents the center of the rose from
rising higher than the surrounding petals.
As you fold and roll the rose be sure that the points on
the roll fall between the points in the last row. When
you reach the size you want your ribbon rose to be
take several stitches through the base of the roll, wrap
the thread around the base. Anchor securely with the
thread and tie off.
At this point if your rose is to be sewn to clothing you
will trim the tails, add a couple of ribbon leaves and
sew it directly to the garment. The alternative is to
place a piece of floral wire around the base and cover
with floral tape adding the leaves as desired.
Concertina Rose
Instructions:
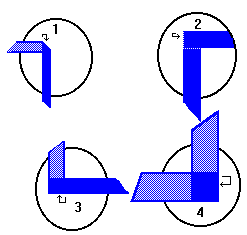
Step 1: :With a 12" length of 1/8" or 1/4" double sided satin ribbon make a right angle fold at the center of the ribbon.
Step 2: Take the horizontal leg and fold it to the back behind the right angle fold.
Step 3: Then take the vertical leg, fold it to the back behind the horizontal fold.
Step 4: Then the horizontal leg is folded to the back behind the vertical. Continue alternating these two folds until you have almost reached the end of your ribbon.
Grasp the two legs of ribbon firmly together and let
go. The ribbon will form a woven chain that looks like the old time concertina from which it got it's name.
Pull either leg gently as your rose forms (see tip to save ribbon or chain roses).
Using needle and knotted thread stitch **through the center of the
rose** two or three times to anchor. Wrap the thread
around the end of the ribbon beneath the rose. Trim
the excess ribbon and add a leaf.
If making a number of roses leave one end attached to
the bolt, make your right angle fold at 6" and when
pulling the rose into shape use the leg that is still
attached to the bolt. This saves ribbon and you can
make garlands of roses by not clipping the ribbon
between and using the leg attached to the bolt as the
space to the next ribbon rose.
Gathered Rose
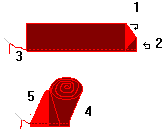
The size of the rose will depend on the width of your ribbon.
Step 1: Fold the raw end of a 12" length of ribbon to meet the bottom edge about 1/2" from that same end.
Step 2: Beginning at the point fold along the bottom edge forming a tight roll and with a needle and knotted thread take several stitches at the bottom edge to anchor the center of your rose.
Step 3: With this same needle and thread run a gathering stitch along the bottom of the ribbon.
Step 4: Gather the ribbon tightly and wrap the gathered edge around the center using stitches as needed to anchor gathers.
Step 5: As you reach the end fold the raw end down and catch it in the gathers. Take several stitches to anchor. Add leaves.
Wired Ribbon Rose
This rose is made the same way as the Gathered Rose
with these exceptions: At the beginning of the rose the
wire from the top edge is twisted with the bottom wire
and both pulled down as if to form a stem as the first
fold is made. The ribbon is gathered tightly along the
bottom wire until it begins to roll around the center.
A stitch is taken every little while to anchor the gathers
to the center of the rose and prevent your rose center from rising higher than the surrounding petals.
When you reach the end of the ribbon or your rose
looks complete, twist the top and bottom wires
together as in the beginning and fold the raw end of
the ribbon to the bottom of your rose and twist all the
wires together.
Clip the wires and add one or two leaves.
Option: Instead of sewing, all roses may be anchored
with a drop of hot or tacky glue if you would rather.
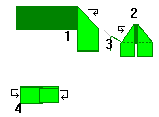
Leaves for Ribbon Roses
This leaf (diagrams 1 - 3) is used for the gathered, wired and folded rose. Cut green ribbon into a length twice as wide as your
rose. Place wrong side up and fold the right side at a
right angle in the center of the ribbon. Repeat with the
left side of the ribbon.
Gather the two ends slightly and stay stitch. Catch the
bottom of the straight side at the back with a single
stitch and anchor it to the right side in the center. Trim the tails.
Stitch to the base of your rose and stitch the finished rose to clothing or glue to your project .
When you wish a stem on your rose pull the ribbon tail down, place a heavy covered floral wire in the center and wrap the tail to the wire using floral tape. Add the leaves as you wrap down the stem.
Leaf for Concertina Rose: See diagram 4
Narrow green ribbon is
folded with both ends folded to the center and
overlapped. Stitch to bottom of rose. Looks like flat
bow without a knot. The rose is where the knot would be.
 Treasure Package
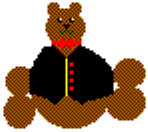
We will give you the instructions here for a Teddy Bear but
check through your disposable canisters and containers and
design animals using the throw away containers you have.
Material:
Instructions:
This container can be covered with felt, Fun Foam, fabric or base coated with Gesso and then painted adding the varnish before the embellishments.
Begin by drawing a line around the canister at the edge of the lid while the lid is on the container. The area underneath the lip of the lid and the lip itself are left uncovered to allow for ease in putting on and taking off the lid although it can be painted to blend in.
Using your canisters for a pattern measure the depth of the
canister from the edge of the lid down including the bottom
lip and around the can with no overlap. Cut a piece of felt,
Fun Foam or fabric to fit and cut two pieces of felt, Fun
Foam or fabric to fit the bottom of the canister. Repeat this
for each canister/container used in the construction.
With the craft glue, glue all felt, Fun Foam or fabric to cover
each canister. Set aside to let dry completely.
To assemble the animal use the largest canister placed lid to
the back, seam to the top. This forms the body. Glue the
seam side of four Pringles canisters to the body canister to
form the four legs all facing forward and slightly extended
beyond the body to allow for easy removal of the lids.
Using the fifth Pringles canister for the head glue it seam
side down to the seam side of the body canister lid facing to
the front with the lid extended just beyond the body canister
(for easy opening) This places all seams facing another
canister and glued in place to prevent peeling back.
You now have the body which opens at the back, the head
and four legs which open to the front.
Add a pompom nose, draw a mouth with a permanent
marker, glue two wiggle eyes in place on the lid of the head
canister and glue two 1 1/2" pompoms in place for the ears.
You can decorate your bear as you wish. Place a small gift in each canister. This gift wrap can then be used to hold treasures.
Options: Using the same instructions but substituting felt or
Fun Foam ears and adding a pompom tail it becomes a
bunny. A string of same sized canisters with the lids on
alternating sides, a real pipe cleaner with a tiny pompoms glued to each end for antennae can become a caterpillar.
Replacing the body canister with a decorative holiday tin
you can face it front with the head and leg canisters facing to
the back. Be sure legs and head are extending at the back for
opening ease. Your animal only needs to have covering on
the head and legs canister leaving the decorative tin as the
clothing.
These canisters can all be painted in place of covering with fabric, felt or foam if you would rather. Remember to add a coat of sealer to protect the painted finish.
Let your imagination be your guide and have fun.
© 1997, Internet Visions Co. All rights reserved. All trademarks are owned by Internet Visions Company.