Cloth Angel Ornament

Materials Needed:
Strip of print fabric, 2" by 30"
10" narrow satin ribbon, color of
choice
3" flat, narrow, gold braid (or narrow
rick rack or narrow ribbon)-for halo
17" flat, narrow, gold braid (or narrow
ribbon)- for wings and bow
small bell (size may vary but must
be large enough to fit on satin ribbon, above)
5/8" wood head bead with hole (size
may vary slightly up or down)
scissors (pinking shears optional)
needle and thread
tacky glue (or glue gun)
Very small bell OR small silk flower OR
other trim of choice (optional)
READ ALL DIRECTIONS BEFORE BEGINNING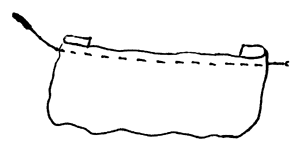
Body: Cut the 30" cloth strip into
2 equal pieces. Edges may be cut with pinking shears, but a staight cut
(or even a torn edge) is fine too. Work with one piece at a time. Fold
under 1/4" on one end, with needle and thread run a gathering stitch (approx.
1/4" long stitches) close to one edge of the cloth. Fold the other edge
in 1/4" also before you stitch across it. Pull the thread to gather, and
tie tightly. This forms a "rosette" of cloth. Repeat with other cloth strip.
Allow ends of the gathered cloth to
overlap slightly If needed, take a small stitch to hold ends together so
the cloth forms a circle.
Hanger: Cut 10" of narrow satin ribbon
for hanger. Thread one end through bell and tie ends in a double knot.
Slide bell close to knot.
Push the loop end of the hanger through the
middle of one of the rosettes FROM THE BOTTOM TO THE TOP. Repeat with other
rosette. Push the loop through the wood bead also. Dot a small amount of
glue between the bell and the rosette, between the two rosettes, and between
the top rosette and the wood bead. Slide all parts down the loop toward
the bell so that they fit together snuggly. (see graphic). Make sure that
the places where the cloth overlaps is lined up on both rosettes. This
spot is the back of the ornament. Make sure that the best (smoothest) part
of the wood bead is facing the other way (to the front). Let glue set.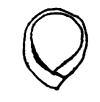
Halo: Cut 3" of flat gold braid (or
rick rack or narrow ribbon). Overlap the ends at right angles as shown
and glue. This forms the halo. Glue the spot where the braid is glued together
to the BACK of the wood bead. Position it so that the hanging loop goes
through the middle of the halo, and the halo stands up over the head as
shown. 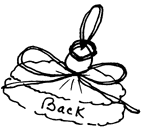
Wings: Cut 10" of the gold braid (or narrow
ribbon) and tie it into a bow. Glue this to the BACK of the angel where
the wood bead and the cloth meet. Cut 8" of the gold braid (or narrow ribbon)
and tie into a smaller bow. Glue this to the FRONT of the angel, where
the wood bead and cloth meet. Press both bows firmly into place.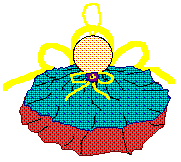
If desired, trim the center of the
front bow, by gluing on another smaller bell, a silk flower, a small candy
or wood heart, or anything you choose.
The ornament can be changed to fit any season/holiday.
Try heart prints for Valentine's, shamrocks for St. Patrick's Day, patriotic
prints for 4th of July.
It can also by made in lace, just cut the
same size of flat lace and proceed the same.
Click below to go to other pattern pages:
Stick Angel
Terra Cotta Angel
Lace Angel Pin
Angel Sucker
or here to go back
to General Directions page
pattern copyright 1998 Leslie Prest
Contact Leslie (Instructor) directly at:
lprest@netzone.com
| Back to the Classroom
at Crafty College |
Copyright Notice: All pages and graphics
are copyrighted by the Internet Visions Company and/or instructor. You
may print these out for the use of the class only. All other uses or distributions
are forbidden.
Crafty College is a division
of the Internet Visions Company.
© 1998, Internet Visions Co. All rights reserved.
All trademarks are owned by Internet Visions Company.
