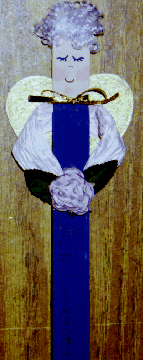
Stick Angel
Materials needed:
paint stirring stick (from hardware
or paint store)
OR substitute a jumbo craft stick
acrylic paint: flesh, blue (or other choice
of dress color)
very small amount country red stencil
creme paint
(or use creme or powder blusher)
permanent, fine tip black marker (red
and blue optional)
1/2" to 1" paint brush or piece of
household sponge
small amount doll hair of choice (shown
is curly nylon)
4" thin wood heart (this is for wings,
if using jumbo craft stick use 2" heart- may substitute cardboard heart,
or use ribbon or twisted paper as per other angel designs.)
gold acrylic (or enough gold colored
paper to cover wood (or cardboard) heart
if using heart for wings)
9" twisted paper, color of choice
(approximately 4 1/2 " if using jumbo craft stick)
very small amount of fiber fill (or
use dryer lint or torn kleenex)
small piece jute (or string or narrow
ribbon)- for hanger
6" narrow ribbon (choice of color)
for neck bow
small silk flowers or other trims
of choice
tacky glue or glue gun
scissors
READ ALL DIRECTIONS BEFORE BEGINNING
Choose the smoothest side of the stick
for the front. Paint top part (above narrow spot) of stirring stick (or
top 1" of jumbo craft stick) with flesh acrylic. If painting with sponge,
use a dabbing motion. Let dry. Paint remainder of stick with choice of
color to form "dress". Shown is a country blue. Make sure to paint a straight
edge around "neck" (narrowed point on stirring stick). Let dry. Paint back
of stick also if desired.
Face: Using fine tip marker, draw face in
center of flesh painted end. Face may be drawn all with black, or you may
use blue to draw eyes and red for mouth.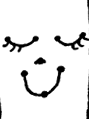
If needed, to help position face, cut
out face pattern and transfer small dots to stick using the following method:
Use a large pin or needle to make holes
at small dots. Position pattern on stick, use a sharp pencil to make SMALL,
LIGHT dots THROUGH the holes onto the stick. Then use marker to "connect
the dots" as shown.
Apply stencil creme paint or blusher
to cheeks using finger, Q-tip, or old paint brush. Be sparing, adding more
if necessary. You can always add more, but it may not come off if you start
with too much. Blend well.
Hair: Dot glue around head where hair
will fit. (if using hot glue I recommend working in small sections at a
time- tacky glue is much more "forgiving" if you don't get the position
just right). Place hair on head and arrange until satisfied. Shown is 6
pieces of curly nylon, cut about 1" long and tied together in the center
with a piece of sewing thread. This helps to control and contain the hair
so it doesn't get too wild. When glue is set trim hair as desired.
Tie ribbon around neck in a double
knot and then a bow.
Arms: Cut 9" piece of twisted paper (4 1/2"
if using craft stick), cut in half. Untwist. (If paper is very stiff, mist
or sprinkle LIGHTLY with a little water and place it in a plastic bag for
15-20 minutes. Paper will relax and be easier to untwist.)
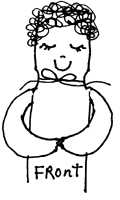 Overlap long edges of paper and glue to form 2 tubes. Stuff center of tubes
lightly using fiber fill (or dryer lint or torn kleenex). Squirt a SMALL
amount of glue inside ends of tubes and pinch ends together. Glue one end
of each tube to BACK of stick at right angles, just below head. Let glue
set. Curve tubes around and down to meet at center front of body, where
waist would be. Glue both ends here, overlapping as needed.
Overlap long edges of paper and glue to form 2 tubes. Stuff center of tubes
lightly using fiber fill (or dryer lint or torn kleenex). Squirt a SMALL
amount of glue inside ends of tubes and pinch ends together. Glue one end
of each tube to BACK of stick at right angles, just below head. Let glue
set. Curve tubes around and down to meet at center front of body, where
waist would be. Glue both ends here, overlapping as needed.
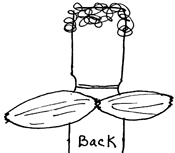
Wings: Paint heart for wings with gold
acrylic (OR spread glue all over surface of heart and glue onto a piece
of gold paper such as wrapping paper, trim flush with edge of heart).Glue
FRONT (gold side) of heart to BACK of body as shown. Heart may be right
side up or upside down, whichever you like best.
If you choose, use ribbon or twisted
paper instead. Make a bow shape (See General Directions
page- "tying" bows,) and glue to back of body at approximate "shoulder"
height. 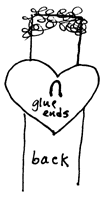
Glue small piece of jute (or string
or ribbon) on back of stick as shown to make a hanger. This way stick will
hang flat on a very small nail or pin on a wall. (or hang as you choose).
Glue silk flowers (or other trims of
choice) to cover ends of twisted paper at front waist.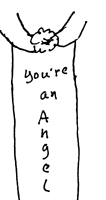
If desired, write a saying or message
on the front of stick below waist. Words can be written one below another
or at a slant for longer words. Ex.: "You're an Angel", "God Bless my Kitchen",
or any saying or personalization you choose.
Click below to go to other pattern pages:
Cloth Angel Ornament
Terra Cotta Angel
Lace Angel Pin
Angel Sucker
Or here to go back to General
Directions page
copyright 1998 Leslie Prest
Contact Leslie (Instructor) directly at:
lprest@netzone.com
| Back to the Classroom
at Crafty College |
Copyright Notice: All pages and graphics
are copyrighted by the Internet Visions Company and/or instructor. You
may print these out for the use of the class only. All other uses or distributions
are forbidden.
Crafty College is a division
of the Internet Visions Company.
© 1998, Internet Visions Co. All rights reserved.
All trademarks are owned by Internet Visions Company.
