Lace Angel Pin

Materials Needed:
9" flat lace (may be up to 2" wide,
use less length for narrower widths)
9" of 1" wide gold ribbon (or other
choice of ribbon or even 1" wide flat lace)
IF MAKING PIN IN CLOTH: you need the
equivalent amounts of 2 contrasting print fabrics, edge may be "pinked"
but a straight cut is fine too)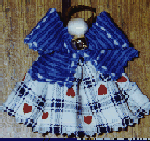
5/8" no-hole wood bead (size may vary a
little up or down, may use hole bead if you have to)
2" narrow, flat, gold braid ( or narrow
rick rack or narrow satin ribbon)- for halo
small bell (or small silk flower or
other choice of trims)
flat-back pin (could substitute large safety
pin, but will be harder to glue in place)
tacky glue (or glue gun)
needle and thread
scissors (pinking shears optional)
READ ALL DIRECTIONS BEFORE BEGINNING
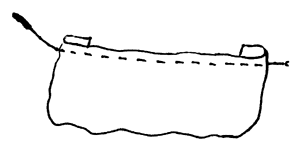 Body: Start
with the 9" lace (or cloth) and needle and thread.Fold under 1/4" on one
end. Run a gathering stitch (approx. 1/4" long stitches) close to the top
edge.
Fold the other end in 1/4" also before you
stitch across it.Pull the thread to gather, and tie tightly. The side where
the ends meet is the back.
Wings: Cut the 9" of gold ribbon (or
other ribbon or cloth). See General Directions page-"tying"
bows. Using those directions, form a bow shape and glue to the TOP
FRONT of the gathered lace or cloth. Let glue set.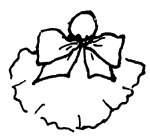
Head: Glue wood bead to TOP of gathered
lace or cloth and wings as shown. Let glue set. Make sure the best (smoothest)
side of the wood bead is facing the front. (If you have to use hole bead,
angle bead so hole doesn't show too much). 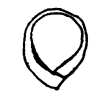
Halo: Cut the 2" of flat gold braid
(or rick rack or ribbon). Overlap the ends at right angles as shown and
glue. Glue this point to the BACK of the head bead so that halo stands
up over head as shown.
Glue flat-back pin to back of body.
Trim front of wings with small bell, flower,
or your choice of trims.
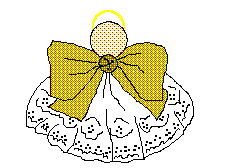
Pin can easily be varied for different
seasons/holidays. Lace with gold wings and a bell look very festive for
Christmas time. Red or pink lace (or heart printed fabric) look cute for
Valentine's Day- trim with a small painted wood heart or even a small candy
heart. Try shamrock prints for St. Patrick's or garden prints. The possibilities
are almost endless.
Click below to go to other pattern pages:
Stick Angel
Terra Cotta Angel
Angel Sucker
Cloth Angel Ornament
or here to go back
to General Directions page
pattern copyright 1998 Leslie Prest
Contact Leslie (Instructor) directly at:
lprest@netzone.com
| Back to the Classroom
at Crafty College |
Copyright Notice: All pages and graphics
are copyrighted by the Internet Visions Company and/or instructor. You
may print these out for the use of the class only. All other uses or distributions
are forbidden.
Crafty College is a division
of the Internet Visions Company.
© 1998, Internet Visions Co. All rights reserved.
All trademarks are owned by Internet Visions Company.


 Body: Start
with the 9" lace (or cloth) and needle and thread.Fold under 1/4" on one
end. Run a gathering stitch (approx. 1/4" long stitches) close to the top
edge.


