Terra Cotta Angel

Materials needed:
2" terra cotta (clay) pot
acrylic paint: flesh, white, blue
(or other choice of eye color), black
large (1" or so), soft paint brush
(or piece of household sponge
fine tip, permanent black marker (red
marker optional)
15" jute (or string or narrow ribbon)
small bell (size may vary but must
fit on jute above)
5/8" wood bead with hole (size may
vary, but must NOT fit through pot hole)
180" (5 yd) yarn-like doll hair (shown
is Bumples brand- you may substitue your choice or actually use yarn
6" narrow, flat, gold braid ( or rick
rack or narrow ribbon) -for halo
piece of print fabric- at least 1"
by 7"
16" of 4" wide twisted paper- color
of choice- for wings
scissors (pinking shears optional)
tacky glue or glue gun
small bell OR silk flower OR other trim
of choice (optional)
READ ALL DIRECTIONS BEFORE BEGINNING
Paint outside of pot with flesh acrylic
using brush or piece of sponge. If using sponge, use a dabbing motion.
Let dry and apply second coat to cover completely.
Face: See General
Directions page- Painting Eyes. Using these directions, paint eyes
on pot, add nose with black marker. Add mouth with black or red marker.
If needed for placement guide, cut
out face pattern and transfer dots to pot using following method:
Use large pin or needle to make holes
at small dots. Position pattern on pot, use sharp pencil to make SMALL,
LIGHT dots THROUGH the holes onto the pot. "Connect" the dots to form nose
and mouth, and use dots to position center of eyes.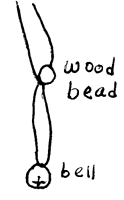
Hanger: Cut 16" of jute (or string
or narrow ribbon) and thread through bell. Slide bell to center of jute.
Push jute ends through pot hole from INSIDE and measure distance so the
bell will JUST show below edge of pot. Either hold this point with your
finger, measure with a ruler, or mark it with a pen. Remove jute from the
pot and tie ends together in a knot at the measured spot. 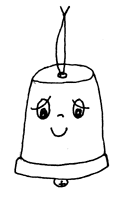
Thread jute ends through wood bead
(if hole is too small for both ends, thread bead on only one piece of jute).
Push ends back through hole in pot.
Bring ends together and tie in double
knot as shown to form hanging loop of desired length.
Hair: Cut 30 pieces of doll hair, 6"
long each. Tie the centers of all strand together with another piece of
hair. 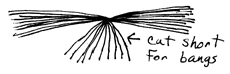 Bring 4 or 5 pieces from each
side toward the front and cut these strands short for bangs.
Bring 4 or 5 pieces from each
side toward the front and cut these strands short for bangs. 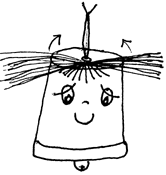
Dot glue over pot where hair will go,
making sure some glue is in hole, around hanger and bead. This will hold
the hanger in place. Place hair on head IN FRONT OF hanger with bangs toward
the front. Arrange hair by pulling strands toward the sides and back until
you get a natural look. (If using hot glue be very careful to get placement
right first. I recommend tacky glue, it lets you rearrange.) Add more glue
in spots if needed and trim hair as desired.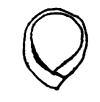
Halo: Cut 6" of flat gold braid (or
rick rack or narrow ribbon) and overlap the ends at right angles as shown.
Glue in this position. This is the back of the halo. Glue this to the back
of the head, positioning it so it stands up over head and goes around hanging
loop.
Wings: Cut 16" of twisted paper and untwist
it. (If paper is very stiff, mist or sprinkle LIGHTLY with a little water
and seal in a plastic bag for 15-20 minutes. Paper will relax and be easier
to untwist.)
See General Directions
page- "tying" bows. Using these directions, form untwisted paper into
a bow shape and glue it to center back of pot.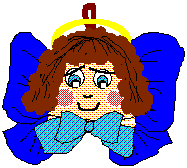
Cut print fabric into a strip 1" by
7" (pinking shears add a nice edge, but a straight cut is fine too). "Tie"
a bow using same directions as above. Glue this to front rim of pot below
face.
Glue a silk flower, another bell, or
trim of your choice to middle of front bow if desired.
Angels can also be made with tiny pots,
just reduce the size of everything. Try a VERY small pot with a long jute
hanger as a necklace. For smaller than 2" pots I recommend using 1" ribbon
or another fabric strip for wings rather than twisted paper.
Angels will vary quite a bit in appearance
depending on color choices for wings and bow, and on trims used. Try a
patriotic print with red, white or blue wings, or a garden print with silk
flowers. Pink wings with a heart print are cute for Valentine's. Trim it
with a candy heart.
Click below to go to other pattern pages:
Stick Angel
Cloth Angel Ornament
Lace Angel Pin
Angel Sucker
or here to go back
to General Directions page
copyright 1998 Leslie Prest
Contact Leslie (Instructor) directly at:
lprest@netzone.com
| Back to the Classroom
at Crafty College |
Copyright Notice: All pages and graphics
are copyrighted by the Internet Visions Company and/or instructor. You
may print these out for the use of the class only. All other uses or distributions
are forbidden.
Crafty College is a division
of the Internet Visions Company.
© 1998, Internet Visions Co. All rights reserved.
All trademarks are owned by Internet Visions Company.
